Filling in Fingers Captured in a Scanned Image (When a Book Is Scanned)(SV600)
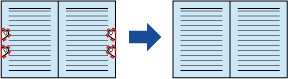
Fingers that are captured when a book is scanned can be filled in.
ATTENTION
- To fill in fingers captured in the scanned image, the fingers need to be detected.
If a book is scanned in the following ways, captured fingers may not be detected correctly.
- When two or more fingers that are used to hold down a book to be scanned are touching each other (Figure 1)
- When you hold down a book to be scanned with manicured fingers or fingers with artificial nails (Figure 2)
- When you hold down a book to be scanned with your fingers bent (Figure 3)
- When fingers that are used to hold down a book to be scanned are captured 1 cm (0.39 in.) or more (Figure 4)
- When there is text or an image within 5 mm (0.2 in.) around the fingers that are used to hold down a book to be scanned (Figure 5)
- When a book that has a background color other than white (such as a comic magazine) is scanned (Figure 6)
- When a book is scanned after [Gray] or [B&W] is selected from the [Color mode] drop-down list in the [Scanning] tab of the ScanSnap Setup Window

- Follow the procedure below to perform multiple book image correction for one page.
- Edit in book image correction mode (
 ).
).- Correcting a distorted book image
- Splitting a double-page spread image
- Edit in point retouch mode (
 ).
).- Filling in the captured fingers in image
If you edit in the book image correction mode after editing in the point retouch mode, the edited results in point retouch mode are overridden.
- Edit in book image correction mode (
HINT
- Up to five fingers on each side (right/left) can be filled in.
- To prevent image deterioration, select and fill in as many fingers as possible in one go.
- On the window that appears after a book is scanned, select [Double-page spread (Book/Magazine)] and click the [Check/Correct] button.
For details about how to perform a scan, refer to Scanning Books (SV600).
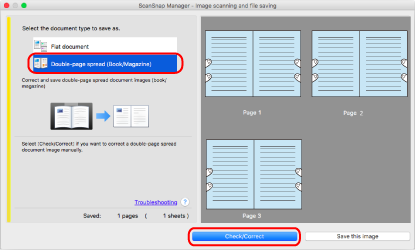
- The [ScanSnap Manager - Book Image Viewer] window appears.
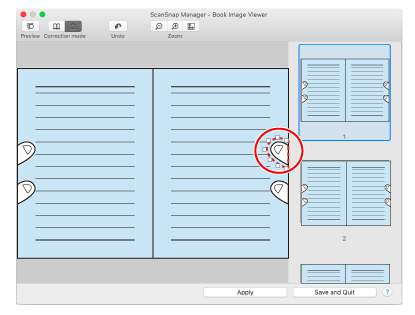
- Select the page for filling in captured fingers.
- Click .
- Click on a finger captured in a scanned image with the mouse.
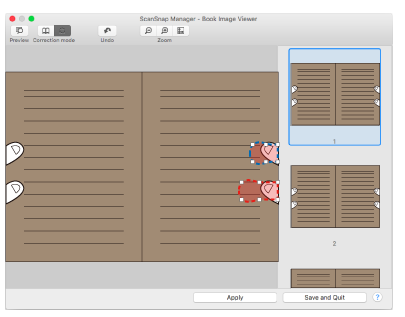
- When a finger is detected, it is indicated with a red dashed outline.
To change a range of the outline, drag the white dot on the outline.
 HINT
HINTWhen a finger captured in a scanned image is not detected, a default outline is displayed around the finger.
In that case, drag the white dot on the outline to align the outline with the shape of the finger.
- When a finger is detected, it is indicated with a red dashed outline.
- Click the [Apply] button.
- The finger captured in a scanned image is filled in.
When you have completed filling in the captured finger, click the [Save and Quit] button.
- The finger captured in a scanned image is filled in.