Scanning Documents Such as Photographs and Clippings (iX100)
Using the optional Carrier Sheet allows you to scan documents that can be damaged quite easily such as photographs, or non-standard size documents that are difficult to load directly such as clippings.
For details about documents that can be loaded, refer to Documents to Scan (iX100).
The [Deskew by text on document] checkbox in the [Scanning mode option] window will be disabled.
To open the [Scanning mode option] window, click the [Option] button in the [Scanning] tab of the ScanSnap Setup Window.
- Click the ScanSnap Manager icon
 in the Dock while holding down the [control] key on the keyboard, and then select [Settings] from the ScanSnap Manager Menu.
- The ScanSnap setup window appears.
- In the [Paper] tab, select [Automatic detection] in [Paper size], and then click the [Carrier Sheet Settings] button.
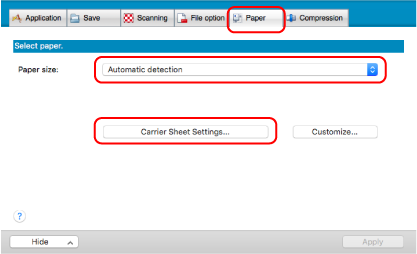
- The [Carrier Sheet Settings] window appears.
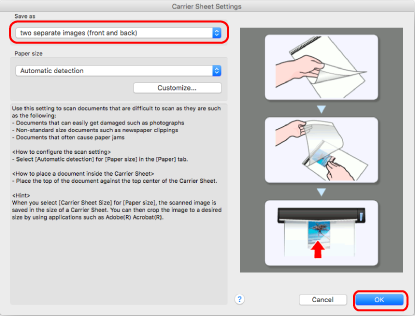
- Select [two separate images (front and back)] in [Save as] and click the [OK] button.
For details, refer to the ScanSnap Manager Help.
- Click the [Apply] button in the ScanSnap setup window.
- Click the [
 ] button in the upper left of the window to close the ScanSnap setup window.
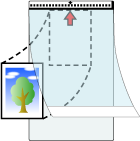
 - Place the document inside the Carrier Sheet.
Open the Carrier Sheet and place the top of the document against the top center of the Carrier Sheet.
- Insert the part with the black and white pattern straight into the feeding section of the ScanSnap, with the scanning side of the document inside the Carrier Sheet facing up.
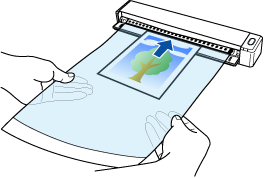
- The Carrier Sheet is pulled in until it is set inside the ScanSnap.
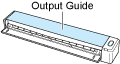
ATTENTIONIf you perform a scan using the Carrier Sheet with the output guide open, a paper jam may occur and damage the documents. Make sure to close the output guide when you perform a scan using the Carrier Sheet.
- Press the [Scan/Stop] button on the ScanSnap to start scanning.
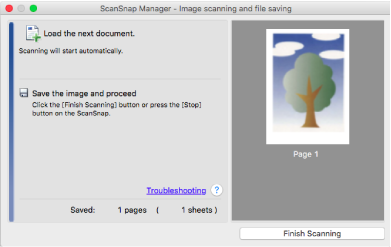
- When scanning is complete, the scanned image of the document that is inside the Carrier Sheet is displayed in the preview area.
HINTRepeat steps 6 to 8 to scan more documents such as photographs and clippings.
You can continue to scan documents that can be inserted directly in the ScanSnap.
For details about how to perform a scan, refer to Scanning Documents (iX100).
- When scanning is complete, the scanned image of the document that is inside the Carrier Sheet is displayed in the preview area.
- Press the [Scan/Stop] button on the ScanSnap to finish scanning.
- The scanned image is saved.
- The scanned image is output at the center of the page in the size specified for [Paper size] in the [Carrier Sheet Settings] window.
- If [Automatic detection] is specified for [Paper size] in the [Carrier Sheet Settings] window, an optimal size will be selected automatically from the available standard sizes in [Paper size]. Note that the size of the image may become smaller than the original document depending on the document scanned, or part of the image may appear missing.
Example: When the contents are printed to fit in A5 size in the center of an A4 size document, the scanned image is output in A5 size. To output the scanned image in its original size, specify the document size in [Paper size].
- The scanned image is not saved in the correct size (when [Automatic detection] is selected for [Paper size] in the [Carrier Sheet Settings] window)
- Shadows appear around the edges of the scanned image
- Black lines appear around the edges of a uniquely shaped cutting
