Parts and Functions (iX500)
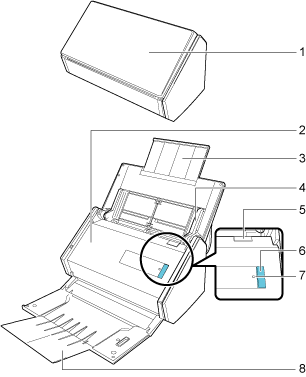
Front
No. |
Name |
Description |
|---|---|---|
1 |
ADF paper chute (cover) |
Open it to use iX500. Opening it turns on iX500. Then, you can load a document on it. |
2 |
ADF top section |
Open it to remove jammed documents, replace the Roller Set, or clean the inside of iX500. |
3 |
Extension |
Pull out when scanning long documents. |
4 |
Side guide |
Adjust to the width of documents to prevent them from getting skewed. |
5 |
ADF release tab |
Pull this tab to open the ADF top section. |
6 |
[Scan] button |
Starts scanning. Can be pressed even when the stacker is closed. Indicates the status of iX500 as follows: Blue (lit): Ready Blue (flashing): Scanning Orange (flashing): Error |
7 |
Wi-Fi indicator |
Indicates the connection status between iX500 and your wireless access point as follows: Blue (lit): Ready Blue (flashing): Standby Orange (lit): Not Connectable Orange (flashing): Not Connectable (WPS error) |
8 |
Stacker |
Open to use the stacker. Stacks up the ejected documents. |
Back

No. |
Name |
Description |
|---|---|---|
9 |
Tape seal |
Remove this tape seal after installing the software. |
10 |
Security cable slot |
Used to connect an anti-theft security cable (commercially available). |
11 |
Power connector |
Used to connect a power cable. |
12 |
USB connector |
Used to connect a USB cable. |
13 |
Ventilation port |
Holes for ventilating hot air from inside iX500. |
14 |
WPS button |
Press this button to connect to a WPS compatible wireless access point by using the push button method. |
15 |
Wi-Fi switch |
Turn this switch on to connect iX500 to a wireless LAN. |