Archived content
NOTE: this is an archived page and the content is likely to be out of date.
Cleaning the ADF
Clean the ADF in the following procedure.
|
- Turn off the scanner and wait for at least 15 minutes.
- Pull the ADF release tab to open the ADF.
 CAUTION:
Be careful not to have your fingers caught when the ADF closes.
The procedure can be viewed on the Video.
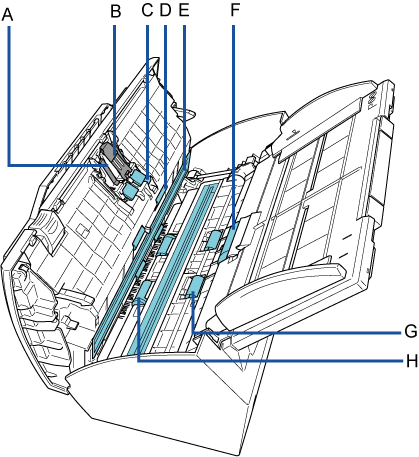
- Clean the following locations with a cloth/Cleaning Paper moistened with Cleaner F1, or a sheet of Cleaning Wipe.

Pad Assy (×1)A Pad Assy (×1) B Pick Spring (metal part shown in gray) (×1) C Ultrasonic Sensor (×2) *One on the opposite side D Idler Roller (×4) E Glass (×2) *One on the opposite side F Pick Roller (×1) G Feed Roller (×2) H Eject Roller (×2) Wipe the dirt and dust off the surface of the rubber pads, downwards from top to bottom. Be careful not to get your hand or the cloth caught on the pick spring (metal part).
Ultrasonic Sensor (×2)Gently wipe the dirt and dust off the surface of the ultrasonic sensors.
Idler Roller (×4)Gently wipe the rollers as you rotate them manually. Be careful not to damage the roller surface. Make sure that it is cleaned properly because residue on the roller will affect the feeding performance.
Glass (×2)Gently wipe the dirt and dust off the surface of the glass sections.
Pick Roller (×1)Gently wipe the roller as you rotate it downwards manually. Be careful not to damage the roller surface. Make sure that it is cleaned properly because residue on the roller will affect the feeding performance.
The procedure can be viewed on the Video.
Feed Roller (×2)/Eject Roller (×2)The power must be turned on to rotate the feed/eject rollers.
- Turn on the scanner.
- Open the ADF when "1" is displayed on the Function Number Display.
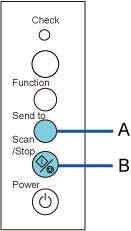
- When you press the [Send to] and [Scan/Stop] buttons at the same time, the feed/eject rollers rotate a certain amount.

A [Send to] Button B [Scan/Stop] Button
 CAUTION:
When you press the [Send to] button and the [Scan/Stop] button at the same time, the feed rollers and the eject rollers rotate together. Be careful not to touch the rollers while they are rotating. - Put a piece of cloth/Cleaning Paper moistened with Cleaner F1 or a sheet of Cleaning Wipe against the roller surface, and wipe horizontally.
Wipe the whole surface by pressing the [Send to] and [Scan/Stop] buttons at the same time to rotate the rollers.
Make sure that it is cleaned properly because black residue on the roller will affect the feeding performance.
As a guideline, pressing the [Send to] and [Scan/Stop] buttons six times will rotate the feed/eject rollers one revolution.
The procedure can be viewed on the Video.
 - Close the ADF.
Push the center of the ADF until it locks in place.
 CAUTION:
Confirm that the ADF is closed properly. Otherwise, the document may not be fed through the ADF.
The procedure can be viewed on the Video.


