Replacing the Consumables
Replace the consumables in the following procedure.
 CAUTION:
Make sure to reset the sheet counter after replacing the consumables.
For details, refer to (3) at the end of this page.
(1) Replacing the Brake Roller
- Remove all documents from the ADF paper chute (Feeder).
- Pull the ADF release tab towards you to open the ADF.
CAUTION:
Be careful not to have your fingers caught when the ADF closes.
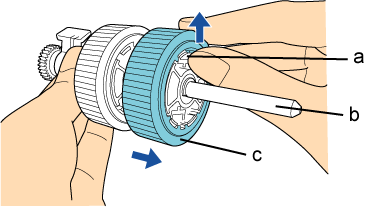
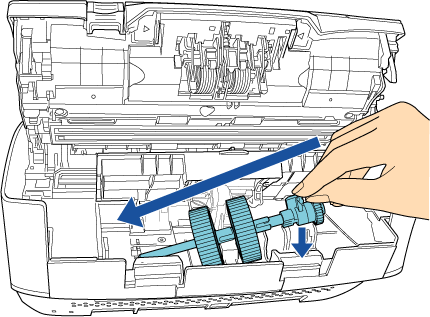
- Remove the brake rollers.
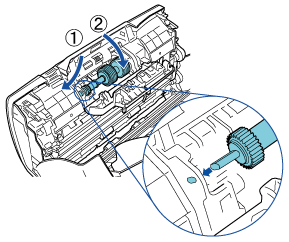
- ⅰ. Hold both ends of the cover, and open it in the direction of the arrow.
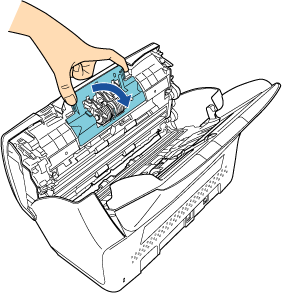
- ⅱ. Lift the right side of the roller first, then pull out the shaft from the slot on the left.
- ⅰ. Hold both ends of the cover, and open it in the direction of the arrow.
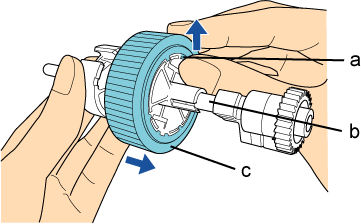
- Remove the brake rollers from their shaft.
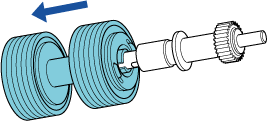
- Attach new brake rollers on the shaft.
Insert the protrusion on the shaft into the slot.
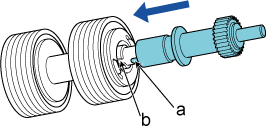
a Protrusion b Slot
- Attach the shaft.
- ⅰ. Insert the left end of the shaft into the hole in accordance with the hole shape, and then attach the right side of the shaft.
- ⅱ. Close the cover.
CAUTION:
Confirm that the brake rollers are installed properly.
Otherwise, it may cause feeding errors such as paper jams.
- ⅰ. Insert the left end of the shaft into the hole in accordance with the hole shape, and then attach the right side of the shaft.
- Attach the shaft.
CAUTION:
Be careful not to have your fingers caught when the ADF closes.
The procedure can be viewed on the Video.
- Reset the brake roller counter. Refer to (3)
(2) Replacing the Pick Roller
- Remove all documents from the ADF paper chute (Feeder).
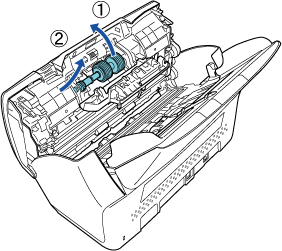
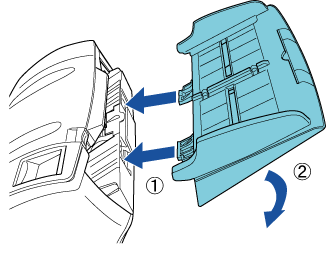
- Hold both ends of the ADF paper chute (Feeder), and lift ① then pull it out ② in the direction of the arrow.

- Pull the ADF release tab towards you to open the ADF.
CAUTION:
Be careful not to have your fingers caught when the ADF closes.
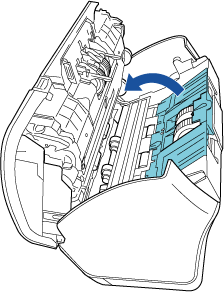
- Remove the pick rollers.
- ⅰ. Open the sheet guide by lifting the tab.
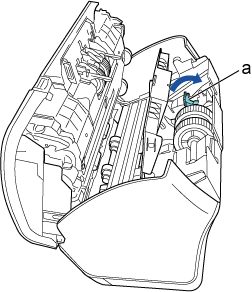
- ⅱ. Rotate the bushing on the shaft.
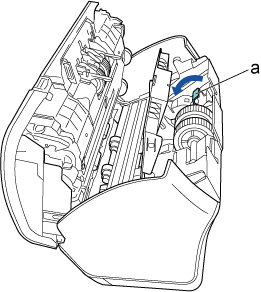
a Bushing
- ⅲ. Lift the bushing in the direction of the arrow ① (about 5 mm) first, then pull the end of the shaft out of the slot in the direction of the arrow ②, and finally pull out the shaft completely in the direction of the arrow ③.
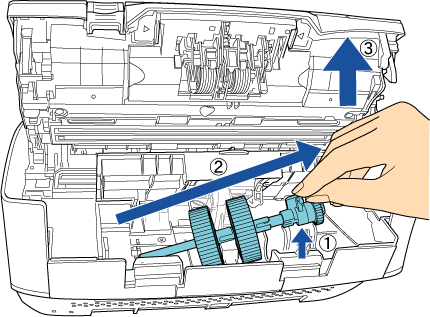
CAUTION:
Be careful not to touch the gear near the bushing on the shaft because it contains grease.
- ⅰ. Open the sheet guide by lifting the tab.
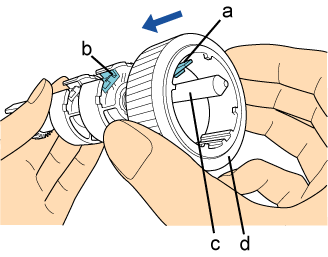
- Remove the pick rollers (×2) one by one from the shaft.
- ⅰ. Pull out the pick roller from the shaft as you lift the retaining clip.
a Retaining clip b Shaft c Pick roller
- ⅱ. Pull out the other pick roller from the shaft as you lift the retaining clip.
a Retaining clip b Shaft c Pick roller
- ⅰ. Pull out the pick roller from the shaft as you lift the retaining clip.
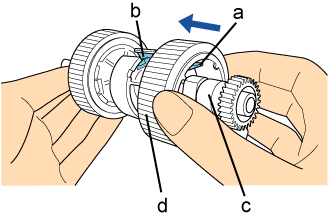
- Attach a new pick roller on the shaft one by one.
- ⅰ. Insert the retaining clip of the pick roller into the slot.
a Retaining clip b Slot c Shaft d Pick roller
- ⅱ. Insert the retaining clip of the other pick roller into the slot.
a Retaining clip b Slot c Shaft d Pick roller
CAUTION:
Confirm that the pick rollers are installed properly.
Otherwise, it may cause feeding errors such as paper jams.
Make sure to insert the pick rollers until they lock in place.
- ⅰ. Insert the retaining clip of the pick roller into the slot.
- Attach the shaft.
- ⅰ. Insert the left end of the shaft into the slot, and lower the other end gradually.
- ⅱ. Rotate the bushing to lock the shaft.
a Bushing
- ⅲ. Close the sheet guide. Make sure that both ends of the sheet guide are locked firmly.
CAUTION:
Confirm that the pick rollers are installed properly.
Otherwise, it may cause feeding errors such as paper jams.
- ⅰ. Insert the left end of the shaft into the slot, and lower the other end gradually.
- Close the ADF.
CAUTION:
Be careful not to have your fingers caught when the ADF closes.
- Attach the ADF paper chute (Feeder).
Insert the tabs into the slots on the back of the scanner in the direction of the arrow ①, and tilt the ADF paper chute (Feeder) in the direction of the arrow ② until it locks in place.
Make sure that the surface with the side guides is facing up.
The procedure can be viewed on theVideo.
- Reset the pick roller counter. Refer to (3).
(3) Resetting the Sheet Counter
- Confirm that the scanner is connected to the computer, then turn on the scanner.
- Open the [Software Operation Panel] window.
- Windows® XP/Windows Vista®/Windows Server® 2008/Windows® 7
Select [Start] menu → [All Programs] → [fi Series] → [Software Operation Panel] - Windows Server® 2012/Windows® 8
Right-click the Start screen, and select [All apps] on the app bar → [fi Series] → [Software Operation Panel]. - Windows Server® 2012 R2/Windows® 8.1
Select [↓] on the lower left side of the Start screen → [Software Operation Panel] under [fi Series].
To display [↓], move the mouse cursor.
- Windows® XP/Windows Vista®/Windows Server® 2008/Windows® 7
- From the listing on the left, select [Device Setting].
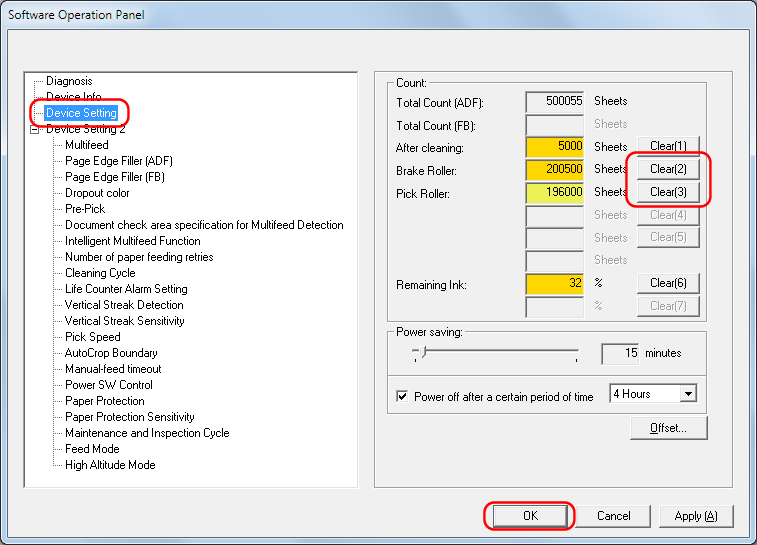
- Click the [Clear] button for the consumable that you replaced.
→ The counter is reset to "0". - Click the [OK] button on the [Software Operation Panel] dialog box.
→ A message appears. - Click the [OK] button.
→ The settings are saved.