Archived content
NOTE: this is an archived page and the content is likely to be out of date.
Replacing the Print Cartridge
Replace the print cartridge in the following procedure:
(1) Replacing the Print Cartridge
- Turn off the scanner.
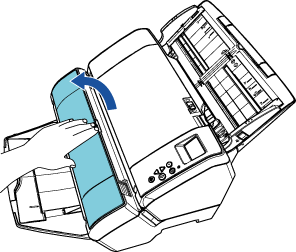
- Open the print cartridge cover from the middle part as shown below.
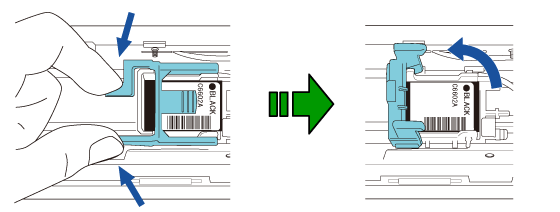
- Squeeze both ends of the print cartridge holder to release the print cartridge holder lock and lift it open as shown below.
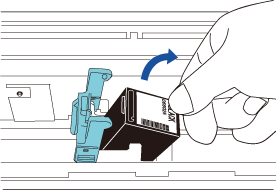
- Remove the old print cartridge.
- Remove the protective tape from the new print cartridge.
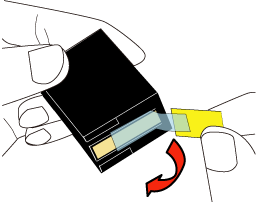
ATTENTION: Do not touch the metal part of the cartridge or put the protective tape back on.
- Insert the print cartridge with the tab part to the right.
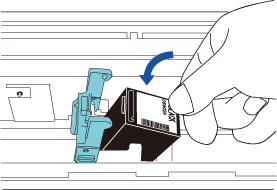
ATTENTION: Be careful not to scratch or damage the wiring film with the print cartridge.
- Lower the print cartridge holder slowly until it is locked.
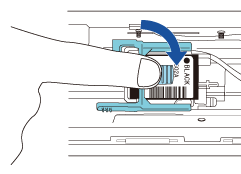
- Move the print cartridge towards the printing position where documents pass through.
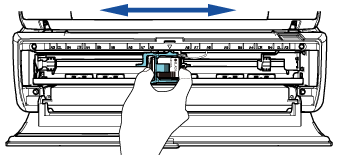
ATTENTION: Note that, depending on the position of the print cartridge, when content to be printed is on the edge of a document, a part of the content may be printed outside of the document width.
- Close the print cartridge cover.
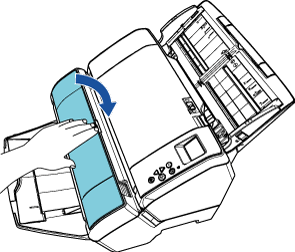
- Turn on the scanner.
(2) Resetting the Ink Counter
- Confirm that the scanner is connected to the computer, then turn on the scanner.
- Open the [Software Operation Panel] window.
- Windows Vista/Windows Server 2008/Windows 7
Select [Start] menu → [All Programs] → [fi Series] → [Software Operation Panel]. - Windows Server 2012/Windows 8
Right-click the Start screen, and select [All apps] on the app bar → [Software Operation Panel] under [fi Series]. - Windows Server 2012 R2/Windows 8.1
Click [↓] on the lower left side of the Start screen and select [Software Operation Panel] under [fi Series].
To display [↓], move the mouse cursor. - Windows 10
Select [Start] menu → [All apps] → [fi Series] → [Software Operation Panel].
- Windows Vista/Windows Server 2008/Windows 7
- From the listing on the left, select [Device Setting].
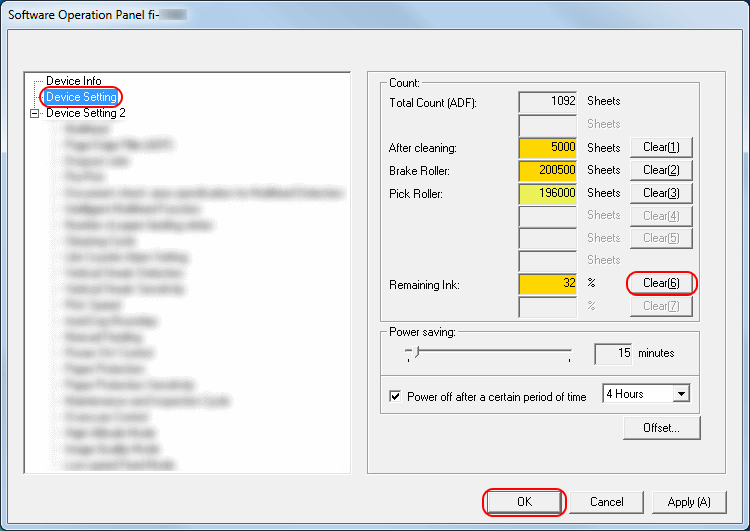
- Click the [Clear] button for the ink counter.
→ The counter is reset to "100". - Click the [OK] button on the [Software Operation Panel] window.
→ A message window appears. - Click the [OK] button.
→ The settings are saved.


