Screens on the Touch Panel (iX1600 / iX1500)
The screens displayed on the touch panel of the ScanSnap are either the home screen to start scanning or the [Settings] screen to check or modify the settings of the ScanSnap.
This section explains the following screens:
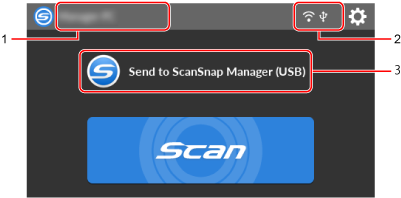
Home screen
The home screen is a screen where you perform a scan.
When the ScanSnap and a computer are connected, one of the following screens appears.
- When the ScanSnap and the computer are connected via a USB cable
- When the ScanSnap and a computer are connected via wireless LAN

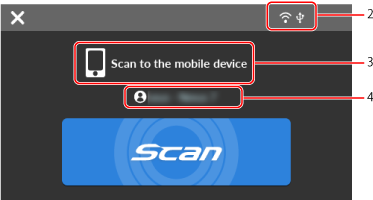
When the ScanSnap and a mobile device are connected, the following screen appears.
![]()
Displays the [Selecting a User] screen.
In the [Selecting a User] screen, user names of the computers that have been connected to the ScanSnap before are listed. Selecting a user name in the list can change the current computer to the computer that you want to connect the ScanSnap to.
![]() is displayed in the following cases:
is displayed in the following cases:
- The options below are selected in the [Settings] screen on the touch panel
- [Selected user] is selected for [Display of profiles] in the [Scanner settings] screen
- [Access point connection] or [Direct connection] is selected for [Wi-Fi connect mode] in the [Wi-Fi settings] screen
- Two or more history records of computers that have been connected to the ScanSnap before exist
User name (1)
Displays a user name that is connected with the ScanSnap.
A user name is displayed in the following cases:
- The options below are selected in the [Settings] screen on the touch panel
- [Selected user] is selected for [Display of profiles] in the [Scanner settings] screen
- [Access point connection] or [Direct connection] is selected for [Wi-Fi connect mode] in the [Wi-Fi settings] screen
- Two or more history records of computers that have been connected to the ScanSnap before exist
Connection status (2)
Displays the connection statuses of the ScanSnap.

- Displays the signal status between a wireless access point and the ScanSnap in four levels.
When the ScanSnap is searching for a wireless access point or is not connected to a wireless access point,
 appears.
- Appears when the ScanSnap and the computer are connected via a USB cable.

- Appears when the Wi-Fi connect mode for the ScanSnap is set to Direct Connect mode which is not via a wireless access point.
When the ScanSnap cannot establish a connection to a wireless access point, the ScanSnap and the computer or mobile device can be connected directly via wireless LAN.
![]()
Displays the [Settings] screen. You can configure the settings for the ScanSnap.
When there is a maintenance notification, ![]() appears on
appears on ![]() .
.
Status (3)
Displays the status of a computer or mobile device that is connected to the ScanSnap.
Device name (4)
Displays a mobile device name when a device that is connected to the ScanSnap is a mobile device.

Disconnects the connection between the ScanSnap and the mobile device.
[Scan] button
Scanning starts.
When ![]() is displayed on the [Scan] button, scanning does not start. Follow the message that is displayed when you press
is displayed on the [Scan] button, scanning does not start. Follow the message that is displayed when you press ![]() to solve the problem.
to solve the problem.
[Settings] Screen
The [Settings] screen is the screen in which you can check the ScanSnap, wireless LAN, and maintenance information, and specify settings.
![]()
Returns to the home screen.
![]()
Displays the [Maintenance] screen.
The following operations can be performed in the [Maintenance] window.
- Specifying the setting to notify you when the scanner detects dirt on the glass which causes vertical streaks on scanned images
- Checking when to replace consumables
- Starting the cleaning operation for the feed rollers and eject rollers
- Updating the firmware to a newer version
In the following cases, ![]() appears on
appears on ![]() .
.
- When dirt on the glass is detected
- When the scanned page count exceeded the replacement cycle
- When the latest firmware is available
![]()
Displays the [Scanner settings] screen.
The following operations can be performed in the [Scanner settings] window.
- Checking the information on the ScanSnap, wireless LAN, or network
- Configuring the following settings
- Name of the ScanSnap
- Whether or not to display the results regarding the saving process of scanned images in a cloud service
- Startup mode
- Automatic power off
- Method to display profiles
- Language displayed on the touch panel
- Type of USB operation
- Resetting the following settings
- Settings other than [Display language] in the [Scanner settings] screen
- Setting for the [Notify when the latest is available] checkbox in [Update firmware] in the [Maintenance] screen
- Setting for the [Notify when glass is dirty] checkbox in [Dust detection] in the [Maintenance] screen
![]()
Displays the [Wi-Fi settings] screen.
The following operations can be performed in the [Wi-Fi settings] window.
- Switching the wireless LAN connect mode for connecting the ScanSnap to a computer or mobile device
- Modifying the settings for each connect mode
- Checking the information such as the wireless LAN connection status and the signal strength
- Resetting the wireless settings that are configured for the ScanSnap
When there is a device with the same IP address as that of the ScanSnap on the network, ![]() is displayed on
is displayed on ![]() .
.
![]()
The [Connecting Devices] screen is displayed.
Shows the information below which is necessary when connecting a new computer or a new mobile device.
- Scanner name
- IP address
- Network name (SSID)
- Security key
The displayed information varies depending on the connection method.
![]()
Displays the [Help] screen.
Shows the reference page on ScanSnap Help.