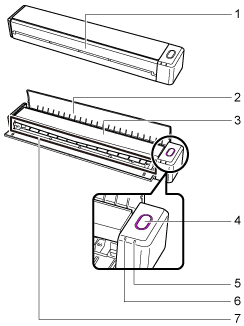
Parts and Functions of the ScanSnap
Front
No. |
Name |
Description |
|---|---|---|
1 |
Feed guide (*1) |
Open it to use the ScanSnap. Opening it turns on iX100. Then, you can place a document on it to insert the document. |
2 |
Output guide |
Open it to eject documents from the front of the ScanSnap. Select an ejection method depending on the document type you are scanning. For details about documents that can be scanned with the ScanSnap, refer to Documents That Can Be Loaded Directly into the ScanSnap.
|
3 |
Top cover |
Open it to remove jammed documents or clean the inside of the ScanSnap. |
4 |
[Scan/Stop] button (*1) |
Press this button to start or finish scanning. Indicates the status of the ScanSnap. For details, refer to The Wi-Fi Indicator and the [Scan/Stop] Button. |
5 |
Battery indicator |
Indicates the remaining battery power and battery charging status.
|
6 |
Wi-Fi indicator |
Indicates the status of the ScanSnap connected via wireless LAN. For details, refer to The Wi-Fi Indicator and the [Scan/Stop] Button. |
7 |
Feeding section |
Insert the document here to load. |

| *1: | When the ScanSnap has turned off automatically because of the automatic power off function, either press the [Scan/Stop] button (this will not start scanning), or close the feed guide, then open it again to turn the ScanSnap back on. For details, refer to Automatic Power OFF. |
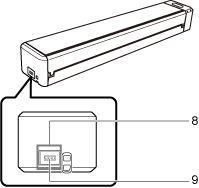
Side
No. |
Name |
Description |
|---|---|---|
8 |
Tape seal |
Remove the tape seal after installing the application. |
9 |
USB connector |
Used to connect a USB cable in the following cases:
|
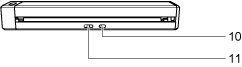
Back
No. |
Name |
Description |
|---|---|---|
|
10 |
WPS button |
Press this button to connect to a WPS compatible device by using the push button method. |
|
11 |
Wi-Fi switch |
Turn this switch on to connect the ScanSnap via wireless LAN. Always turn this switch on when using ScanSnap Cloud. |