Archived content
NOTE: this is an archived page and the content is likely to be out of date.
Cleaning
Clean the ADF in the following procedure:
| The inside of the ADF becomes very hot when the scanner is being used.
Before you start cleaning the inside, make sure to turn off the power, unplug the power cable and wait at least 15 minutes for the ADF glass to cool down. |
| Important: |
|
- Turn off the scanner and wait for at least 15 minutes.
- Unplug the power cable.
- Pull the ADF release tab towards you to open the ADF.
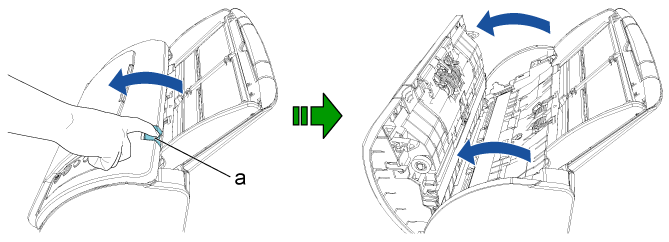
a ADF Release Tab
 CAUTION:
Be careful not to have your fingers caught when the ADF closes.
- Clean the following locations with a cloth moistened with Cleaner F1, or a sheet of Cleaning Wipe.
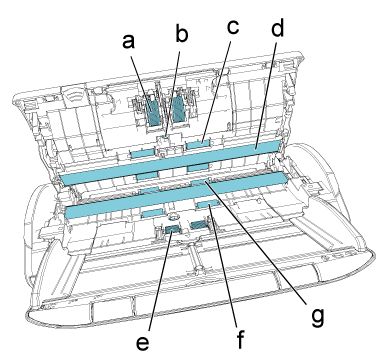
a Brake Roller (× 2) b Ultrasonic Sensor (× 2) c Plastic Idler Roller (× 4) d Glass (× 2) e Pick Roller (× 2) f Feed Roller (× 2) g Eject Roller (× 2) Brake Roller (× 2)
Remove the brake roller from the scanner.
For details about how to remove the brake roller, refer to "(1) Replacing the Brake Roller" in "Replacing the Consumables".
Gently wipe the dirt and dust off the grooves of the roller surface, taking care not to damage the surface of the roller.
Ultrasonic Sensor (× 2)
Gently wipe the dirt and dust off the surface of the ultrasonic sensors. If it is difficult to clean, use a cotton swab.
Important: When cleaning, be careful not to damage the document sensor with a cloth or Cleaning Wipe.
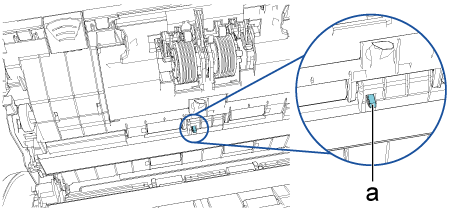
a Document Sensor
Plastic Idler Roller (× 4)
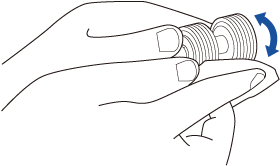
Gently wipe the dirt and dust off the rollers as you rotate the roller with your hand, taking care not to damage the surface of the roller. Make sure that they are cleaned properly because residue on the rollers will affect the feeding performance.
Glass (× 2)
Gently wipe the dirt and dust off the surface of the glass sections.
Important: Vertical streaks may appear on scanned images if the glass is dirty.
Pick Roller (× 2)
Gently wipe the dirt and dust off the grooves of the roller surface as you rotate the roller with your hand, taking care not to damage the surface of the roller. Make sure that they are cleaned properly because residue on the rollers will affect the feeding performance.
Feed Roller (× 2)/Eject Roller (× 2)
The power must be turned on to rotate the feed/eject rollers for cleaning.
- Connect the power cable, and turn on the scanner.
- Open the ADF after "1" is displayed on the Function Number Display of the operator panel.
For details, refer to step 3.
 CAUTION:
Be careful not to have your fingers caught when the ADF closes. - When you press the [Send to] and [Scan/Stop] buttons on the operator panel at the same time, the feed/eject rollers rotate a certain amount.
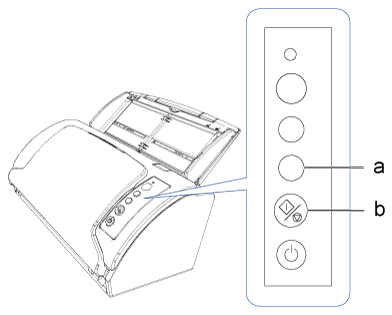
a [Send to] Button b [Scan/Stop] Button
 CAUTION:
Be careful not to have your fingers caught when the ADF closes. - Put a piece of cloth moistened with Cleaner F1 or a sheet of Cleaning Wipe against the surface of the feed roller or eject rollers, and wipe horizontally.
Rotate the rollers to wipe dirt and dust off the surface, by pressing the [Send to] and [Scan/Stop] buttons at the same time.
Make sure that they are cleaned properly because residue on the rollers will affect the feeding performance.
As a guideline, pressing the [Send to] button and the [Scan/Stop] button simultaneously seven times will rotate the feed/eject rollers one full turn.
- Close the ADF.
 CAUTION:
Be careful not to have your fingers caught when the ADF closes.
Important: Check that the ADF is closed properly. Otherwise, the document may not be fed into the ADF. - After cleaning, reset the counter for the number of sheets that have been scanned in the Software Operation Panel.
For details about how to reset the counter, refer to "(2) Resetting the Sheet Counter" in "Replacing the Consumables".


