Saving Data to Google Drive
This section explains how to save the scanned image as a PDF file to Google Drive.
ATTENTION
- You need to create a Google account (free).
- [Scan to Google Drive] is not available in a proxy environment that requires authentication upon connecting to the Internet.
- Click the [Scan to Google Drive] icon
 in the Quick Menu.
- The [Scan to Google Drive] window appears.
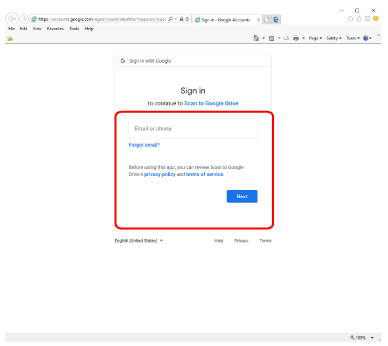
- Enter your e-mail address and password, and then click the [Sign in] button.
- A window appears.
- Click the [Accept] button.
- Text recognition is performed.HINT
- If [JPEG(*.jpg)] is selected for [File format] in the [File option] tab of the ScanSnap setup window, a separate PDF file will be created from each JPEG file.
- Note that text recognition will be performed only on pages containing text which is not yet recognized.
- Saving to Google Drive starts.
- Text recognition is performed.
- Click the [Close] button to close the [Scan to Google Drive] window when the saving is completed.
Google Drive does not start up after the saving has completed. To check the saved PDF file, start a web browser and log into Google Drive.
ATTENTION
- You cannot start scanning when the Quick Menu is displayed. Save the PDF file to Google Drive before scanning the next document.
- Do not move, delete, or rename scanned images using other applications while the Quick Menu is displayed.
HINT
- The settings for [Scan to Google Drive] can be changed. For details, refer to Changing the Settings of Linked Applications.
- Profiles can also be used for the linkage function. For details, refer to Profile.
- ScanSnap Folder can also be used to save scanned images to Google Drive. For details, refer to ScanSnap Folder Operations.