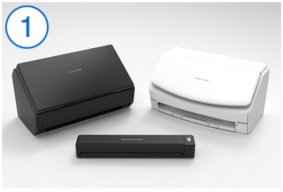
Setting up with ScanSnap iX100 and a Mobile Device
Before starting the setup process, charge the batteries of the ScanSnap and a mobile device.
iOS
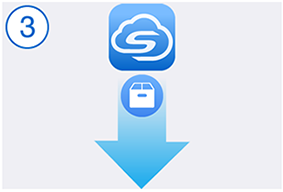
- Download and install the ScanSnap Cloud application.
-
Start the ScanSnap Cloud application.
When you already have a ScanSnap account
Tap the [I already have an account] button, log in with your ScanSnap account, and go to step 4.
When you do not have a ScanSnap account
Tap the [For initial use] button and go to step 3.
-
Create a ScanSnap account.
 HINT
HINTSpecify a valid e-mail address for your ScanSnap account.
The following characters can be used for a password:
Alphanumeric characters
A to Z, a to z, and 0 to 9
Symbols
! @ # $ % ^ * ( ) - \ _ + | [ ] { } : , . / ?
A password must be 8 characters or longer.
-
Specify a cloud storage service for a scanned image.
 HINT
HINTIf you select [Save by document type], you need to specify cloud storage services for all of the document types.
When you finish specifying cloud storage services, the setup process for the camera function is completed.
If you tap the [Get started] button, a message that prompts you to check the settings of the ScanSnap appears. Tap [Continue] in the message.
-
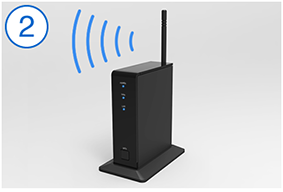
Make preparations for connecting the ScanSnap to the Internet.
 HINT
HINTSelect a wireless access point to be used with the ScanSnap Cloud service for the Wi-Fi connection setting of a mobile device.
Keep the USB cable connected to the power source, and proceed with the setup.
The preparation process is complete when the Wi-Fi indicator
 lights up in orange.
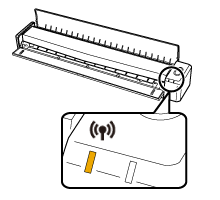 HINT
HINTIf the ScanSnap is connected to a wireless access point, the preparation process is complete when the Wi-Fi indicator
lights up in blue.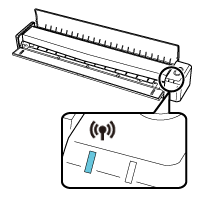
-
Connect the ScanSnap and a mobile device to a wireless access point.
When Entering the Connection Information Directly
-
Change the connection setting of a mobile device to the ScanSnap.
![[Wi-Fi setting] Screen](../config/../images/ios_wifi.png)
The connecting process is complete when the Wi-Fi indicator
lights up in green.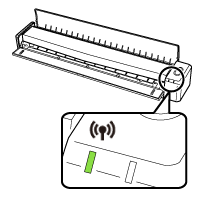
-
Select a ScanSnap scanner from the list.
The setting process is complete.
-
Change the connection setting of a mobile device to the ScanSnap.
-
Update the ScanSnap to the latest status.
-
Update the firmware of the ScanSnap.
![[Firmware update] Screen](../config/../images/firm_up_ix100_ios.png)
-
Select the ScanSnap again for the connection setting of a mobile device.
HINT
If a password is required, enter the "SECURITY KEY" value of the ScanSnap.
Enter the password with attention to uppercase and lowercase letters.
The connecting process is complete when the Wi-Fi indicator
lights up in green. -
Select the wireless access point for the destination.
![[Wireless access point/router setting] Screen](../config/../images/net_ap_ios.png)
The connecting process is complete when the Wi-Fi indicator
lights up in blue.
-
Update the firmware of the ScanSnap.
-
Test the ScanSnap Cloud service.

When the ScanSnap is connected to the ScanSnap Cloud service, the [Scan/Stop] button and the Wi-Fi indicator
on the ScanSnap light up in purple.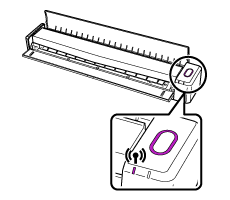
Scanned images are saved in the specified cloud storage services.
The setup process for the ScanSnap Cloud service is complete.
HINTRefer to Changing the Settings that Were Configured at the Setup for details about how to change a cloud storage service for scanned images, change a wireless access point, or add the ScanSnap to be used after setting up the ScanSnap Cloud service.
![[WPS connection] Screen](../config/../images/net_wps_ios.png)
Android 10 or Later
- Download and install the ScanSnap Cloud application.
-
Start the ScanSnap Cloud application.
When you already have a ScanSnap account
Tap the [I already have an account] button, log in with your ScanSnap account, and go to step 4.
When you do not have a ScanSnap account
Tap the [For initial use] button and go to step 3.
-
Create a ScanSnap account.
HINT
Specify a valid e-mail address for your ScanSnap account.
The following characters can be used for a password:
Alphanumeric characters
A to Z, a to z, and 0 to 9
Symbols
! @ # $ % ^ * ( ) - \ _ + | [ ] { } : , . / ?
A password must be 8 characters or longer.
-
Specify a cloud storage service for a scanned image.
HINT
If you select [Save by document type], you need to specify cloud storage services for all of the document types.
When you finish specifying cloud storage services, the setup process for the camera function is completed.
If you tap the [Get started] button, a message that prompts you to check the settings of the ScanSnap appears. Tap [Continue] in the message.
-
Make preparations for connecting the ScanSnap to the Internet.
HINT
Select a wireless access point to be used with the ScanSnap Cloud service for the Wi-Fi connection setting of a mobile device.
Keep the USB cable connected to the power source, and proceed with the setup.
The preparation process is complete when the Wi-Fi indicator
lights up in orange.HINTIf the ScanSnap is connected to a wireless access point, the preparation process is complete when the Wi-Fi indicator
lights up in blue. -
Connect the ScanSnap and a mobile device to a wireless access point.
When Entering the Connection Information Directly
-
Change the connection setting of a mobile device to the ScanSnap.
![[Wi-Fi setting] Screen](../config/../images/android_wifi.png) HINT
HINTIf a password is required, enter the "SECURITY KEY" value of the ScanSnap.
Enter the password with attention to uppercase and lowercase letters.
The connecting process is complete when the Wi-Fi indicator
lights up in green.
-
Select a ScanSnap scanner from the list.
The setting process is complete.
-
Follow the instructions on the screen to select a ScanSnap scanner to be set.
![[WPS connection] Screen](../config/../images/net_wps_android.png)
The connecting process is complete when the Wi-Fi indicator
lights up in blue.
-
Change the connection setting of a mobile device to the ScanSnap.
-
Update the ScanSnap to the latest status.
-
Update the firmware of the ScanSnap.
![[Firmware update] Screen](../config/../images/firm_up_ix100_android.png)
The updating process is complete when the lit [Scan/Stop] button turns from orange to blue.
![Color of the [Scan/Stop] Button](../config/../images/Hard_front_scan_button_ix100_blue-orange.png)
When the ScanSnap is connected to a wireless access point, go to step 8. Otherwise, proceed to the next step.
-
Select the ScanSnap again for the connection setting of a mobile device.
HINT
If a password is required, enter the "SECURITY KEY" value of the ScanSnap.
Enter the password with attention to uppercase and lowercase letters.
The connecting process is complete when the Wi-Fi indicator
lights up in green. -
Select the wireless access point for the destination.
![[Wireless access point/router setting] Screen](../config/../images/net_ap_android.png)
The connecting process is complete when the Wi-Fi indicator
lights up in blue.
-
Update the firmware of the ScanSnap.
-
Test the ScanSnap Cloud service.
When the ScanSnap is connected to the ScanSnap Cloud service, the [Scan/Stop] button and the Wi-Fi indicator
on the ScanSnap light up in purple.Scanned images are saved in the specified cloud storage services.
The setup process for the ScanSnap Cloud service is complete.
HINTRefer to Changing the Settings that Were Configured at the Setup for details about how to change a cloud storage service for scanned images, change a wireless access point, or add the ScanSnap to be used after setting up the ScanSnap Cloud service.
Android 9 or Earlier
- Download and install the ScanSnap Cloud application.
-
Start the ScanSnap Cloud application.
When you already have a ScanSnap account
Tap the [I already have an account] button, log in with your ScanSnap account, and go to step 4.
When you do not have a ScanSnap account
Tap the [For initial use] button and go to step 3.
-
Create a ScanSnap account.
HINT
Specify a valid e-mail address for your ScanSnap account.
The following characters can be used for a password:
Alphanumeric characters
A to Z, a to z, and 0 to 9
Symbols
! @ # $ % ^ * ( ) - \ _ + | [ ] { } : , . / ?
A password must be 8 characters or longer.
-
Specify a cloud storage service for a scanned image.
HINT
If you select [Save by document type], you need to specify cloud storage services for all of the document types.
When you finish specifying cloud storage services, the setup process for the camera function is completed.
If you tap the [Get started] button, a message that prompts you to check the settings of the ScanSnap appears. Tap [Continue] in the message.
-
Make preparations for connecting the ScanSnap to the Internet.
HINT
Select a wireless access point to be used with the ScanSnap Cloud service for the Wi-Fi connection setting of a mobile device.
Keep the USB cable connected to the power source, and proceed with the setup.
The preparation process is complete when the Wi-Fi indicator
lights up in orange.HINTIf the ScanSnap is connected to a wireless access point, the preparation process is complete when the Wi-Fi indicator
lights up in blue. -
Connect the ScanSnap and a mobile device to a wireless access point.
When Entering the Connection Information Directly
-
Change the connection setting of a mobile device to the ScanSnap.
![[Select ScanSnap] Screen](../config/../images/android-wifi_ix100.png) HINT
HINTIf a password is required, enter the "SECURITY KEY" value of the ScanSnap.
Enter the password with attention to uppercase and lowercase letters.
The connecting process is complete when the Wi-Fi indicator
lights up in green.
-
Select a ScanSnap scanner from the list.
The setting process is complete.
-
Follow the instructions on the screen to select a ScanSnap scanner to be set.
The connecting process is complete when the Wi-Fi indicator
lights up in blue.
-
Change the connection setting of a mobile device to the ScanSnap.
-
Update the ScanSnap to the latest status.
-
Update the firmware of the ScanSnap.
The updating process is complete when the lit [Scan/Stop] button turns from orange to blue.
-
Select the wireless access point for the destination.
The connecting process is complete when the Wi-Fi indicator
lights up in blue.
-
Update the firmware of the ScanSnap.
-
Test the ScanSnap Cloud service.
When the ScanSnap is connected to the ScanSnap Cloud service, the [Scan/Stop] button and the Wi-Fi indicator
on the ScanSnap light up in purple.Scanned images are saved in the specified cloud storage services.
The setup process for the ScanSnap Cloud service is complete.
HINTRefer to Changing the Settings that Were Configured at the Setup for details about how to change a cloud storage service for scanned images, change a wireless access point, or add the ScanSnap to be used after setting up the ScanSnap Cloud service.