This website is designed to be used with ScanSnap Home 1.4.
If you are using ScanSnap Home 2.0 or later, refer to here.
Cleaning the ScanSnap
This section explains how to clean the ScanSnap.
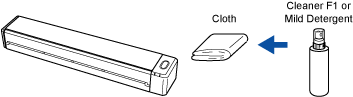
Cleaning the outside of the ScanSnap
Clean the outside of the ScanSnap regularly.
Disconnect the cables from the ScanSnap and then clean the outside of the ScanSnap with a dry cloth, or a cloth moistened with Cleaner F1/mild detergent.
Never use paint thinner or any other organic solvents. The shape or color may be changed.
When cleaning the ScanSnap, prevent liquids from entering the ScanSnap.
It may take a long time for Cleaner F1 to dry if an excessive amount is used. Moisten the cloth with moderate quantity.
Wipe off the cleaner completely to leave no residue on the cleaned parts.
Cleaning the inside of the ScanSnap
Clean the inside of the ScanSnap regularly.
Scanning repeatedly accumulates dust and paper dust inside the ScanSnap, and this may result in an error during a scan.
As a guideline, the inside of the ScanSnap should be cleaned every 100 sheets scanned.
Note that this guideline varies depending on the types of documents you scan. For instance, it may be necessary to clean the scanner more frequently when you scan documents on which the toner is not sufficiently fused.
-
Do not use aerosol spray or spray that contains alcohol. Paper dust and other dust blown up by strong air from the spray may enter the inside of the scanner which may cause scanner failure or malfunction.
Also note that sparks generated by static electricity may cause a fire.
Do not use water or mild detergent to clean the inside of the ScanSnap.
It may take a long time for Cleaner F1 to dry if an excessive amount is used. Moisten the cloth with moderate quantity.
Wipe off the cleaner completely to leave no residue on the cleaned parts.
- Clean the glass sections and the plastic idler rollers.
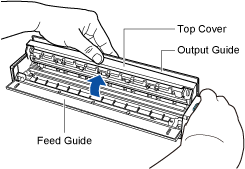
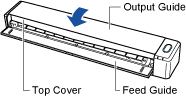
- Open the top cover and the output guide.
- Clean the following locations with a cloth moistened with Cleaner F1.
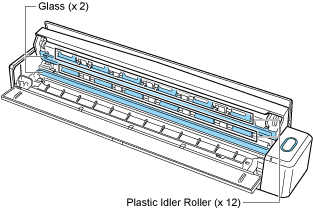
Glass (× 2, one on the top cover and one on the opposite side)
Wipe the dirt and dust off the surface of the glass sections.
TIPIf glue or other adhesive sticks to the glass sections, wipe it off carefully.
Any remaining dirt may cause vertical streaks to occur in a scanned image.
Plastic idler roller (× 12, located on the top cover)
Gently wipe the dirt and dust off the rollers as you rotate them manually.
Be careful not to damage the surface of the rollers.
Make sure that they are cleaned properly because residue on the rollers will affect the feeding performance.
- Open the top cover and the output guide.
- Clean the feed roller and eject roller.
- Clean the following locations with a cloth moistened with Cleaner F1.
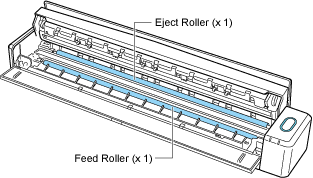
Feed roller (× 1)
Press the [Scan/Stop] button to rotate the roller.
Gently wipe the dirt and dust off while taking care not to damage the surface of each roller.
Make sure that they are cleaned properly because residue on the rollers will affect the feeding performance.
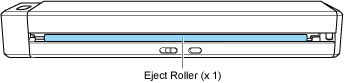
Eject roller (× 1)
Press the [Scan/Stop] button to rotate the roller.
Gently wipe the dirt and dust off while taking care not to damage the surface of each roller.
Make sure that they are cleaned properly because residue on the rollers will affect the feeding performance.
If the eject roller is difficult to clean, try cleaning it from the back of the ScanSnap while you keep the top cover slightly open.
 TIP
TIPPressing the [Scan/Stop] button seven times will rotate the feed roller and the eject roller one revolution.
- Clean the following locations with a cloth moistened with Cleaner F1.
- Close the top cover and the output guide.
Close the top cover until it locks in place.
 ATTENTION
Make sure that the top cover is completely closed.
Otherwise, paper jams or other feeding errors, or image faults may occur.