Connecting the ScanSnap Directly with Direct Connect Mode

If a connection to a wireless access point cannot be established, you can connect the ScanSnap to the mobile device directly in Direct Connect mode without using a wireless access point.

The ScanSnap transmits the network name (SSID) instead of a wireless access point. To connect a mobile device to the ScanSnap directly via Wi-Fi, establish a connection with the network name (SSID) of the ScanSnap from the Wi-Fi settings on a computer or mobile device.

Note that the ScanSnap does not have a wireless access point function or a router function. Therefore, a mobile device that is connected to the ScanSnap in Direct Connect mode cannot be connected to the Internet or other devices.

This section explains how to manually connect the ScanSnap temporarily to a mobile device via a direct connection.

When you turn off the ScanSnap and turn it back on, the wireless mode returns to the one that has been specified in ScanSnap Wireless Setup Tool.

HINT
  • To connect the ScanSnap and a mobile device via a direct connection all the time, select [Direct Connect mode] for the wireless mode in ScanSnap Wireless Setup Tool.

    For details, refer to the ScanSnap Wireless Setup Tool Help.

    For details about how to start ScanSnap Wireless Setup Tool, refer to here in the ScanSnap Help. For details about how to start ScanSnap Wireless Setup Tool, refer to here in the ScanSnap Help.

  1. Press Settings in the home screen on the touch panel of the ScanSnap to display the [Settings] screen.
  2. Press Wi-Fi Settings to display the [Wi-Fi settings] screen.
  3. Press [Wi-Fi connect mode] to display the [Wi-Fi connect mode] screen.
  4. Select [Direct connection].
  5. Press Back twice to display the [Settings] screen.
  6. Press Connecting Devices to display the [Connecting Devices] screen.
  7. Open the screen for setting the Wi-Fi function on the mobile device.

    For details, refer to the manual of the mobile device.

  8. Enter the network name (SSID) and security key that are displayed in the [Connecting Devices] screen in the window for setting the Wi-Fi function.
  9. Close the ADF paper chute (cover) to turn off the ScanSnap.
  10. Close the feed guide to turn off the ScanSnap.
  11. Turn on the Wi-Fi switch that is at the back of the ScanSnap.
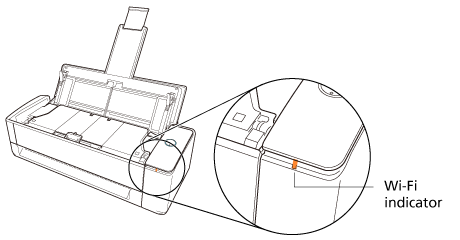
  12. While holding down the WPS button that is at the back of the ScanSnap, open the ADF paper chute (cover) to turn the power on.

    At this point, press the WPS button for more than 3 seconds until the Wi-Fi indicator flashes in green.

    When the Wi-Fi connect mode is changed to the Direct Connect mode, the Wi-Fi indicator lights up in orange.

    Wi-Fi indicator
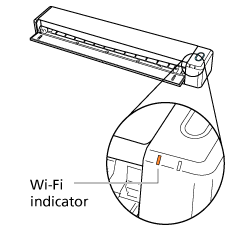
  13. While holding down the [Scan/Stop] button, open the feed guide to turn the power on.

    At this point, press the [Scan/Stop] button for more than 3 seconds until the Wi-Fi indicator flashes in green.

    When the Wi-Fi connect mode is changed to the Direct Connect mode, the Wi-Fi indicator lights up in orange.

    Wi-Fi indicator
  14. Open the screen for setting the Wi-Fi function on the mobile device.
    HINT
    • For details, refer to the manual of the mobile device.

  15. Enter the ScanSnap network name (SSID) and security key in the screen for setting the Wi-Fi function.

    The default ScanSnap network name (SSID) and security key are on the bottom of the ScanSnap.

The ScanSnap is directly connected to the mobile device via a direct connection.

The ScanSnap is connected with the mobile device directly and the Wi-Fi indicator lights up in green.