• HOME
  • ScanSnap Home Mobile Help
  • Scanning Documents
  • How to Scan Documents
  • Saving Scanned Images to a Mobile Device

Saving Scanned Images to a Mobile Device

Images created from the documents that you scanned with the ScanSnap can be saved to a mobile device.

HINT
  • When images of scanned documents are saved to a mobile device, the optional Carrier Sheet and Photo Carrier Sheet cannot be used.

  • When images of scanned documents are saved to a mobile device, the optional Carrier Sheet, Photo Carrier Sheet, and Booklets Carrier Sheet cannot be used.

  • When images of scanned documents are saved to a mobile device, the optional Carrier Sheet cannot be used.

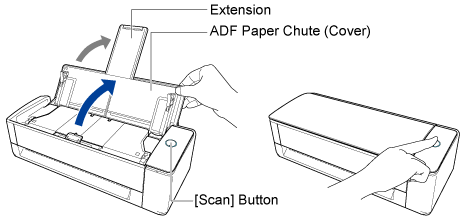
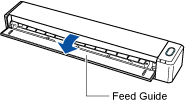
  1. Open the ADF paper chute (cover) of the ScanSnap to turn the power on. Hold the right side of the ADF paper chute (cover) of the ScanSnap then open it or press the [Scan] button to turn it on. Open the feed guide of the ScanSnap to turn the power on.
    Opening the ADF Paper Chute (Cover)

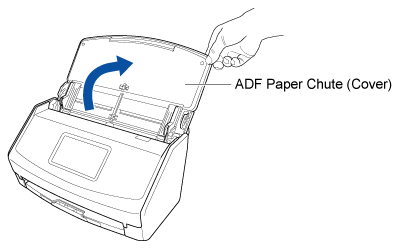
    Open the ADF paper chute (cover) fully so that the [Scan] button lights up in blue.

    When the ADF paper chute (cover) is opened, the extension will rise automatically.

    Opening the ADF Paper Chute (Cover)
    Opening the Feed Guide
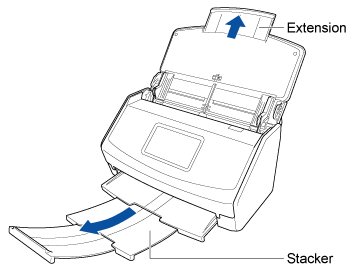
  2. Pull out the extension and the stacker on the ADF paper chute (cover).
    Pulling Out the Extension
  3. Tap the [Scan] icon Scan at the bottom of the ScanSnap Home screen to display the Scan screen.
  4. Configure the scan settings in [Scan settings].

    Configure the scan settings in accordance with the intended use of the scanned documents and images.

    If the scan settings have already been configured, proceed to the next step.

  5. Load documents in the ScanSnap. Insert a document into the ScanSnap.

    For details about loading documents and the scan settings to be configured for each document type, refer to Loading the Document in the ScanSnap.

    For details about loading documents and the scan settings to be configured for each document type, refer to Loading the Document in the ScanSnap.

    For details about loading documents and the scan settings to be configured for each document type, refer to Loading the Document in the ScanSnap.

    For details about inserting a document and the scan settings to be configured for each document type, refer to Inserting the Document in the ScanSnap.

  6. Press the [Scan] button in the home screen on the touch panel to start scanning the document. Press the [Scan] button to start scanning the document. Press the [Scan/Stop] button to start scanning the document.

    When scanning a long page document with a length exceeding 360 mm, hold down the [Scan] button for 3 seconds or longer.

    After scanning is complete, if the message "Load the next document." is displayed in ScanSnap Home, you can continue scanning. To continue scanning, load the next document to be scanned in the ScanSnap and press the [Scan] button.

    To finish scanning, press the [Finish] button without loading any document in the ScanSnap.

    HINT
    • You can change the feed mode setting by pressing the feed mode setting icon in the screen (for confirming whether or not you want to continue scanning) that appears on the touch panel.

      When scanning the following types of documents, change the feed mode setting to [Manual scan].

      • Documents folded in half

      • Envelopes

      • Documents with sticky notes attached

      • Documents with multiple sheets overlapped such as transfer paper

      • Long page documents such as long receipts

      • Plastic cards

    To scan a long page document with a length exceeding 360 mm, hold down the [Scan] button for 3 seconds or longer until it flashes blue.

    After scanning is complete, if the message "Load the next document." is displayed in ScanSnap Home, you can continue scanning. To continue scanning, load the next document to be scanned in the ScanSnap and press the [Scan] button. When the document is inserted into the manual feeder, scanning starts automatically.

    To finish scanning, press the [Scan] button without loading any document in the ScanSnap.

    After scanning is complete, if the message "Load the next document." is displayed in ScanSnap Home, you can continue scanning. To continue scanning, insert the next document to be scanned in the ScanSnap. When the document is inserted, scanning starts automatically.

    To finish scanning, press the [Scan/Stop] button without inserting any document in the ScanSnap.

When [Preview after scanning] is set to on in [Scan settings] in ScanSnap Home, the images created from documents that you scanned are displayed in the Preview screen of ScanSnap Home.

To check the saved image file, tap the [Data] icon Data at the bottom of the ScanSnap Home screen to display the Scanned data screen.

Scanned images saved to the mobile device can be displayed by tapping Local at the top of the Scanned data screen.

ATTENTION
  • The scanned data will be discarded if you exit ScanSnap Home during scanning.

  • When a notification occurs such as an e-mail alert, alarm, or power shortage during scanning, the mobile device connected to ScanSnap will be disconnected and scanning will be canceled.

    In this case, the image created from the scanned document will be kept but you cannot continue scanning the rest of the document.

  • Do not exit ScanSnap Home while receiving a file. Doing so may slow down the next startup because the Scanned data screen takes time to reload.

See also

  • Power for the ScanSnap
  • Displayed Screens on the Touch Panel
  • Before Using This Site
  • How to Use This Site
  • Customer Support
  • Cookie Policy

© PFU Limited 2023-2024

  • TOP