Displayed Screens on the Touch Panel (When Using ScanSnap Go)
When the ScanSnap and a mobile device are connected using ScanSnap Go, the screens displayed on the touch panel allow you to select a profile to be used for scanning documents, or to disconnect the ScanSnap from the mobile device to stop using ScanSnap Go.
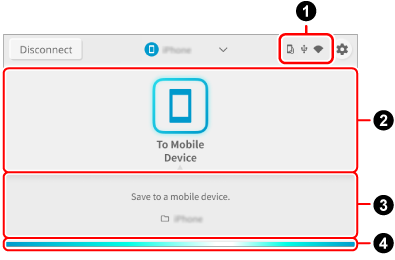
- [Disconnect] button
-
Disconnects the ScanSnap from the mobile device to stop using ScanSnap Go.
- Connection status

Displays the connection statuses of the ScanSnap.

Appears when the ScanSnap can be connected to a mobile device using ScanSnap Go.

Appears when the ScanSnap and the computer are connected via a USB cable.

Appears when the ScanSnap and the mobile device are connected using ScanSnap Go.
- Profile list

-
Displays the profiles that you use when scanning documents with the ScanSnap.
Press the icon of the profile that you want to use to select it.
- Profile information

-
Displays the information of the profile selected on the profile list.
Press
 /
/ at the bottom of the screen or slide up and down the bottom of the screen to switch between the profile information display modes.
- Profile description/save destination information
-
Displays the information of the profile selected in the profile list and save destination for scanned images.

- Scan settings
-
Displays the scan settings configured for the profile.

You can change the scan settings on the screen that appears when you press the scan setting icon.
The scan settings changed on the touch panel are reset to their original settings after documents are scanned.
If you want to always scan documents with the same settings, change the scan settings in ScanSnap Home.
The following scan settings can be changed on the touch panel.
TIPIf you select a profile that uses ScanSnap Cloud, setting items which are not supported by the cloud service that you established a link with are not displayed.
Depending on the combination of setting items, unsupported setting items do not appear.
For example, if one of the following options is set in the ScanSnap Home scan settings, [B & W] does not appear under [Color mode] because it is not supported.
[File format] is set to [JPEG]
[File naming rule] is set to [Name files automatically]
[Extraction of business card information] is set to on (when the document type is "Business Cards")
- File format
-
Select the file format for scanned images.
If you select a profile that is configured to detect a document type automatically,
 is displayed and the settings cannot be changed on the touch panel.
Icon
Parameter
Description

PDF (Single)
This option is displayed when the document type is set to "Documents" and profile that does not use ScanSnap Cloud is selected.
Images of all documents that you scanned are saved as a single PDF file (*.pdf).
PDF
This is displayed when a profile that uses ScanSnap Cloud is selected.
Saves a scanned image in a PDF format (*.pdf).
The page structure of a scanned image differs depending on the document type.
For "Documents" or "Photos"
Images of all documents that you scanned are saved as a single image.
For "Business Cards" or "Receipts"
An image of each document that you scanned is saved as a single image.

PDF (Multiple)
This is displayed when a profile that does not use ScanSnap Cloud is selected.
Saves scanned images that are split into separate files per page in a PDF format (*.pdf).
PDF (create per page)
This is displayed when a profile that uses ScanSnap Cloud is selected.
Saves scanned images that are split into separate files per page in a PDF format (*.pdf).

JPEG
Saves a scanned image in a JPEG format (*.jpg).
- Color modeColor mode setting
-
Select a color mode for scanned images.
If you select a profile that is configured to detect a document type automatically,
 is displayed and the settings cannot be changed on the touch panel.
Icon
Parameter
Description


Auto
Automatically detects the color of each document and scans in color, gray, or black and white.


Color
Always saves the scanned image in color.


Gray
Always saves the scanned image in gray.


B & W
Always saves the scanned image in black and white.
Suitable for scanning black and white documents that only contain text.
- Scanning sideScanning side setting
-
Select a scanning side for documents.
If you select a profile that is configured to detect a document type automatically,
 is displayed and the settings cannot be changed on the touch panel.
Icon
Parameter
Description


Duplex
Scans both sides of a document.


Simplex
Scans only one side of a document.
- Image qualityImage quality setting
-
You can change this setting on the [Setting for current scan] screen that appears when you press
 .
.Select an image quality level (resolution) for scanned images.
If you select a profile that is configured to detect a document type automatically,
 is displayed and the settings cannot be changed on the touch panel.
Scanning speeds vary depending on the image quality.
Icon
Parameter
Description


Auto
Scans documents at an optimal resolution according to the paper size of the documents.
The image quality is determined based on the length of the short side of the document.
When the short side is longer than 115 mm: Better
When the short side is 115 mm or shorter: Best


Normal
A scan is performed at a resolution of 150 dpi when [Color mode] is set to [Color] or [Gray] and 300 dpi when it is set to black and white.
A scan is performed at a resolution of 150 dpi when [Color mode setting] is set to [Color] or [Gray], and 300 dpi when it is set to black and white.


Better
A scan is performed at a resolution of 200 dpi when [Color mode] is set to [Color] or [Gray], and 400 dpi when it is set to black and white.
A scan is performed at a resolution of 200 dpi when [Color mode setting] is set to [Color] or [Gray], and 400 dpi when it is set to black and white.


Best
A scan is performed at a resolution of 300 dpi when [Color mode] is set to [Color] or [Gray], and 600 dpi when it is set to black and white.
A scan is performed at a resolution of 300 dpi when [Color mode setting] is set to [Color] or [Gray], and 600 dpi when it is set to black and white.
- Feed
-
Select a feeding method for scanning documents.
Icon
Parameter
Description

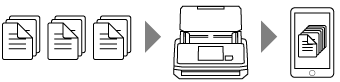
Normal scan
Scanning automatically finishes when all of the documents loaded in the ScanSnap are scanned.


Continuous scan
Scanning documents continues until the [Finish] button is pressed.
You can scan a large number of documents in a single scan.

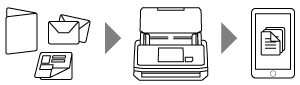
Manual scan
Automatically scans documents loaded one sheet at a time in the ScanSnap until the [Finish] button is pressed.
Multi-layered or thicker documents such as the following can be scanned.
Documents folded in half
Envelopes
Documents with sticky notes attached
Multi-layered documents such as transfer paper
Long page documents such as long receipts
Plastic cards

Manual scan (Front/Back merging)
Automatically scans documents loaded one sheet at a time in the ScanSnap until the [Finish] button is pressed.
When a document larger than a A4/Letter size that is folded in half and meets the following conditions is scanned, the images for the both sides of the document are merged into one image.
Paper size
A3 size
B4 size
Double letter size
There is text, diagram, or a table on the fold line of a folded document.

This is displayed when a profile with the following settings is selected in the ScanSnap Home scan settings.
A cloud service is selected as the save destination for scanned images
[Paper size] is set to [Automatic]
- Scan bar

-
Indicates the status of the ScanSnap.
Blue (light streaming)
If you press the [Scan] button, scanning starts. If you load the next document being scanned, scanning automatically starts
Orange (lit)
Error
Turned off
Cannot scan with the selected profile