Displayed Screens on the Touch Panel
The screens displayed on the touch panel of the ScanSnap are either the home screen to start scanning or the [Settings] screen to check or modify the settings of the ScanSnap.
This section explains the following screens:
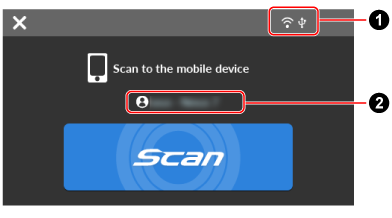
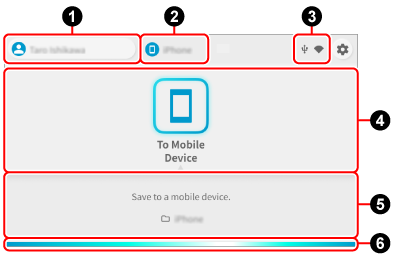
Home Screen When a Mobile Device Is Connected
When you tap ![]() on the Scan screen of ScanSnap Home, the following screen will be displayed.
on the Scan screen of ScanSnap Home, the following screen will be displayed.

-
Disconnects the ScanSnap from the mobile device.
- Connection status

Displays the connection statuses of the ScanSnap.


-
Displays the signal status between a wireless access point and the ScanSnap in three levels.
In the following cases,
 appears.
Searching for a wireless access point
No wireless access point specified
No signal
Displays the signal status between a wireless access point and the ScanSnap in four levels.
When the ScanSnap is searching for a wireless access point or is not connected to a wireless access point,
 appears.

Appears when the ScanSnap and the computer are connected via a USB cable.


Appears when the Wi-Fi connect mode for the ScanSnap is set to Direct Connect mode which connects the scanner and the computer via Wi-Fi without a wireless access point.
If you are in an environment where you cannot establish a connection to a wireless access point, the ScanSnap and the computer or mobile device can be connected directly via Wi-Fi.
- Terminal name

Displays the terminal name of the mobile device that is connected to the ScanSnap.
- [Scan] button
Starts scanning.
When
 is displayed on the [Scan] button, scanning does not start. Follow the message that is displayed when you press to solve the problem.
Home Screen When Linked with a Cloud Service
When you tap ![]() on the Scan screen of ScanSnap Home, the following screen will be displayed.
on the Scan screen of ScanSnap Home, the following screen will be displayed.
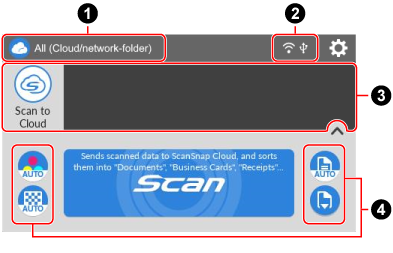
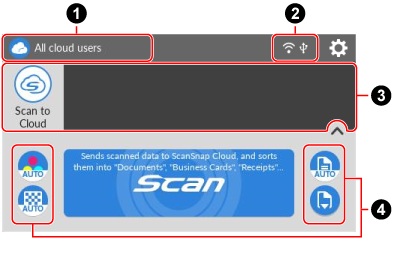
- User icon/User name
-
If a user icon/user name is displayed, press the user icon to display the [Selecting a User] screen and select [All (Cloud/network-folder)].
If a user icon/user name is displayed, press the user icon to display the [Selecting a User] screen and select [All cloud users].
- Connection status
Displays the connection statuses of the ScanSnap.
-
Displays the signal status between a wireless access point and the ScanSnap in three levels.
In the following cases,
appears.Searching for a wireless access point
No wireless access point specified
No signal
Displays the signal status between a wireless access point and the ScanSnap in four levels.
When the ScanSnap is searching for a wireless access point or is not connected to a wireless access point,
appears. Appears when the ScanSnap and the computer are connected via a USB cable.
Appears when the Wi-Fi connect mode for the ScanSnap is set to Direct Connect mode which connects the scanner and the computer via Wi-Fi without a wireless access point.
If you are in an environment where you cannot establish a connection to a wireless access point, the ScanSnap and the computer or mobile device can be connected directly via Wi-Fi.

The [Settings] screen appears. You can specify the settings for the ScanSnap.
When there is a maintenance notification,
 appears on .
- Profile list

Displays the profiles. Select a profile to be used from this list.
Displays up to 30 profiles.
Run your finger over the profile list horizontally to scroll through the profiles. A scroll bar appears under the profile list while you are scrolling through the profiles.
Press the selected profile to display the following information on the [Scan] button:
Description of the profile
Name of the user who created the profile
The information above is displayed when [All users] is set for [Display of profiles] in the [Scanner settings] screen that can be displayed after displaying the [Settings] screen on the touch panel.
TIPProfiles displayed in the profile list can be switched between profiles created only with a computer that is using the ScanSnap and profiles created with all computers that have been connected to the ScanSnap before.
The display settings of profiles in the profile list can be switched from the touch panel. In the [Settings] screen on the touch panel, press [Scanner settings] to display the [Scanner settings] screen, then change the settings for [Display of profiles].
 /
/ 
Switches the display of the profile list.
Displays a profile name of the selected profile in the profile list.
By pressing the displayed profile name, the following information is displayed:
Description of the profile
Name of the user who created the profile
The information above is displayed when [All users] is set for [Display of profiles] in the [Scanner settings] screen that can be displayed after displaying the [Settings] screen on the touch panel.
- Section to display and modify the scan settings

-
Displays the scan settings for the selected profile. Press each icon to display the Scan settings screen where you can change the scan settings temporarily. Scanning a document will return the scan settings back to the settings before any changes are made.
If you want to always scan documents with the same settings, change the scan settings in ScanSnap Home.
The following scan settings can be changed on the touch panel.
TIPA setting item which is not supported by a cloud service that you established a link with is not displayed.
- Color modeColor mode setting
-
Select a color mode for scanned images.
If you select a profile that is configured to detect a document type automatically,
 is displayed and the settings cannot be changed on the touch panel.
Icon
Parameter
Description


Auto
Automatically detects the color of each document and scans in color, gray, or black and white.


Color
Always saves the scanned image in color.


Gray
Always saves the scanned image in gray.


B & W
Always saves the scanned image in black and white.
Suitable for scanning black and white documents that only contain text.
- Scanning sideScanning side setting
-
Select a scanning side for documents.
If you select a profile that is configured to detect a document type automatically,
 is displayed and the settings cannot be changed on the touch panel.
Icon
Parameter
Description


Duplex
Scans both sides of a document.


Simplex
Scans only one side of a document.
- Image qualityImage quality setting
-
You can change this setting on the [Setting for current scan] screen that appears when you press
 .
.Select an image quality level (resolution) for scanned images.
If you select a profile that is configured to detect a document type automatically,
 is displayed and the settings cannot be changed on the touch panel.
Scanning speeds vary depending on the image quality.
Icon
Parameter
Description


Auto
Scans documents at an optimal resolution according to the paper size of the documents.
The image quality is determined based on the length of the short side of the document.
When the short side is longer than 115 mm: Better
When the short side is 115 mm or shorter: Best


Normal
A scan is performed at a resolution of 150 dpi when [Color mode] is set to [Color] or [Gray] and 300 dpi when it is set to black and white.
A scan is performed at a resolution of 150 dpi when [Color mode setting] is set to [Color] or [Gray], and 300 dpi when it is set to black and white.


Better
A scan is performed at a resolution of 200 dpi when [Color mode] is set to [Color] or [Gray], and 400 dpi when it is set to black and white.
A scan is performed at a resolution of 200 dpi when [Color mode setting] is set to [Color] or [Gray], and 400 dpi when it is set to black and white.


Best
A scan is performed at a resolution of 300 dpi when [Color mode] is set to [Color] or [Gray], and 600 dpi when it is set to black and white.
A scan is performed at a resolution of 300 dpi when [Color mode setting] is set to [Color] or [Gray], and 600 dpi when it is set to black and white.
- Feed mode setting
-
Select a feeding method for scanning documents.
Icon
Parameter
Description

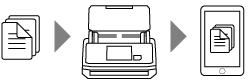
Normal scan
Scanning automatically finishes when all of the documents loaded in the ScanSnap are scanned.

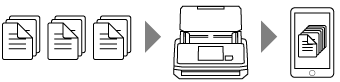
Continuous scan
Scanning documents continues until the [Finish] button is pressed.
You can scan a large number of documents in a single scan.

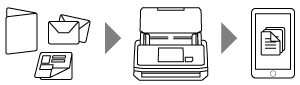
Manual scan
Automatically scans documents loaded one sheet at a time in the ScanSnap until the [Finish] button is pressed.
Scan with [Manual scan] for documents that have overlapping areas, long page documents, or thick documents, such as the following documents:
Documents folded in half
Envelopes
Documents with sticky notes attached
Multi-layered documents such as transfer paper
Long page documents such as long receipts
Plastic cards
TIP-
When a destination cloud service is displayed for each document type in the Cloud settings screen in ScanSnap Home, the icons shown below are displayed. These icons are not changed even if the color mode, scanning side, or image quality is changed in the scan settings.
 (Color mode setting)
 (Scanning side setting)
 (Image quality setting)
When a destination cloud service is displayed for each document type in the Cloud settings screen in ScanSnap Home, the [Setting for each document type] button is displayed in the Scan settings screen. To change the scan settings for each document type, select one of the document type tabs that appear when you press the [Setting for each document type] button and change the settings.
- [Scan] button
Starts scanning.
When
is displayed on the [Scan] button, scanning does not start. Follow the message that is displayed when you press to solve the problem.
Home screen
On the home screen, you can perform the following:
Selecting a profile that you use when scanning documents
Changing the scan settings temporarily for a profile
Switching the user using the ScanSnap and mobile device connected to the ScanSnap
Checking the ScanSnap connection status
- User name
-
Displays the user name of the mobile device that is connected to the ScanSnap.
Pressing the user name displays the [Selecting a User] screen.
- [Selecting a User] screen
-
In the [Selecting a User] screen, user names of the mobile devices that have been connected to the ScanSnap before are displayed in the list. Selecting a user name in the list will switch the mobile device connected to the ScanSnap.
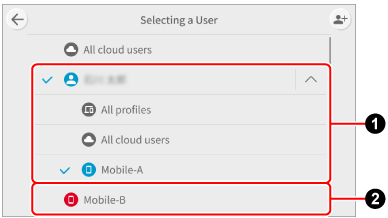
The user name of the mobile device that appears on the [Selecting a User] screen varies as shown below depending on whether the mobile device is signed in to a ScanSnap account.
For regions where ScanSnap accounts can be used, refer to here.
When the mobile device is signed in to a ScanSnap account

ScanSnap account name
If multiple mobile devices are signed in to the same ScanSnap account, the device name appears under the account name.
When the mobile device is not signed in to a ScanSnap account

Mobile device name

-
The [Selecting a User] screen switches to the edit mode.
User names can be sorted or deleted.

-
Displays the [Install the app] screen.
Shows the information which is necessary for connecting the ScanSnap to a mobile device.
- Device name
-
If the user name displayed in
is a ScanSnap account name, the device name of the connected mobile device will be displayed.If the ScanSnap has been connected to multiple mobile devices that are signed in to the same ScanSnap account, on the screen that appears when you press the device name, you can switch between the mobile devices and select the device that you want to use to connect to the ScanSnap.
- Connection status
Displays the connection statuses of the ScanSnap.

Appears when the ScanSnap can be connected to a mobile device using ScanSnap Go.
-
Displays the signal status between a wireless access point and the ScanSnap in three levels.
In the following cases,
appears.Searching for a wireless access point
No wireless access point specified
No signal
Displays the signal status between a wireless access point and the ScanSnap in four levels.
When the ScanSnap is searching for a wireless access point or is not connected to a wireless access point,
appears. Appears when the ScanSnap and the computer are connected via a USB cable.
Appears when the Wi-Fi connect mode for the ScanSnap is set to Direct Connect mode which connects the scanner and the computer via Wi-Fi without a wireless access point.
If you are in an environment where you cannot establish a connection to a wireless access point, the ScanSnap and the computer or mobile device can be connected directly via Wi-Fi.

-
The [Settings] screen appears. You can specify the settings for the ScanSnap.
When there is a maintenance notification,
appears on . - Profile list
-
Displays the profiles that you use when scanning documents with the ScanSnap.
You can perform the following with the profile list:
Selecting a profile
Press the icon of the profile that you want to use to select it.
Sorting profiles
Hold down the profile icon you want to change the order of until the home screen changes to the [Sort] screen, then drag it.
When the operation is complete, press the [Complete] button.
If [Privacy mode] is set to [Enable] on the [Scanner settings] screen of the touch panel, profiles cannot be sorted.
- Profile information

-
Displays the information of the profile selected on the profile list.
Press
 /
/ at the bottom of the screen or slide up and down the bottom of the screen to switch between the profile information display modes.
- Profile description/save destination information
-
Displays the information of the profile selected in the profile list and save destination for scanned images.

- Scan settings
-
Displays the scan settings configured for the profile.
You can change the scan settings on the screen that appears when you press the scan setting icon.
The scan settings changed on the touch panel are reset to their original settings after documents are scanned.
If you want to always scan documents with the same settings, change the scan settings in ScanSnap Home.
The following scan settings can be changed on the touch panel.
TIPIf you select a profile that uses ScanSnap Cloud, setting items which are not supported by the cloud service that you established a link with are not displayed.
Depending on the combination of setting items, unsupported setting items do not appear.
For example, if one of the following options is set in the ScanSnap Home scan settings, [B & W] does not appear under [Color mode] because it is not supported.
[File format] is set to [JPEG]
[File naming rule] is set to [Name files automatically]
[Extraction of business card information] is set to on (when the document type is "Business Cards")
- File format
-
Select the file format for scanned images.
If you select a profile that is configured to detect a document type automatically,
 is displayed and the settings cannot be changed on the touch panel.
Icon
Parameter
Description

PDF (Single)
This option is displayed when the document type is set to "Documents" and profile that does not use ScanSnap Cloud is selected.
Images of all documents that you scanned are saved as a single PDF file (*.pdf).
PDF
This is displayed when a profile that uses ScanSnap Cloud is selected.
Saves a scanned image in a PDF format (*.pdf).
The page structure of a scanned image differs depending on the document type.
For "Documents" or "Photos"
Images of all documents that you scanned are saved as a single image.
For "Business Cards" or "Receipts"
An image of each document that you scanned is saved as a single image.

PDF (Multiple)
This is displayed when a profile that does not use ScanSnap Cloud is selected.
Saves scanned images that are split into separate files per page in a PDF format (*.pdf).
PDF (create per page)
This is displayed when a profile that uses ScanSnap Cloud is selected.
Saves scanned images that are split into separate files per page in a PDF format (*.pdf).

JPEG
Saves a scanned image in a JPEG format (*.jpg).
- Color modeColor mode setting
-
Select a color mode for scanned images.
If you select a profile that is configured to detect a document type automatically,
is displayed and the settings cannot be changed on the touch panel.Icon
Parameter
Description
Auto
Automatically detects the color of each document and scans in color, gray, or black and white.
Color
Always saves the scanned image in color.
Gray
Always saves the scanned image in gray.
B & W
Always saves the scanned image in black and white.
Suitable for scanning black and white documents that only contain text.
- Scanning sideScanning side setting
-
Select a scanning side for documents.
If you select a profile that is configured to detect a document type automatically,
is displayed and the settings cannot be changed on the touch panel.Icon
Parameter
Description
Duplex
Scans both sides of a document.
Simplex
Scans only one side of a document.
- Image qualityImage quality setting
-
You can change this setting on the [Setting for current scan] screen that appears when you press
.Select an image quality level (resolution) for scanned images.
If you select a profile that is configured to detect a document type automatically,
is displayed and the settings cannot be changed on the touch panel.Scanning speeds vary depending on the image quality.
Icon
Parameter
Description
Auto
Scans documents at an optimal resolution according to the paper size of the documents.
The image quality is determined based on the length of the short side of the document.
When the short side is longer than 115 mm: Better
When the short side is 115 mm or shorter: Best
Normal
A scan is performed at a resolution of 150 dpi when [Color mode] is set to [Color] or [Gray] and 300 dpi when it is set to black and white.
A scan is performed at a resolution of 150 dpi when [Color mode setting] is set to [Color] or [Gray], and 300 dpi when it is set to black and white.
Better
A scan is performed at a resolution of 200 dpi when [Color mode] is set to [Color] or [Gray], and 400 dpi when it is set to black and white.
A scan is performed at a resolution of 200 dpi when [Color mode setting] is set to [Color] or [Gray], and 400 dpi when it is set to black and white.
Best
A scan is performed at a resolution of 300 dpi when [Color mode] is set to [Color] or [Gray], and 600 dpi when it is set to black and white.
A scan is performed at a resolution of 300 dpi when [Color mode setting] is set to [Color] or [Gray], and 600 dpi when it is set to black and white.
- Feed
-
Select a feeding method for scanning documents.
Icon
Parameter
Description

Normal scan
Scanning automatically finishes when all of the documents loaded in the ScanSnap are scanned.

Continuous scan
Scanning documents continues until the [Finish] button is pressed.
You can scan a large number of documents in a single scan.

Manual scan
Automatically scans documents loaded one sheet at a time in the ScanSnap until the [Finish] button is pressed.
Multi-layered or thicker documents such as the following can be scanned.
Documents folded in half
Envelopes
Documents with sticky notes attached
Multi-layered documents such as transfer paper
Long page documents such as long receipts
Plastic cards

Manual scan (Front/Back merging)
Automatically scans documents loaded one sheet at a time in the ScanSnap until the [Finish] button is pressed.
When a document larger than a A4/Letter size that is folded in half and meets the following conditions is scanned, the images for the both sides of the document are merged into one image.
Paper size
A3 size
B4 size
Double letter size
There is text, diagram, or a table on the fold line of a folded document.

This is displayed when a profile with the following settings is selected in the ScanSnap Home scan settings.
A cloud service is selected as the save destination for scanned images
[Paper size] is set to [Automatic]
- Long page scan
-
You can change this setting on the [Setting for current scan] screen that appears when you press
.Icon
Parameter
Description

Enable
Enables scanning of long page documents longer than 500 mm (19.6 in.).

Disable
Disables scanning of long page documents.
However, even if this setting is disabled, you can still scan long page documents by holding down the [Scan] button on the ScanSnap for 3 seconds or longer.
- Scan bar

-
Indicates the status of the ScanSnap.
Blue (light streaming)
If you press the [Scan] button, scanning starts. If you load the next document being scanned, scanning automatically starts
Orange (lit)
Error
Turned off
Cannot scan with the selected profile
[Settings] screen
The [Settings] screen is the screen in which you can check the ScanSnap, Wi-Fi, and maintenance information, and specify settings.


Returns to the home screen.
- Maintenance

Displays the [Maintenance] screen.
The following operations can be performed in the [Maintenance] screen.
-
Specifying the setting to notify you with the dust detection function when the scanner detects dirt on the glass which causes vertical streaks on scanned images
However, the dust detection does not detect all dirt. If vertical streaks appear on scanned images, clean the glass inside the ScanSnap regardless of whether the dust detection notifies you or not.
Specifying the setting to notify you when the scanner detects dirt on the glass which causes vertical streaks on scanned images
Checking when to replace consumables
Starting the cleaning operation for the feed rollers and eject rollers
Updating the firmware to a newer version
In the following cases,
appears on the [Maintenance] icon.In the following cases,
appears on .In the following cases,
appears on .When dirt on the glass is detected
When the scanned page count exceeded the replacement cycle
When a newer version of firmware is released
-
- Scanner settings

Displays the [Scanner settings] screen.
The following operations can be performed in the [Scanner settings] screen.
Checking the information on the ScanSnap, Wi-Fi, or network
Setting the following items
Name of the ScanSnap
Whether or not to display the results of saving scanned images to a cloud service
Startup mode
Auto power off
Brightness of the touch panel
Privacy mode
Method for displaying profiles
Language displayed on the touch panel
USB operation
Initializing profiles that are saved on the ScanSnap
Resetting the ScanSnap settings
For details about the ScanSnap settings that will be reset and the procedure for resetting them, refer to Resetting the ScanSnap Settings.
- Wireless settings

Displays the [Wireless settings] screen.
The following operations can be performed in the [Wireless settings] screen.
Displays the [Wi-Fi settings] screen.
The following operations can be performed in the [Wi-Fi settings] screen.
Switching the Wi-Fi connect mode for connecting the ScanSnap to a computer or mobile device
Modifying the settings for each connect mode
Checking the information such as the Wi-Fi connection status and the signal strength
Setting whether to enable ScanSnap Go
Modifying the settings for using a network folder
The feature to save scanned images directly from the ScanSnap to a network folder is available in ScanSnap Home for Windows/Mac.
Resetting the Wi-Fi settings that are configured for the ScanSnap
If there is a device with the same IP address as the ScanSnap on the network,
is displayed on the [Wireless settings] icon.When there is a device with the same IP address as that of the ScanSnap on the network,
is displayed on .- Install the app

-
Displays the [Install the app] screen.
Shows the information which is necessary for connecting the ScanSnap to a mobile device.
Displays the [Connecting Devices] screen.
Shows the following information which is necessary for connecting the scanner to a new mobile device.
The displayed information varies depending on the connection method for the ScanSnap.
Scanner name
IP address
Network name (SSID)
Security key
- Help

Displays the [Help] screen.
Displays the following information.
Reference web page for the ScanSnap manuals
How to scan documents with the ScanSnap
Displays the [Help] screen.
Shows the reference page of the ScanSnap manual.