Power for the ScanSnap
This section explains the power statuses (on, off, startup mode, and sleep mode) of the ScanSnap and the auto power off function. This section explains the power statuses (on, off, and sleep mode) of the ScanSnap and the auto power off function. This section explains the power statuses (on, off, and sleep mode) of the ScanSnap.
Turning on and Turning off the ScanSnap
- Turning the ScanSnap on
-
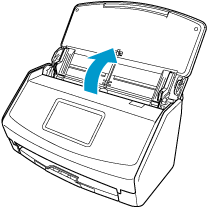
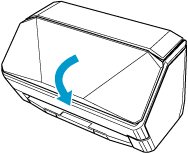
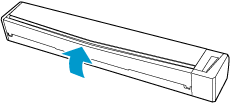
Open the ADF paper chute (cover) of the ScanSnap to turn the power on.
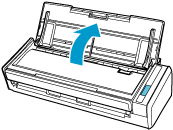
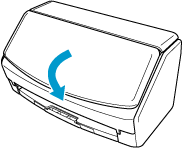
Open the feed guide of the ScanSnap to turn the power on.
Press the [Scan] button
 or [Stop] button
  on the ScanSnap to turn the power on.


- Turning the ScanSnap on
-
The ScanSnap is turned on by performing one of the following operations.
Holding the right side of the ADF paper chute (cover)
to open itOpen the ADF paper chute (cover) fully so that the [Scan] button
 lights up in blue.
When the ADF paper chute (cover) is opened, the extension
will rise automatically.
Pressing the [Scan] button

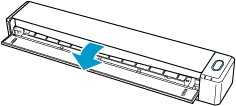
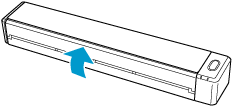
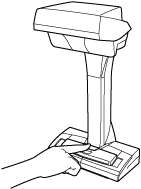
Inserting a document into the manual feeder
When a document is inserted into the manual feeder, the document is fed into the ScanSnap and is held firmly.
If you press the [Scan] button with the document held firmly in the ScanSnap, it starts scanning.
 TIP
TIPIf the ScanSnap has been set to turn on by inserting a document into the manual feeder, inserting a document such as a semi-transparent document (e.g. tracing paper), thin document, or transparent sheet may not turn on the ScanSnap.
If the ScanSnap is not turned on, perform one of the following to turn it on.
Opening the ADF paper chute (cover)
Pressing the [Scan] button
- Turning the ScanSnap off
-
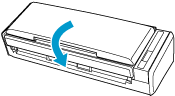
Close the ADF paper chute (cover) of the ScanSnap to turn the power off.
When the ADF paper chute (cover) is closed, the extension will return to the original position in the ADF paper chute (cover) automatically.
Close the feed guide of the ScanSnap to turn the power off.
The ScanSnap is turned off by pressing the [Stop] button for more than 3 seconds until the power LED of the ScanSnap is turned off.

 TIP
TIP-
When the ScanSnap is connected to a computer via a USB cable and [Connection settings] is set to [Wi-Fi off] in the [Wireless settings] screen on the touch panel, if the following operations are performed on the computer, the ScanSnap is turned off.
When the ScanSnap is connected to a computer via a USB cable and [Wi-Fi connect mode] is set to [Wi-Fi off] in the [Wi-Fi settings] screen on the touch panel, if the following operations are performed on the computer, the ScanSnap is turned off.
When the ScanSnap is connected to a computer via a USB cable and the Wi-Fi switch on the ScanSnap is turned off, if the following operations are performed on the computer, the ScanSnap is turned off.
If the following operations are performed on the computer connected to the ScanSnap, the ScanSnap is turned off.
Disconnecting the USB cable from the computer
Turning off the computer
Press
 → [Wireless settings] in the home screen on the touch panel to display the [Wireless settings] screen.
Press
 →
→  in the home screen on the touch panel to display the [Wi-Fi settings] screen.
Connect the USB cable to the computer or turn on the computer to turn on the ScanSnap again.
Press the [Scan] button or the [Stop] button on the ScanSnap to turn on the ScanSnap again.
-
Startup mode of the ScanSnap
The action that the ScanSnap takes when the ADF paper chute (cover) is opened and the ScanSnap is turned on depends on the start up mode setting of the ScanSnap.
The ScanSnap has two startup modes as described below.
- Fast
The ScanSnap is ready to be used. The ScanSnap enters sleep mode (standby mode) when the ADF paper chute (cover) is closed.
ATTENTIONSetting the startup mode of the ScanSnap to [Fast] disables the auto power off function, resulting in increased energy consumption.
- Normal
The ScanSnap is turned on. The ScanSnap is turned off when the ADF paper chute (cover) is closed.
The procedure to change the setting for the startup mode of the ScanSnap is as follows:
-
Press
in the home screen on the touch panel of the ScanSnap to display the [Settings] screen.Press
in the home screen on the touch panel of the ScanSnap to display the [Settings] screen. -
Press
 to display the [Scanner settings] screen.
Press [Scanner settings] to display the [Scanner settings] screen.
Press [Startup Mode] to display the [Startup Mode] screen.
Change the setting.
-
Press
 to return to the home screen.
Press
 to return to the home screen.
Windows
Display the Scan Window of ScanSnap Home.
Select [Preferences] in the menu that appears when you click
 at the top of the scan window to display the preferences window.
Click the [Power settings] button in [Scanner information] in the [Scanner] tab to display the [Power settings] window.
Change the settings for [Startup Mode] and then click the [OK] button.
Click the [OK] button to close the preferences window.
macOS
Display the Scan Window of ScanSnap Home.
Select [Preferences] in the menu that appears when you click
at the top of the scan window to display the preferences window.Click the [Power settings] button in [Scanner information] in the [Scanner] tab to display the [Power settings] window.
Change the settings for [Startup Mode] and then click the [OK] button.
Click
 at the top of the window to close the preferences window.
Sleep mode of the ScanSnap
When the ScanSnap is on and has not been used for 10 minutes, it enters sleep mode (standby mode).
When the ScanSnap is on and has not been used for 15 minutes, it enters sleep mode (standby mode).
When the ScanSnap is on and has not been used for one minute, it enters sleep mode (standby mode).
Perform one of the following to resume the ScanSnap from sleep mode (standby mode).
Load a document in the ScanSnap
Load documents in the ADF paper chute (cover) or insert a document into the manual feeder
Press the touch panel of the ScanSnap
Press the [Scan] button on the ScanSnap
Press the [Stop] button on the ScanSnap
Press the [Scan/Stop] button on the ScanSnap
Close the ADF paper chute (cover) and open it again
Close the feed guide and open it again
Auto power off for the ScanSnap
When the ScanSnap is turned on and left unused for a specified time, it turns off automatically.
Perform one of the following to turn on the ScanSnap.
Perform one of the following to turn on the ScanSnap.
Press the touch panel of the ScanSnap
Press the [Scan] button on the ScanSnap
Press the [Scan] button on the ScanSnap
Press the [Stop] button on the ScanSnap
Press the [Scan/Stop] button on the ScanSnap
Close the ADF paper chute (cover) and open it again
Close the feed guide and open it again
-
When the startup mode of the ScanSnap is set to [Fast], the auto power off function is disabled, resulting in increased energy consumption.
-
In the following cases, the auto power off function is disabled, resulting in increased energy consumption.
The startup mode of the ScanSnap is set to [Fast]
The auto power off function for the ScanSnap is set to [Never]
-
Setting the auto power off function for the ScanSnap to [Never] disables the auto power off function, resulting in increased energy consumption.
In the following cases, regardless of the setting for the time of the ScanSnap to turn off automatically, the ScanSnap is turned off automatically after it is left unused for one minute.
The ADF paper chute (cover) of the ScanSnap is closed
The startup mode of the ScanSnap is set to [Normal]
To change the time of the ScanSnap to turn off automatically, perform the operations in the following procedure:
To change the time of the ScanSnap to turn off automatically or change the setting so that it will not turn off automatically, perform the operations in the following procedure:
-
Press
in the home screen on the touch panel of the ScanSnap to display the [Settings] screen.Press
in the home screen on the touch panel of the ScanSnap to display the [Settings] screen. -
Press
to display the [Scanner settings] screen.Press [Scanner settings] to display the [Scanner settings] screen.
Press [Automatic power off] to display the [Automatic power off] screen.
-
Press the setting field for [ScanSnap will automatically power off] to display a list.
Press the setting field for [ScanSnap will automatically power off] to display a list.
Change the setting.
-
Press
to return to the home screen.Press
to return to the home screen.
Windows
Display the Scan Window of ScanSnap Home.
Select [Preferences] in the menu that appears when you click
at the top of the scan window to display the preferences window.Click the [Power settings] button in [Scanner information] in the [Scanner] tab to display the [Power settings] window.
Change the settings for [Automatic power off time] and then click the [OK] button.
Click the [OK] button to close the preferences window.
macOS
Display the Scan Window of ScanSnap Home.
Select [Preferences] in the menu that appears when you click
at the top of the scan window to display the preferences window.Click the [Power settings] button in [Scanner information] in the [Scanner] tab to display the [Power settings] window.
Change the settings for [Automatic power off time] and then click the [OK] button.
Click
at the top of the window to close the preferences window.