Loading Documents Larger than A4 or Letter Size (While Linking with a Cloud Service)
When scanning an A3, B4, or Double Letter size document, fold the document in half and load it directly in the ScanSnap, or load the document using the Carrier Sheet. When scanning an A3, B4, or Double Letter size document, fold the document in half and insert it directly into the manual feeder of the ScanSnap, or insert the document using the Carrier Sheet. When scanning an A3, B4, or Double Letter size document, insert the document into the ScanSnap using the Carrier Sheet.
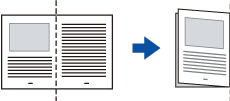
When a document folded in half is scanned, the images scanned for the left and right pages of the document are merged automatically.
-
Scanning documents larger than A4/Letter size is only available for Return Scan, in which a document is inserted into the manual feeder and scanned.
For details about documents that can be scanned with Return Scan, refer to Documents That Can Be Scanned with the ScanSnap in the ScanSnap Help.
- Load a document in the ScanSnap.
- When loading a document directly in the ScanSnap
-
HINT
-
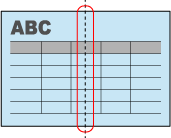
Scanned images are automatically merged only when there is text, diagram, or a table on the fold line of the folded document.
Document whose scanned images are merged automatically
Document whose scanned images are not merged automatically
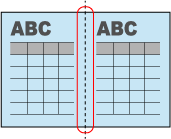
For a document whose scanned images are not merged automatically, you can use the optional Carrier Sheet to scan the document and merge the scanned images automatically.
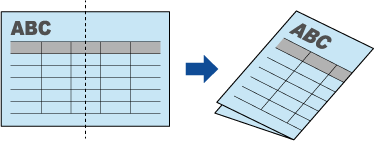
Fold the document in half with the sides to be scanned facing out.
 ATTENTION
Fold the long side of the document in half. If the left and right areas of the folded document are different in size from each other, the scanned images may not be merged automatically.
-
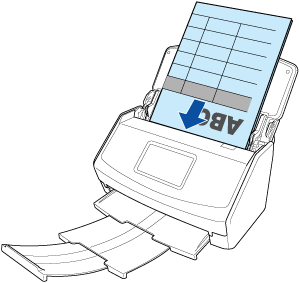
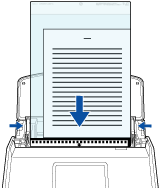
Load the document in the ADF paper chute (cover).
-
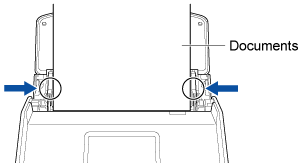
Align the side guides with both ends of the document.
Hold each side guide in the middle to adjust them. Otherwise, the documents may be fed skewed.
-
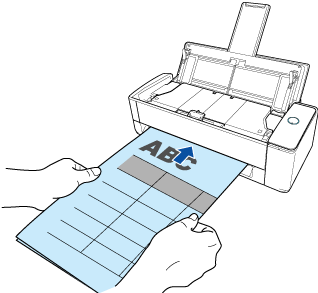
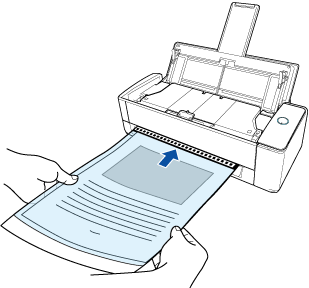
Insert the top end of the document straight into the middle of the manual feeder.
Make sure that the document is fed into the ScanSnap and is held firmly.
 ATTENTION
-
The document comes out from the back of the ScanSnap during the scan.
Leave space (about the length of the document) at the back of the ScanSnap.
HINTYou can scan a document with the ADF paper chute (cover) closed.
-
-
- When loading a document using the Carrier Sheet
-
-
Fold the document in half with the side to be scanned facing out.
Fold it tightly and smooth out any creases.
-
Open the Carrier Sheet to bind the document.
Note that the front side of the Carrier Sheet has a black and white pattern at the top and a thick vertical line in the upper right-hand corner.
Align the top and the fold line of the document with the Carrier Sheet so that there is no space in the upper right-hand corner of the Carrier Sheet.

-
Load the Carrier Sheet with the end which has the black and white pattern as the leading edge in the ADF paper chute (cover).
Align the side guides with both ends of the Carrier Sheet.
-
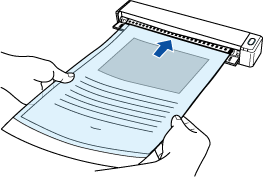
Insert the part with the black and white pattern straight into the manual feeder of the ScanSnap, with the front side of the Carrier Sheet facing up.
Make sure that the Carrier Sheet is fed into the ScanSnap and is held firmly.
 ATTENTION
The document comes out from the back of the ScanSnap during the scan.
Leave space (about the length of the Carrier Sheet) at the back of the ScanSnap.
HINTYou can scan a document with the ADF paper chute (cover) closed.
-
-
Fold the document in half with the side to be scanned facing out.
Fold it tightly and smooth out any creases.
-
Open the Carrier Sheet to bind the document.
Note that the front side of the Carrier Sheet has a black and white pattern at the top and a thick vertical line in the upper right-hand corner.
Align the top and the fold line of the document with the Carrier Sheet so that there is no space in the upper right-hand corner of the Carrier Sheet.
-
Insert the part with the black and white pattern straight into the feeding section of the ScanSnap, with the front side of the Carrier Sheet facing up.
Make sure that the Carrier Sheet is fed into the ScanSnap and is held firmly.
 ATTENTION
Scanning the Carrier Sheet with the output guide of the ScanSnap open causes a paper jam. Scan the Carrier Sheet with the output guide closed.
