This website is designed to be used with ScanSnap Home 1.4.
If you are using ScanSnap Home 2.0 or later, refer to here.
A "Paper jam" Message Is Displayed
If a "Paper jam" message is displayed when an image created from the document that you scanned with the ScanSnap is saved to a cloud service, the issue may be caused by the following:
The documents were not loaded correctly.
Thick paper or a thick card was scanned while the output guide was open.
Thin paper, a newspaper clipping, or a document that may be difficult to feed was scanned.
A thick plastic card was scanned.
For details about the documents that can be scanned, refer to Documents That Can Be Scanned with the ScanSnap.
When scanning a long page document that is longer than the standard size, set the feed mode setting to [Manual Scan].
In addition, press the [Scan] button on the ScanSnap for three seconds or longer to scan the document.
To scan a long page document that is longer than the standard size, select [Normal] or [Better] for the image quality in the scan settings.
In addition, press the [Scan] button on the ScanSnap for three seconds or longer until the button flashes in blue to scan the document with U-turn Scan.
For details, refer to Loading Long Page Documents Exceeding Standard Size.
Remove the jammed document by referring to the following video.
Be careful not to touch any sharp parts upon removing jammed documents. This may cause injury.
Be careful not to get your accessories (for example, ties and necklaces) or hair caught inside the ScanSnap. This may cause injury.
The glass surface may become extremely hot during operation. Be careful not to burn yourself.
When the ADF top section is closed, the sound of the roller rotating comes out.
After the sound stops, load the removed document again and resume scanning.
Open the ADF top section to remove the jammed document by referring to the following video.
For Return Scan, in which a document is inserted into the manual feeder and scanned, also open the ADF top section, and remove the jammed document.
Be careful not to touch any sharp parts upon removing jammed documents. This may cause injury.
Be careful not to get your accessories (for example, ties and necklaces) or hair caught inside the ScanSnap. This may cause injury.
The glass surface may become extremely hot during operation. Be careful not to burn yourself.
When the ADF top section is closed, the sound of the roller rotating comes out.
If the stacker does not return to the original place automatically, open the ADF paper chute (cover) again and close it.
When the error is cleared, the [Scan] button flashes in purple twice.
Load the removed document again, and press the [Scan] button to resume scanning.
To finish scanning, press the [Scan] button without loading the document again after the error is cleared.
The images that are scanned before the error occurs are saved to a cloud service.
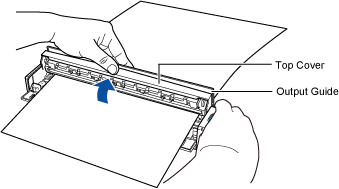
Do not use force to pull out the jammed document, and make sure to open the top cover first and then remove the document.
Be careful not to get your accessories (for example, ties and necklaces) or hair caught inside the ScanSnap. This may cause injury.
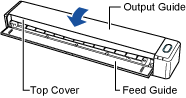
Open the top cover and the output guide.
If you are using the output guide, open the top cover only.
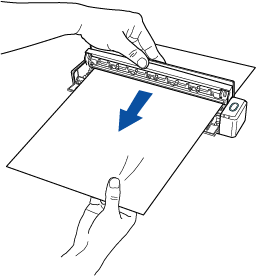
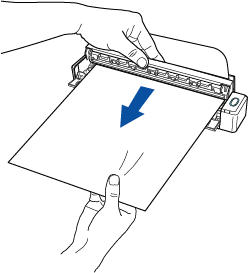
Remove the jammed document.
When the output guide is not used
When the output guide is used
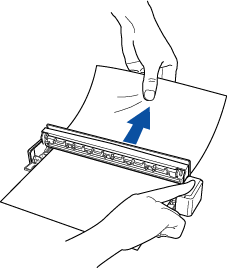
TIPIf the document is difficult to pull out, close the top cover slightly.
If you still cannot remove the document, press the [Scan/Stop] button on the ScanSnap for more than 4 seconds while keeping the top cover open.
This rotates the feed roller and the eject roller, which will help you remove the document easier (rollers keep rotating while the button is being held down).
Close the top cover and the output guide until they lock in place.
 ATTENTION
Make sure that the top cover is completely closed.
Otherwise, paper jams or other feeding errors, or image faults may occur.
When the error is cleared, the [Scan/Stop] button flashes in purple twice.
TIPThe [Scan/Stop] button may flash in blue when the error is cleared. In such a case, wait for a while for the button to flash in purple twice.
-
Insert the document again, and press the [Scan/Stop] button.
Scanning is resumed.
TIPTo finish scanning, press the [Scan/Stop] button without inserting the document again after the error is cleared.
The images that are scanned before the error occurs are saved to a cloud service.