Selecting Operations from the Quick Menu
The Quick Menu will allow you to start using the ScanSnap right away even if it is your first time.
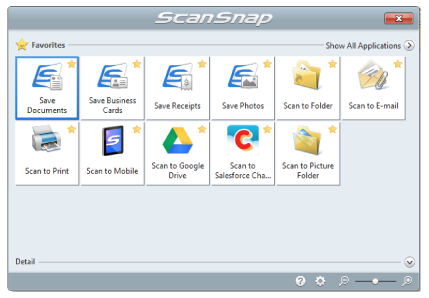
Select an application from the Quick Menu to perform the following desired operations:
Using Scanned Images
Share the Scanned Document Files with Others.
 Scan to Folder
- Save the scanned image directly in a shared folder on a network after scanning, share the scanned image with others and inform them of the destination folder path by an e-mail message automatically created with the path stated.
Send Document Files to Others via E-mail.
 Scan to E-mail
- Send an e-mail message to others with the scanned image file attached.ATTENTION
Up to ten files can be attached to an e-mail message.
When you scan more than one document with the scan settings shown below, multiple files are created. Pay attention to the number of documents to scan:
- File format: JPEG (*.jpg)
- [Generate one PDF file per (n) page(s)] checkbox is selected
Make Copies of a Paper Document.
 Scan to Print
- Print the scanned image with a printer.
Save Scanned Documents to a Mobile Device.
 Scan to Mobile
- Save the scanned image to a mobile device connected to the computer.
You can access the saved files through an application that can view PDF or JPEG files.
Displayed when .NET Framework 3.0 is installed.
Note that .NET Framework 3.0 is also included in .NET Framework 3.5 (SP1 or later). It is recommended to install the latest update in the operating system and use .NET Framework 3.5 (SP1 or later).
If .NET Framework 4 or later is already installed, you need to install .NET Framework 3.0 separately because .NET Framework 3.0 is not included in .NET Framework 4 or later version.
Convert Catalogs and Pamphlets into Digital Data and Save Them.
 Scan to Picture Folder
- Save scanned images of catalogs and pamphlets directly into your Pictures folder.
Linking with Applications
Organize and Manage the Scanned Document Files.
 Save Documents
- Scanned Images are saved in ScanSnap Home as content data records with [Documents] as the document type. Content data records can be organized or managed in ScanSnap Home.
This is displayed when the following conditions are met.
- ScanSnap Home is installed
- ScanSnap Organizer, CardMinder, or ScanSnap Receipt is not installed
ATTENTION- If both ScanSnap Manager and ScanSnap Home are installed, ScanSnap Home cannot be used to scan documents.
- To use ScanSnap Home, you need to activate a license beforehand.
For details about how to activate a license, refer to here in the ScanSnap Home Help.
 ScanSnap Organizer
- Save the scanned images in a folder specified in ScanSnap Organizer, allowing you to organize and manage the scanned images in ScanSnap Organizer.
Displayed when ScanSnap Organizer is installed.
File and Organize a Large Number of Business Cards.
 Save Business Cards
- Scanned Images are saved in ScanSnap Home as content data records with [Business Cards] as the document type. Content data records can be organized or managed in ScanSnap Home.
This is displayed when the following conditions are met.
- ScanSnap Home is installed
- ScanSnap Organizer, CardMinder, or ScanSnap Receipt is not installed
ATTENTION- If both ScanSnap Manager and ScanSnap Home are installed, ScanSnap Home cannot be used to scan documents.
- To use ScanSnap Home, you need to activate a license beforehand.
For details about how to activate a license, refer to here in the ScanSnap Home Help.
 Scan to CardMinder
- Store and manage business cards in CardMinder.
Displayed when CardMinder is installed.
HINTWhen CardMinder is used for the linkage function, it is recommended that you select [Automatic resolution] or [Best] for [Image quality] on the [Scanning] tab of the ScanSnap setup window. ScanSnap Manager cannot link with CardMinder when [Image quality] is set to [Excellent].
Digitize Photos to Create an Album.
 Save Photos
Scanned Images are saved in ScanSnap Home as content data records with [Photos] as the document type. Content data records can be organized or managed in ScanSnap Home.
This is displayed when the following conditions are met.
- ScanSnap Home is installed
- ScanSnap Organizer, CardMinder, or ScanSnap Receipt is not installed
ATTENTION- If both ScanSnap Manager and ScanSnap Home are installed, ScanSnap Home cannot be used to scan documents.
- To use ScanSnap Home, you need to activate a license beforehand.
For details about how to activate a license, refer to here in the ScanSnap Home Help.
Convert Your Paper Documents into Digital Data to Conveniently Organize Them.
 Scan to Rack2-Filer Smart
- Save the scanned images as PDF files in Rack2-Filer Smart to manage and organize them.
Displayed when Rack2-Filer Smart trial version or Rack2-Filer Smart is installed.
 Scan to Rack2-Filer
- Save the scanned images as PDF files in Rack2-Filer to manage and organize them.
Displayed when Rack2-Filer (sold separately) is installed (V5.0 or later recommended).
Convert Your Paper Documents into Digital Data to Conveniently Organize Them (Magic Desktop).
 Scan to Magic Desktop
- Save the scanned images in Magic Desktop to manage and organize them.
Displayed when Magic Desktop trial version or Magic Desktop is installed.
 Save Receipts
- Scanned Images are saved in ScanSnap Home as content data records with [Receipts] as the document type. Content data records can be organized or managed in ScanSnap Home.
This is displayed when the following conditions are met.
- ScanSnap Home is installed
- ScanSnap Organizer, CardMinder, or ScanSnap Receipt is not installed
ATTENTION- If both ScanSnap Manager and ScanSnap Home are installed, ScanSnap Home cannot be used to scan documents.
- To use ScanSnap Home, you need to activate a license beforehand.
For details about how to activate a license, refer to here in the ScanSnap Home Help.
Quote Text from Your Paper Documents.
 ABBYY Scan to Word
 ABBYY Scan to Excel(R)
 ABBYY Scan to PowerPoint(R)
- Have the scanned image text recognized and converted into a Word, Excel, or PowerPoint document.
Displayed when ABBYY FineReader for ScanSnap (5.0 or later) is installed.
HINTIt is recommended that you select [Automatic resolution] or [Best] for [Image quality] on the [Scanning] tab of the ScanSnap setup window.
Share the Scanned Document Files through Linkage with SharePoint.
 Scan to SharePoint
- Save the scanned image in SharePoint.
Displayed when Scan to Microsoft SharePoint is installed.
Linking with Cloud Services
Manage Scanned Documents through Linkage with Dropbox.
 Scan to Dropbox
- Save scanned image files to your Dropbox folder.
Displayed when Dropbox for Windows 1.1.45 or later is installed.
Manage Scanned Documents through Linkage with Evernote.
 Scan to Evernote (Document)
- Save PDF files in Evernote.
Displayed when Evernote for Windows 3.5 or later is installed.
Manage Handwritten Notes through Linkage with Evernote.
 Scan to Evernote (Note)
- Save JPEG files in Evernote.
Displayed when Evernote for Windows 3.5 or later is installed.
Manage Scanned Documents through Linkage with Google Drive.
 Scan to Google Drive
- Save PDF files in Google Drive.
Displayed when .NET Framework 4 or an in-place upgrade for .NET Framework 4 is installed.
After installing .NET Framework, apply the updates in Windows Update.
Manage Scanned Documents through Linkage with Salesforce Chatter.
 Scan to Salesforce Chatter
- Post scanned image files to Salesforce Chatter. You can use posted files with Salesforce CRM.
You need to install .NET Framework 4.5 or an in-place upgrade for .NET Framework 4.5.
Manage Scanned Documents through Linkage with SugarSync.
 Scan to SugarSync
- Save scanned image files to your SugarSync folder.
Displayed when SugarSync Manager for Windows 1.9.28 or later is installed.
You can freely add applications to the Quick Menu. For details, refer to Managing Linked Applications.