This website is designed to be used with ScanSnap Home 1.4.
If you are using ScanSnap Home 2.0 or later, refer to here.
Loading Documents Such as Photographs and Clippings (While Linking with a Cloud Service)
When scanning easily damaged documents, such as photographs or non-standard size documents that are difficult to load such as clippings, insert the documents into the manual feeder of the ScanSnap using the optional Carrier Sheet/Photo Carrier Sheet. When scanning easily damaged documents, such as photographs, or non-standard size documents that are difficult to load such as clippings, insert the documents into the ScanSnap using the optional Carrier Sheet.
The procedure to perform a scan with the Photo Carrier Sheet is described as an example below.
-
Scanning documents such as photographs and clippings without damaging them is only available for Return Scan, in which a document is inserted into the manual feeder and scanned.
For details about documents that can be scanned with Return Scan, refer to Documents That Can Be Scanned with the ScanSnap in the ScanSnap Help.
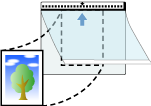
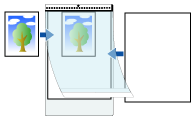
- Place a document inside the Photo Carrier Sheet.
Open the Photo Carrier Sheet and place the top center of the document against the top center of the Photo Carrier Sheet.
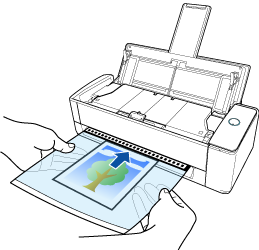
- Face the scanning side upwards and insert the part of the Photo Carrier Sheet with the black and white pattern straight into the manual feeder.
Make sure that the Photo Carrier Sheet is pulled in and set in the ScanSnap.
 ATTENTION
The document comes out from the back of the ScanSnap during the scan.
Leave space (about the length of the Photo Carrier Sheet) at the back of the ScanSnap.
TIPYou can scan a document with the ADF paper chute (cover) closed.
-
If the image of a scanned document has a problem as shown below, place a blank (white) sheet of paper underneath the document when scanning.
Shadows appear around the edges of the scanned image
Black lines appear around the edges of a uniquely shaped cutting document if you place the document in a Photo Carrier Sheet

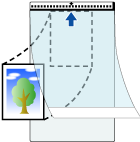
- Place the document inside the Carrier Sheet.
Open the Carrier Sheet and place the top of the document against the top center of the Carrier Sheet.
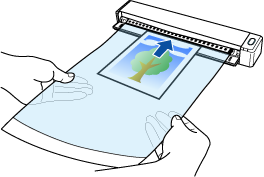
- Insert the part with the black and white pattern on the Carrier Sheet straight into the feeding section of the ScanSnap, with the scanning side facing up.
Make sure that the Carrier Sheet is fed into the ScanSnap and is held firmly.
 ATTENTION
-
Scanning the Carrier Sheet with the output guide of the ScanSnap open causes a paper jam. Scan the Carrier Sheet with the output guide closed.

TIP-
If the image of a scanned document has a problem as shown below, place a blank (white) sheet of paper underneath the document when scanning.
Shadows appear around the edges of the scanned image
Black lines appear around the edges of a uniquely shaped cutting document if you place the document in a Photo Carrier Sheet
-