This website is designed to be used with ScanSnap Home 2.xx.
If you are using ScanSnap Home 3.0 or later, refer to here.
Adding Necessary Scanned Images
After scanning documents, add scanned images, which have not been cropped, in order to crop them. Up to 20 crop frames can be added for one scanned image.
-
Add a scanned image in the [ScanSnap Home - View cropped images] window.
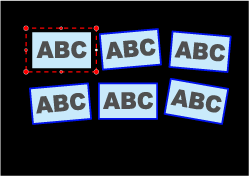
Apply a frame around a part of the scanned image that you want to crop by dragging the mouse.
When the crop frame is applied, the scanned image that you cropped is added to the end of [Cropped image].
The scanned image that you added is also saved.
-
Add a scanned image in the [ScanSnap Home - View cropped images] window.
Apply a frame around a part of the scanned image that you want to crop by dragging the mouse.
When the crop frame is applied, the cropped part is added at the bottom of the list of scanned images.
The scanned image that you added is also saved.