• HOME
  • ScanSnap Help
  • Wi-Fi Settings
  • Wi-Fi Settings
  • Connecting the ScanSnap and a Computer Directly Using a Direct Connection for the Time Being

Connecting the ScanSnap and a Computer Directly Using a Direct Connection for the Time Being

When you cannot establish a connection to a wireless access point, manually connect the ScanSnap and a computer for the time being via Wi-Fi using a Direct Connection.

When you turn off the ScanSnap and turn it back on, the Wi-Fi connect mode returns to the one that has been specified in ScanSnap Wireless Setup Tool.

HINT
  • To connect the ScanSnap and a mobile device via a direct connection all the time, select [Direct Connect mode] for the wireless mode in ScanSnap Wireless Setup Tool.

    For details, refer to the ScanSnap Wireless Setup Tool Help.

    For details about how to start ScanSnap Wireless Setup Tool, refer to Configuring the Wi-Fi Settings.

  1. Close the ADF paper chute (cover) to turn off the ScanSnap. Close the feed guide to turn off the ScanSnap.
  2. When the ScanSnap is connected to a computer via a USB cable, disconnect the USB cable from the computer.
  3. Turn on the Wi-Fi switch that is at the back of the ScanSnap.
  4. While holding down the WPS button that is at the back of the ScanSnap, open the ADF paper chute (cover) to turn the power on. While holding down the [Scan/Stop] button, open the feed guide to turn the power on.

    At this point, press the WPS button for more than 3 seconds until the Wi-Fi indicator flashes in green.

    At this point, press the [Scan/Stop] button for more than 3 seconds until the Wi-Fi indicator flashes in green.

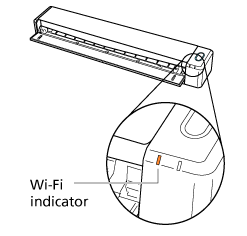
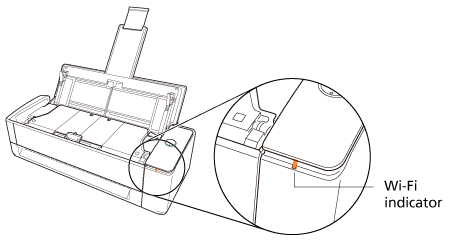
    When the Wi-Fi connect mode is changed to the Direct Connection mode, the Wi-Fi indicator lights up in orange.

    Wi-Fi indicator
    Wi-Fi indicator
  5. Open the window for setting the Wi-Fi function on the computer.
    HINT
    • For details, refer to the manual of the computer.

  6. Enter the ScanSnap network name (SSID) and security key in the window for setting the Wi-Fi function.

    The default ScanSnap network name (SSID) and security key are on the bottom of the ScanSnap.

    When the ScanSnap is connected with a computer directly by a direct connection, the Wi-Fi indicator lights up in green.

    If you have never used the ScanSnap with a computer that you are using, perform the following steps.

  7. Add the ScanSnap to ScanSnap Home.
    1. Click the [Scan] button at the top of the Main Window of ScanSnap Home to display the Scan Window.

      If the main window is not already displayed, refer to To Display the Main Window.

      If the main window is not already displayed, click the [ScanSnap Home] icon ScanSnap Home Icon in the application list that appears when you click Launchpad in the Dock.


    2. Select [Add a ScanSnap] from the [Select a scanner] list.
    3. In the [ScanSnap Home - Connecting ScanSnap] window, select the ScanSnap model to be connected and then click the [Start setup] button.
    4. In the [ScanSnap Home - Connecting ScanSnap] window (Connection with the ScanSnap), select the scanner name of the ScanSnap to be connected, and click the [Next] button.
      HINT
      • When an IP address is set for the ScanSnap, you can connect the ScanSnap to a computer by specifying the IP address.

        Specify the IP address for the ScanSnap to be connected in the window that appears when you click [Using an IP address].

    5. When the [ScanSnap Home - Connecting ScanSnap] window (Connection is complete) appears, click the [Next] button.
    6. When the [ScanSnap Home - Connecting ScanSnap] window (Let's use it!) appears, check the contents and click the [Close] button.

The computer and the ScanSnap are connected directly.

HINT
  • You can also connect the ScanSnap by clicking the [Add] button under [Scanner information] in the [Scanner] tab of the preferences window. To remove the ScanSnap that you do not need, select the ScanSnap from the list of ScanSnap units and click the [Remove] button. It is also removed from the [Select a scanner] list in the scan window.

    To display the preferences window, select [Settings] → [Preferences] from the menu.

  • You can also connect the ScanSnap by clicking the [Add] button under [Scanner information] in the [Scanner] tab of the preferences window. To delete the ScanSnap that you do not need, select the ScanSnap from the list of ScanSnap units and click the [Delete] button. It is also deleted from the [Select a scanner] list in the scan window.

    To display the preferences window, select [ScanSnap Home] → [Preferences] in the menu bar.
 

See also

  • Reconnecting the ScanSnap and a Computer by Specifying the IP Address of the ScanSnap
  • Before Using This Site
  • How to Use This Site
  • Customer Support
  • Cookie Policy

© PFU Limited 2018-2024

  • TOP