This website is designed to be used with ScanSnap Home 2.xx.
If you are using ScanSnap Home 3.0 or later, refer to here.
Scan Window
The scan window of ScanSnap Home is the window in which you can select a profile and start scanning a document. You can also manage the ScanSnap to be connected and the profiles in the window.
The screenshots shown are examples of when the ScanSnap iX1600 is connected. When the ScanSnap iX1600 Receipt Edition is connected, the displayed information will be slightly different.
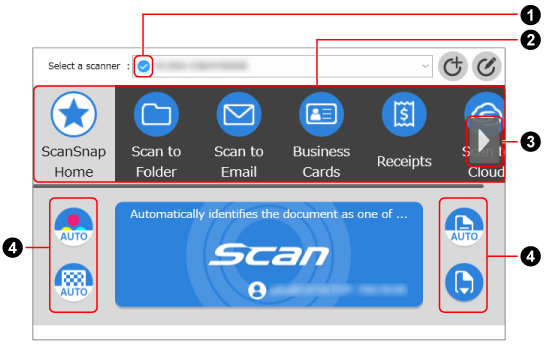
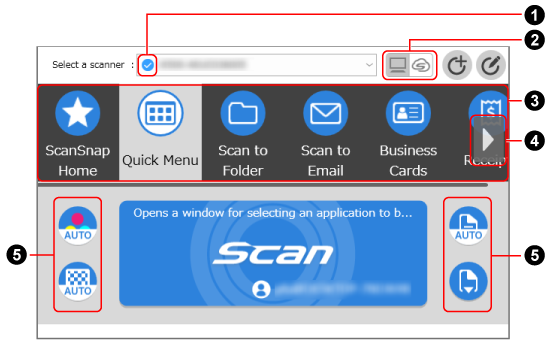
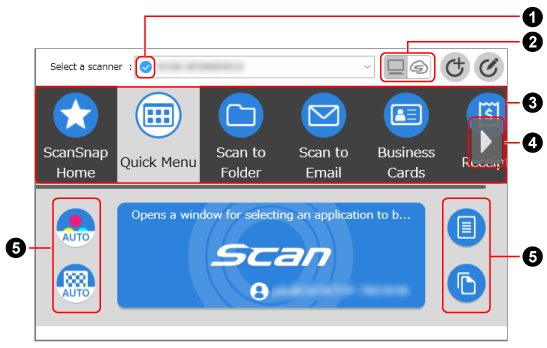
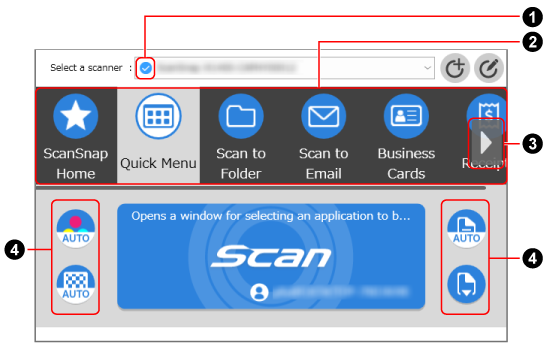
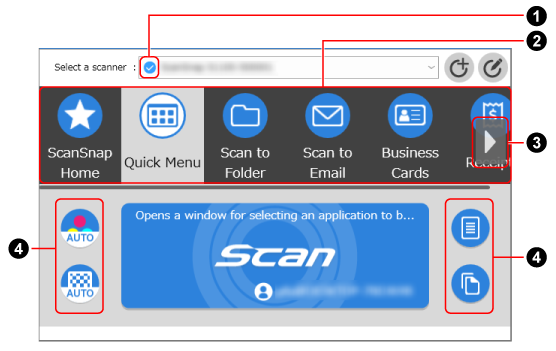
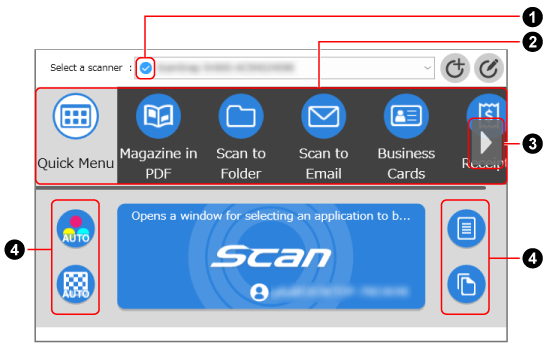
- Select a scanner
Displays a list of the ScanSnap units that have been connected to the computer that is currently used.
You can select another ScanSnap to switch the connection or add a new ScanSnap to be connected with the computer.
When you switch the connected ScanSnap, the displayed profile list is also switched.
- Indicator for connection status of the scanner (
 )
) Displays the indicator for the status of the ScanSnap. The details on the ScanSnap status appears as a tooltip when you put the cursor over the indicator.
- Buttons to switch the view of the profile list (
 )
) These appear when you are in a region where ScanSnap Cloud can be used.
For regions where ScanSnap Cloud can be used, refer to here.

Displays a profile in which a save destination for scanned images is set to a local folder or a network folder.

-
Displays a profile in which a save destination for scanned images is set to a cloud service.

Click this to display the [Add new profile] Window in which you can create a new profile.
A new profile can be created no matter how the connection status is for the ScanSnap which is selected in [Select a scanner].
This icon is unavailable when the profile list has 30 profiles displayed.

Click this to display the [Edit profiles] Window.
You can modify the settings for profiles, delete profiles, and change the order of profiles in the profile list.
You can also delete a profile that has been created by another user.
Profiles can be edited no matter how the connection status is for the ScanSnap which is selected in [Select a scanner].
- Profile list (

 )
) Displays the profiles for the ScanSnap in use. Select a profile to be used from this list.
You can change the display order for a profile in the [Edit profiles] window.
Up to 30 profiles are displayed.
Click the selected profile to display the following information under the [Scan] button.
Description of the profile
Name of the user who created the profile
The information above is displayed when [All users] is set for [Display of profiles] in the [Scanner settings] screen that can be displayed after displaying the [Settings] screen on the touch panel.
The profiles provided in ScanSnap Home by default vary depending on the region where the ScanSnap is used. For details, refer to What is a Profile?.
TIPProfiles displayed in the profile list can be switched between only profiles created by a user who is using the ScanSnap and all profiles created by users who have used the ScanSnap before.
For details, refer to Changing Users in order to Display the User's Own Profiles.
If profiles created by users who have used the ScanSnap before are all displayed, you can change the display order of profiles or delete the profiles even though they were created by other users.
- Profile scroll button (

 )
) Appears when there are more than six profiles and when you put the cursor over the profile list.
Click this button to scroll through five profiles at a time in the profile list. Hold the button to keep scrolling through the profiles.
- Section to display and modify the scan settings (

 )
) Displays the scan settings for the selected profile. Click each scan setting icon to display the setting window and modify the scan setting temporarily. Scanning a document will return the scan settings back to the settings before any changes are made.
If you want to scan documents under the same settings all the time, change the scan settings for a profile in the [Edit profiles] window.
Note that you can edit the settings for profiles that are created with the computer connected to the ScanSnap. The icon is disabled when you select a profile that was created with another computer, a profile configured to save scanned images directly from the ScanSnap to a network folder, or a profile linked with a cloud service using ScanSnap Cloud.
Note that you can edit the settings for profiles that are created with the computer connected to the ScanSnap. The icon is disabled when you select a profile that was created with another computer or a profile that is linked with a cloud service by using ScanSnap Cloud.
The icon is disabled when you select a profile that is linked with a cloud service by using ScanSnap Cloud.
The following scan settings can be changed in the scan window.
- Color mode setting
-
Select a color mode for scanned images.
Icon
Parameter
Description

Automatic
Automatically detects the color of each document and scans in color, gray, or black and white.

Color
Always saves the scanned image in color.

Gray
Always saves the scanned image in gray.

B & W
Always saves the scanned image in black and white.
Suitable for scanning black and white documents that only contain text.
- Side setting
-
Select a scanning side for documents.
Icon
Parameter
Description

Duplex
Scans both sides of a document.

Duplex
When a document type is "Business Cards", scan the front side and then the back side of a business card to make the scanned images of both sides of the business card into a single content data record.
When a document type is "Documents", "Receipts", or "Photos", [Duplex] cannot be selected.
When a profile that is configured to link with a cloud service is selected, even if you select [Duplex] for the scanning side setting, a document is scanned as [Simplex].
When a document type is "Documents", "Receipts", or "Photos", [Duplex] cannot be selected.

Simplex
Scans only one side of a document.
- Image quality setting
-
Select an image quality level (resolution) for scanned images.
Scanning speeds vary depending on the image quality.
For details, refer to Specifications of the ScanSnap.
Icon
Parameter
Description

Automatic
Scans documents at an optimal resolution according to the paper size of the documents.
The image quality is determined based on the length of the short side of the document.
When the short side is longer than 115 mm: Better
When the short side is 115 mm or shorter: Best

Normal
A scan is performed at a resolution of 150 dpi when [Color mode setting] is set to [Color] or [Gray], and 300 dpi when it is set to black and white.

Better
A scan is performed at a resolution of 200 dpi when [Color mode setting] is set to [Color] or [Gray], and 400 dpi when it is set to black and white.

Best
A scan is performed at a resolution of 300 dpi when [Color mode setting] is set to [Color] or [Gray], and 600 dpi when it is set to black and white.

Excellent
A scan is performed at a resolution of 600 dpi when [Color mode setting] is set to [Color] or [Gray], and 1200 dpi when it is set to black and white.
Selecting [Excellent] may slow down the speed of scanning documents depending on your system environment.
- Feed mode setting
-
Select a feeding method for scanning documents.
This setting is configured for each scanning method (U-turn Scan and Return Scan).
If you start scanning documents with the scanning method in which [Continuous scan] is set for the feed mode setting, you can continuously scan documents with U-turn Scan or Return Scan alternately.
Icon
Parameter
Description

Normal scan
Scanning automatically finishes when all of the documents loaded in the ScanSnap are scanned.
Scanning automatically finishes when all of the documents inserted in the ScanSnap are scanned.
Scanning automatically finishes when all of the documents loaded or inserted in the ScanSnap are scanned.
Scanning automatically finishes when all of the documents placed under the ScanSnap are scanned.

Continuous scan
Scanning documents continues until the [Finish] button is pressed.
Scanning documents continues until the [Finish Scanning] button is clicked.
You can scan a large number of documents.

Manual scan
Automatically scans documents loaded one sheet at a time in the ScanSnap until the [Finish] button is pressed.
Scan with [Manual scan] for documents that have overlapping areas, long page documents, or thick documents, such as the following documents:
Documents folded in half
Envelopes
Documents with sticky notes attached
Multi-layered documents such as transfer paper
Long page documents such as long receipts
Plastic cards
TIP-
In the following cases, the icons to display and modify the scan settings are disabled, and therefore the scan settings cannot be modified:
The ScanSnap which is selected in [Select a scanner] is not connected to the computer
The selected profile was not created with the computer to which the ScanSnap is connected
-
When a profile in which the scan settings are configured to detect a document type automatically is selected, the following icons are displayed. These icons are not changed even if the color mode, scanning side, or image quality is changed in the scan settings.
 (Color mode setting)
 (Scanning side setting)
 (Image quality setting)
When the profile is set to detect the document type automatically, [Setting for each document type] is displayed in the scan settings window. To modify the scan settings for each document type that is detected automatically, select one of the document type tabs that appear when you click [Setting for each document type] and modify the settings.
- [Scan] button
Starts a scan when it is clicked.
When
 or
or  is displayed on the [Scan] button, you cannot start a scan. Follow the message that is displayed when you click
  or
or  to solve the problem.TIP
When the selected profile was not created with the computer to which the ScanSnap is connected, the [Scan] button is disabled so you cannot perform a scan.