Quick Menu for Selecting an Application to Perform a Particular Action
The Quick Menu is a function that allows you to select an application to perform a particular action every time you scan a document.
You can perform a particular action on the scanned image by selecting an application in the Quick Menu which is displayed after scanning a document.
When you use the Quick Menu, you cannot set a password to an image in a PDF format to open it.
Quick Menu Window
The Quick Menu consists of the following:
Windows

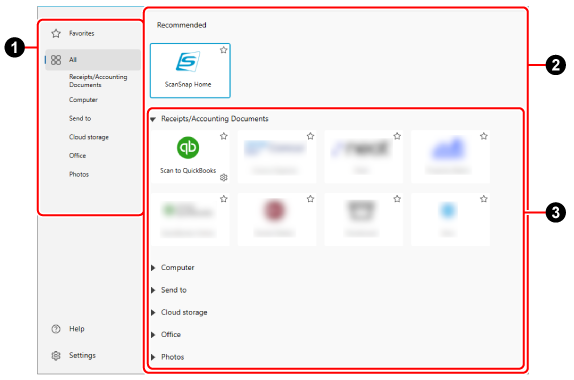
- Tabs to switch between display modes

-
Switching between display modes will switch the applications displayed in the application list
 .
.[Favorites] mode
Only applications with
 will be displayed.
[All] mode
All applications that are displayable in the Quick Menu will be displayed.
Group name
Only applications in the selected group will be displayed.
- Settings
When you click this, the [Quick Menu - Settings] window (where you can select applications to appear in the [Favorites] mode or where you can change the order of applications in the Quick Menu) is displayed.
- Application list
-
A list of available applications in order to perform a particular action is displayed.
In the application list, you can perform the following operations:
Checking the description for an application
Put the mouse pointer over the icon.
Sorting applications
Drag the icon of an application that you want to change the order of.
Assigning/unassigning an application as a favorite
Click
 or .
or .Displaying a window to change the application settings
Click
 .
.
- Recommended
Up to four recommended applications are displayed depending on the document type and selected applications.
- Group list

-
When the Quick Menu display mode is configured to [All] mode, applications displayed in the application list are categorized by group. A group name is displayed only when a group contains applications.
Click
 next to the group name to display all the applications included in the group.
- Receipts/Accounting Documents
-
Applications that save scanned receipt/invoice information in a cloud accounting service are displayed.
- User added application
-
The applications that you chose to add are displayed.
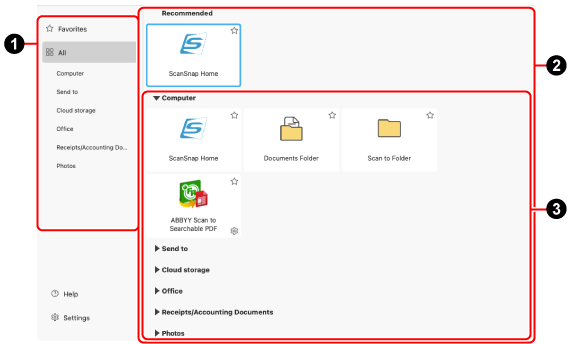
- Computer
-
Applications that save images of scanned documents in a local folder are displayed.
- Send to
-
Applications that allow you to check images of scanned documents before saving them are displayed.
When you send images to a save destination or application by dragging and dropping them, the images are also saved to the destination specified in the profile used when scanning the documents.
The save destination for scanned images can be specified in [Save to] under [Managing options] in the [Edit profiles] Window.
- Cloud storage
-
Applications that save images of scanned documents in a cloud storage service are displayed.
The method for linking to cloud storage services varies depending on whether you are using the ScanSnap in a region where ScanSnap accounts can be used.
For details about regions where ScanSnap accounts are available, refer to here.
When you are in a region where ScanSnap accounts can be used
Scanned images are saved to a cloud storage service that can be linked to ScanSnap Cloud via the ScanSnap Cloud server.
For details about a cloud service that you can establish a link with, refer to the following:
For cloud storage services that cannot be linked to ScanSnap Cloud, install the client application for the relevant cloud storage service on your computer, then link to the service.
When you are in a region where ScanSnap accounts cannot be used
If a client application installed on your computer is available, scanned images are saved via the client application.
For details about a cloud storage service that you can establish a link with, refer to Differences in the Methods for Establishing a Link with a Cloud Service.
TIPEven if you are signed in to a ScanSnap account using a social media account, you need to sign in to the cloud service from the client application.
- Office
-
Applications that convert images of scanned documents into a Word, Excel, or PowerPoint file are displayed.
If you take the contents in an image created from the document that you scanned into consideration when selecting a format for the file to which the image is converted, reproducibility of the image after it is converted becomes higher.
TIPIf you are using ABBYY FineReader for ScanSnap, for details about the settings, refer to the ABBYY FineReader for ScanSnap User's Guide.
The following group names appear when you are using the ScanSnap in a region where ScanSnap accounts can be used.
For details about regions where ScanSnap accounts are available, refer to here.
- Business Cards
-
Applications that save scanned business card information in a cloud service (for managing business cards) are displayed.
- Receipts/Accounting Documents
-
Applications that save scanned receipt/invoice information in a cloud accounting service are displayed.
- Photos
-
Applications that save images of scanned photos in a cloud service (for managing photo images) are displayed.
macOS
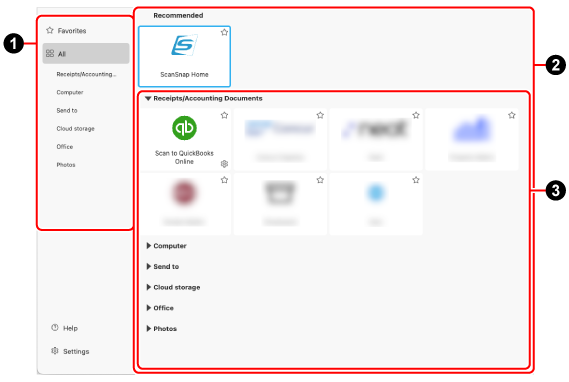
- Tabs to switch between display modes
-
Switching between display modes will switch the applications displayed in the application list
.[Favorites] mode
Only applications with
will be displayed.[All] mode
All applications that are displayable in the Quick Menu will be displayed.
Group name
Only applications in the selected group will be displayed.
- Settings
When you click this, the [Quick Menu - Settings] window (where you can select applications to appear in the [Favorites] mode or where you can change the order of applications in the Quick Menu) is displayed.
- Application list
-
A list of available applications in order to perform a particular action is displayed.
In the application list, you can perform the following operations:
Checking the description for an application
Put the mouse pointer over the icon.
Sorting applications
Drag the icon of an application that you want to change the order of.
Assigning/unassigning an application as a favorite
Click
or .Displaying a window to change the application settings
Click
.
- Recommended
Up to four recommended applications are displayed depending on the document type and selected applications.
- Group list
-
When the Quick Menu display mode is configured to [All] mode, applications displayed in the application list are categorized by group. A group name is displayed only when a group contains applications.
Click
next to the group name to display all the applications included in the group.- Receipts/Accounting Documents
-
Applications that save scanned receipt/invoice information in a cloud accounting service are displayed.
- User added application
-
The applications that you chose to add are displayed.
- Computer
-
Applications that save images of scanned documents in a local folder are displayed.
- Send to
-
Applications that allow you to check images of scanned documents before saving them are displayed.
When you send images to a save destination or application by dragging and dropping them, the images are also saved to the destination specified in the profile used when scanning the documents.
The save destination for scanned images can be specified in [Save to] under [Managing options] in the [Edit profiles] Window.
- Cloud storage
-
Applications that save images of scanned documents in a cloud storage service are displayed.
The method for linking to cloud storage services varies depending on whether you are using the ScanSnap in a region where ScanSnap accounts can be used.
For details about regions where ScanSnap accounts are available, refer to here.
When you are in a region where ScanSnap accounts can be used
Scanned images are saved to a cloud storage service that can be linked to ScanSnap Cloud via the ScanSnap Cloud server.
For details about a cloud service that you can establish a link with, refer to the following:
For cloud storage services that cannot be linked to ScanSnap Cloud, install the client application for the relevant cloud storage service on your computer, then link to the service.
When you are in a region where ScanSnap accounts cannot be used
If a client application installed on your computer is available, scanned images are saved via the client application.
For details about a cloud storage service that you can establish a link with, refer to Differences in the Methods for Establishing a Link with a Cloud Service.
TIPEven if you are signed in to a ScanSnap account using a social media account, you need to sign in to the cloud service from the client application.
- Office
-
Applications that convert images of scanned documents into a Word, Excel, or PowerPoint file are displayed.
If you take the contents in an image created from the document that you scanned into consideration when selecting a format for the file to which the image is converted, reproducibility of the image after it is converted becomes higher.
TIPIf you are using ABBYY FineReader for ScanSnap, for details about the settings, refer to the ABBYY FineReader for ScanSnap User's Guide.
The following group names appear when you are using the ScanSnap in a region where ScanSnap accounts can be used.
For details about regions where ScanSnap accounts are available, refer to here.
- Business Cards
-
Applications that save scanned business card information in a cloud service (for managing business cards) are displayed.
- Receipts/Accounting Documents
-
Applications that save scanned receipt/invoice information in a cloud accounting service are displayed.
- Photos
-
Applications that save images of scanned photos in a cloud service (for managing photo images) are displayed.
To change the display of the Quick Menu
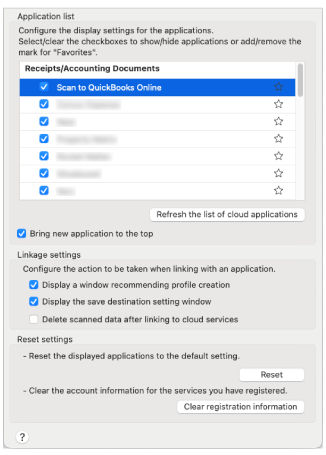
You can change the settings for applications displayed in the Quick Menu in the [Quick Menu - Settings] window that appears when you click [Settings] in the Quick Menu.
Windows
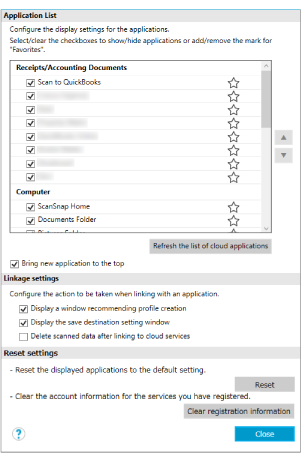
- Application list
-
Displays all applications that appear in the Quick Menu.
The following application settings can be configured.
Hiding an icon
Clear the checkbox for an application name.
Assigning it as a favorite
Click
for an application name to switch to .
![[Up] Button](../../../jp/pc/images/common/QM_button_up_ix2500.png) /
/ ![[Down] Button](../../../jp/pc/images/common/QM_button_down_ix2500.png)
-
When you select an application name in the application list and click this button to move the application, the order of applications that appear in the Quick Menu can be changed.
If an application cannot move up or down anymore, the button is disabled.
Refreshes the list of cloud services displayed in the Quick Menu.
If you select this checkbox, when you add a new application to the Quick Menu, the new application is added to the top of the application list in the Quick Menu. If you clear the checkbox, the new application is added to the bottom of the application list in the Quick Menu.
-
- [Display a window recommending profile creation] checkbox
If you select this checkbox, a notification appears suggesting profile creation based on the history of linking to applications from the Quick Menu.
- [Display the save destination setting window] checkbox
If you select this checkbox, a window to set the destination for images before linking to a cloud service appears.
- [Delete scanned data after linking to cloud services] checkbox
Select this checkbox to delete images from the destination specified in the profile used when scanning the documents after linking with cloud services.
-
- [Reset] button
-
When you click this button, the settings for applications that appear in the Quick Menu return back to the default.
Note that the application that you added is not removed.
- [Clear registration information] button
-
Clears the registered account information for cloud services.
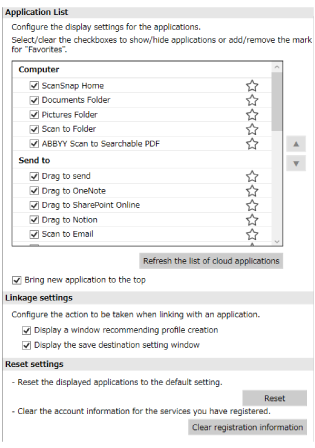
macOS
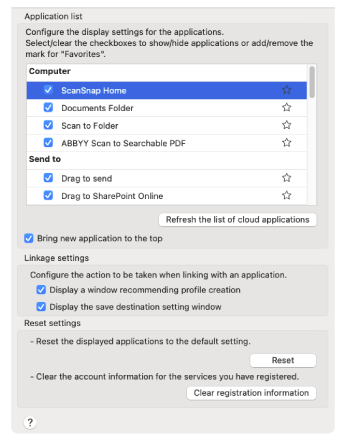
- Application list
-
Displays all applications that appear in the Quick Menu.
The following application settings can be configured.
Changing the icon order
Drag and drop an application name to move it.
Hiding an icon
Clear the checkbox for an application name.
Assigning it as a favorite
Click
for an application name to switch to .
- [Refresh the list of cloud applications] button
Refreshes the list of cloud services displayed in the Quick Menu.
- [Bring new application to the top] checkbox
If you select this checkbox, when you add a new application to the Quick Menu, the new application is added to the top of the application list in the Quick Menu. If you clear the checkbox, the new application is added to the bottom of the application list in the Quick Menu.
- Linkage settings
-
- [Display a window recommending profile creation] checkbox
If you select this checkbox, a notification appears suggesting profile creation based on the history of linking to applications from the Quick Menu.
- [Display the save destination setting window] checkbox
If you select this checkbox, a window to set the destination for images before linking to a cloud service appears.
- [Delete scanned data after linking to cloud services] checkbox
Select this checkbox to delete images from the destination specified in the profile used when scanning the documents after linking with cloud services.
- Reset settings
-
- [Reset] button
-
When you click this button, the settings for applications that appear in the Quick Menu return back to the default.
Note that the application that you added is not removed.
- [Clear registration information] button
-
Clears the registered account information for cloud services.