This website is designed to be used with ScanSnap Home 1.4.
If you are using ScanSnap Home 2.0 or later, refer to here.
Loading Documents Such as Photographs and Clippings
Load a document that can be damaged easily, such as photographs, or non-standard size documents that are difficult to load, such as clippings, in the ScanSnap.
When images of scanned documents are saved to a cloud service, the optional Carrier Sheet or Photo Carrier Sheet can be used.
The following example procedure shows how to load documents directly and how to use the Photo Carrier Sheet.
- Load a document in the ScanSnap.
- When loading a document directly in the ScanSnap
-
-
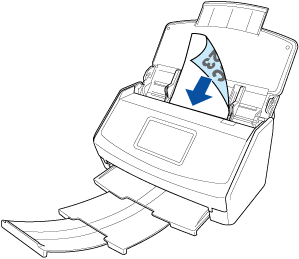
Load only one document in the ADF paper chute (cover).
Load the document face-down and top-first with its back facing you.
-
Configure the scan settings.
- When saving scanned images to a mobile device
-
Tap the [Scan] icon
 at the bottom of the ScanSnap Home screen to display the Scan screen.
Tap [More] in [Scan settings] to display the Scan settings screen.
Tap [Scan] to display the [Scan] screen.
Select [Manual Scan] for [Feed (ADF)].
- When saving scanned images to a cloud service
-
Tap the [Cloud settings] icon
 at the bottom of the ScanSnap Home screen to display the Cloud settings screen.
In the home screen on the touch panel of the ScanSnap, select the profile with the batch of cloud settings to be used from the profile list.
Press the feed mode setting icon
 /
/ /
/ on the touch panel to display the [Feed mode setting] screen.
-
Select [Manual Scan].
-
- When loading a document using the Photo Carrier Sheet (while linking with a cloud service)
-
-
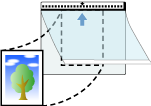
Place a document inside the Photo Carrier Sheet.
Open the Photo Carrier Sheet and place the top center of the document against the top center of the Photo Carrier Sheet.
-
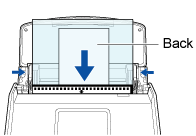
Load the Photo Carrier Sheet with the end which has the black and white pattern as the leading edge in the ADF paper chute (cover) of the ScanSnap.
Align the side guides with both ends of the Photo Carrier Sheet.
TIP-
If the image of a scanned document has a problem as shown below, place a blank (white) sheet of paper underneath the document when scanning.
Shadows appear around the edges of the scanned image
Black lines appear around the edges of a uniquely shaped cutting document if you place the document in a Photo Carrier Sheet

-