This website is designed to be used with ScanSnap Home 2.xx.
If you are using ScanSnap Home 3.0 or later, refer to here.
Modifying the Crop Area of a Document
After scanning a document, modify the size of a frame that is used to crop a scanned image.
-
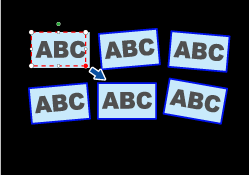
Modify the crop area of the scanned image.
Drag the operating points of the crop frame to modify the crop area.
To move a crop frame, place the mouse inside the crop frame and drag it when all the operating points have turned red.
Click any position on the window to fix a crop area.
A crop area of the scanned image is modified and the image is saved.
-
Modify the crop area of the scanned image.
Drag the operating points of the crop frame to modify the crop area.
To move a crop frame, place the mouse inside the crop frame and drag it when all the operating points have turned red.
Click any position on the window to fix a crop area.
A crop area of the scanned image is modified and the image is saved.