This website is designed to be used with ScanSnap Home 2.xx.
If you are using ScanSnap Home 3.0 or later, refer to here.
[Scan to ScanSnap Home] Window
In the [Scan to ScanSnap Home] window, you can edit images and content information created from the scanned receipts/invoices and save them as content data records to be managed in ScanSnap Home.
The [Scan to ScanSnap Home] window will be displayed when scanning a document using a profile in which [Scan to ScanSnap Home] is set for [Send to] in [Application] in the [Edit profiles] Window.
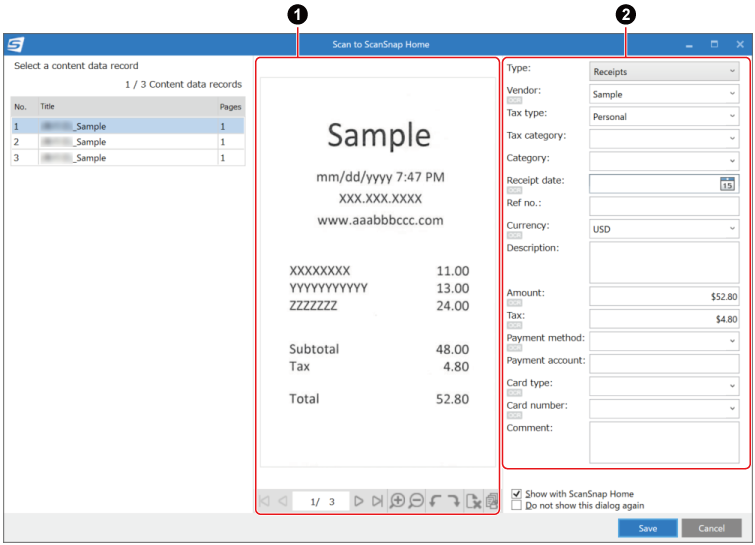
- Select a content data record
-
Displays the title and number of pages of a content data record to be displayed in the main window of ScanSnap Home. You can change the title of a content data record or switch the content data record to be displayed in Preview.
- X/X Content data records
Displays the "No. of the selected content data record/total content data records".
- Title
Displays the title of a content data record to be displayed in the main window of ScanSnap Home. You can change the title by entering a new title directly in the input field.
- Preview (
 )
) The image created from the document that you scanned is displayed.

-
Displays the first page.
When multiple content data records are displayed in [Title], the first page of the content data record that is listed in the top of [Title] is displayed.

-
Displays the previous page.
When multiple content data records are displayed in [Title], the pages of all the content data records can be displayed in order.

-
Specify the page number from the total page numbers of all the content data records that are displayed in [Title].

-
Displays the next page.
When multiple content data records are displayed in [Title], the pages of all the content data records can be displayed in order.

-
Displays the last page.
When multiple content data records are displayed in [Title], the last page of the content data record that is listed in the bottom of [Title] is displayed.

Magnifies the page.

Shrinks the page.

Rotates the selected page 90 degrees counterclockwise.

Rotates the selected page 90 degrees clockwise.

Deletes the selected page.

Displays images of the content data record selected in [Title] in the viewer window.
If you display the viewer window from the [Scan to ScanSnap Home] window, some functions become unavailable.
The operations that are available are as follows:
- Content information (
 )
) -
Displays the text recognition results for the text information in a document as content information with the type of the scanned document classified as "Receipts" or "Invoices".
If the document type or content information is different from that of the scanned receipt/invoice, it can be changed manually.
- [Show with ScanSnap Home] checkbox
When you select this checkbox, ScanSnap Home will start up after a document is scanned.
- [Do not show this dialog again] checkbox
When you select this checkbox, the [Scan to ScanSnap Home] window will not appear after the next scan is complete.
- [Save] button
Saves a content data record to be managed in ScanSnap Home with the changes you made applied.
- [Cancel] button
Cancels the changes you made and displays a message to confirm whether or not to delete the content data record.
If you do not delete the content data record, the changes you made will be canceled and the original content data record will be saved to be managed in ScanSnap Home.
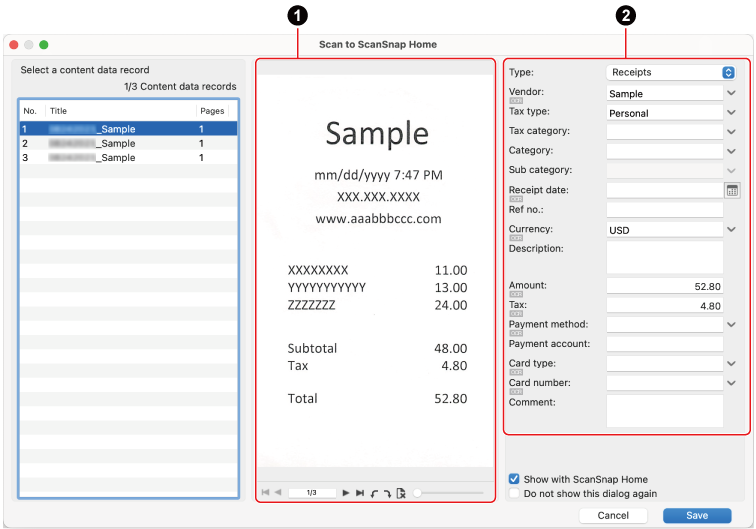
- Select a content data record
-
Displays the title and number of pages of a content data record to be displayed in the main window of ScanSnap Home. You can change the title of a content data record or switch the content data record to be displayed in Preview.
- X/X Content data records
Displays the "No. of the selected content data record/total content data records".
- Title
Displays the title of a content data record to be displayed in the main window of ScanSnap Home. You can change the title by entering a new title directly in the input field.
- Preview ()
The image created from the document that you scanned is displayed.

-
Displays the first page.
When multiple content data records are displayed in [Title], the first page of the content data record that is listed in the top of [Title] is displayed.

-
Displays the previous page.
When multiple content data records are displayed in [Title], the pages of all the content data records can be displayed in order.

-
Specify the page number from the total page numbers of all the content data records that are displayed in [Title].

-
Displays the next page.
When multiple content data records are displayed in [Title], the pages of all the content data records can be displayed in order.

-
Displays the last page.
When multiple content data records are displayed in [Title], the last page of the content data record that is listed in the bottom of [Title] is displayed.

Rotates the selected page 90 degrees counterclockwise.

Rotates the selected page 90 degrees clockwise.

Deletes the selected page.

Zooms in or out the displayed image according to the predefined magnification levels.
Move the slider knob to the right to zoom in, and to the left to zoom out.
- Content information ()
-
Displays the text recognition results for the text information in a document as content information with the type of the scanned document classified as "Receipts" or "Invoices".
If the document type or content information is different from that of the scanned receipt/invoice, it can be changed manually.
- [Show with ScanSnap Home] checkbox
When you select this checkbox, ScanSnap Home will start up after a document is scanned.
- [Do not show this dialog again] checkbox
When you select this checkbox, the [Scan to ScanSnap Home] window will not appear after the next scan is complete.
- [Cancel] button
Cancels the changes you made and displays a message to confirm whether or not to delete the content data record.
If you do not delete the content data record, the changes you made will be canceled and the original content data record will be saved to be managed in ScanSnap Home.
- [Save] button
Saves a content data record to be managed in ScanSnap Home with the changes you made applied.