This website is designed to be used with ScanSnap Home 2.xx.
If you are using ScanSnap Home 3.0 or later, refer to here.
Some Characters Are Not Recognized When Scan to Word/Scan to Excel/Scan to PowerPoint Is Used
If some characters are not recognized when Scan to Word/Scan to Excel/Scan to PowerPoint is used, check the following:
Are the characters small, squashed or faded?
The optimum scan settings vary depending on the document type.
Change the scan settings in the following procedure and perform a scan again:
-
Click the [Scan] button at the top of the main window of ScanSnap Home to display the scan window.
If the main window is not already displayed, refer to To Display the Main Window.
Select the profile that you are using from the profile list.
Click
 to display the [Edit profiles] window.
Click the [Detailed settings] button in [Scan settings] to display the [Detailed settings] window.
-
Depending on the documents that you scan, change the following settings:
In the [Scan] tab, specify either [Better], [Best], or [Excellent] for [Image quality].
TIPSelecting [Excellent] may slow down the speed of scanning documents depending on your system environment.
Change the setting for [Color mode] in the [Scan] tab.
Clear the [Reduce bleed-through] checkbox in the [Scanning options] window that appears when you click the [Option] button in the [Scan] tab.
Change [Compression rate] to [Medium low] or [Low (large file size)] in the [File size] tab.
-
Click the [Scan] button at the top of the main window of ScanSnap Home to display the scan window.
If the main window is not already displayed, click the [ScanSnap Home] icon
 in the application list that appears when you click Launchpad in the Dock.
 Select the profile that you are using from the profile list.
Click
to display the [Edit profiles] window.Click the [Detailed settings] button in [Scan settings] to display the [Detailed settings] window.
-
Depending on the documents that you scan, change the following settings:
In the [Scan] tab, specify either [Better], [Best], or [Excellent] for [Image quality].
TIPSelecting [Excellent] may slow down the speed of scanning documents depending on your system environment.
Change the setting for [Color mode] in the [Scan] tab.
Clear the [Reduce bleed-through] checkbox in the [Scanning options] window that appears when you click the [Option] button in the [Scan] tab.
Change [Compression rate] to [Medium low] or [Low (large file size)] in the [File size] tab.
Even if you try the above solutions, the scanned image may appear different from the original document, or some characters may not be recognized correctly depending on the document to be scanned.
For details, refer to the ABBYY FineReader for ScanSnap User's Guide.
Did you specify the same language as the language on the document in [Document language] of ABBYY FineReader for ScanSnap?
Specify the same language as the language on the document in the following procedure:
-
Display the main window of ScanSnap Home.
For details, refer to To Display the Main Window.
-
Select [Settings] in the menu → [Preferences] to display the preferences window.
In the [Application] tab, select [Scan to Word], [Scan to Excel] or [Scan to PowerPoint(R)], and click the [Set] button.
Specify the same language as the language on the document in [Document language] in the [General Settings] tab.
Specify the same language as the language on the document in the following procedure:
-
Display the main window of ScanSnap Home.
Click the [ScanSnap Home] icon
in the application list that appears when you click Launchpad in the Dock. -
Select [ScanSnap Home] on the menu bar → [Preferences] to display the preferences window.
In the [Application] tab, select [Scan to Word], [Scan to Excel] or [Scan to PowerPoint(R)], and click the [Set] button.
Specify the same language as the language on the document in [Document language] in the [General Settings] tab.
Did the document skew during scanning?
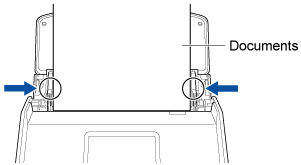
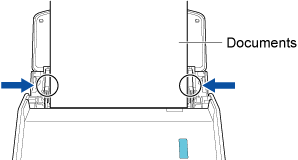
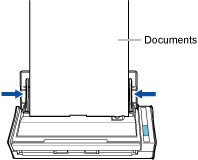
When you load the documents, adjust the side guides to the width of the documents.
When you load the documents in the ADF paper chute (cover), adjust the side guides to the width of the documents.
Hold each side guide in the middle to adjust them. Otherwise, the documents may be fed skewed.
Feeding documents becomes easier with the Receipt Guide.
For details about how to attach the Receipt Guide, refer to Attaching the Receipt Guide.
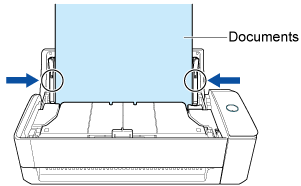
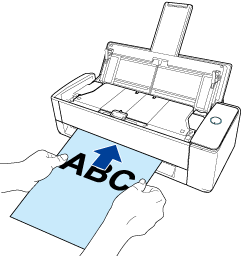
When you insert a document into the manual feeder, insert it straight.
Make sure that the document is fed into the ScanSnap and is held firmly.
Have you selected [Automatic] for [Rotation] in the scan settings?
Select [Automatic] for [Rotation] in the following procedure:
-
Click the [Scan] button at the top of the main window of ScanSnap Home to display the scan window.
If the main window is not already displayed, refer to To Display the Main Window.
Select the profile that you are using from the profile list.
Click
to display the [Edit profiles] window.Select [Automatic] for [Rotation] in [Scan settings].
-
Click the [Scan] button at the top of the main window of ScanSnap Home to display the scan window.
If the main window is not already displayed, click the [ScanSnap Home] icon
in the application list that appears when you click Launchpad in the Dock. Select the profile that you are using from the profile list.
Click
to display the [Edit profiles] window.Select [Automatic] for [Rotation] in [Scan settings].
If text recognition is inaccurate even when the [Automatic] is specified for [Rotation], correct the rotation of scanned images and convert them to Word/Excel/PowerPoint files.
For details, refer to Rotating a Page 90 or 180 Degrees and Converting an Image to a Word/Excel/PowerPoint File.
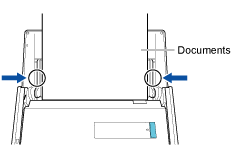
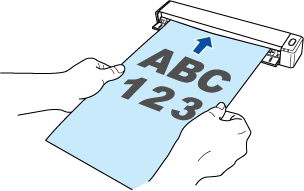
Did you insert the document at a skewed angle in the ScanSnap?
Insert the document straight into the feeding section of the ScanSnap.
Make sure that the document is fed into the ScanSnap and is held firmly.
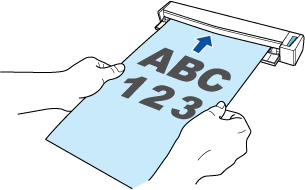
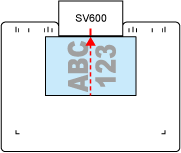
Did you align the center of the document with the centering mark?
Align the center of the document with the centering mark of the ScanSnap.
Is the height of the document more than 3 cm?
The height of the document should be 3 cm or less.
The line on the side of the ScanSnap base indicates the maximum height.

Did you place the ScanSnap and document on a flat surface?
Place the ScanSnap and document on a flat surface.
Remove any foreign objects from under the ScanSnap.
Did you place the document in a position lower than the ScanSnap?
Place the document on the same level as the ScanSnap.