Transferring Information on Scanned Receipts/Invoices to QuickBooks
Windows
You can transfer content information created from receipts/invoices scanned with the ScanSnap to QuickBooks Online or QuickBooks Desktop.
You can also edit the images and content information in the [Scan to QuickBooks] window before transferring them to QuickBooks.
To transfer information on scanned receipts/invoices to QuickBooks Desktop, download and install one of the following client applications from the download page.
QuickBooks Desktop Pro 2021 or later
QuickBooks Desktop Premier 2021 or later
QuickBooks Desktop Enterprise 2021 or later
Refer to here for the download page.
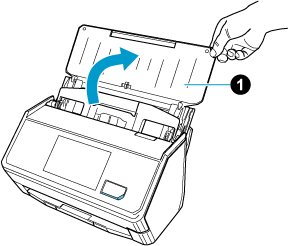
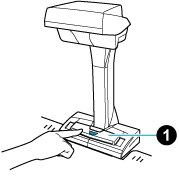
- Open the ADF paper chute (cover)
 of the ScanSnap.
When the ADF paper chute (cover) is opened, the power is turned on.
-
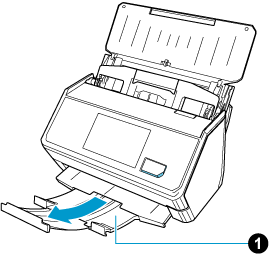
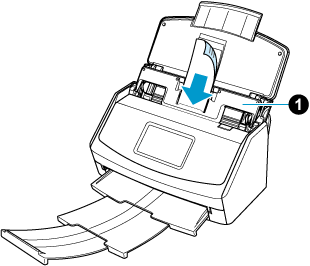
Extend the stacker on the ScanSnap. Pull out the extension and the stacker
 .
.
-
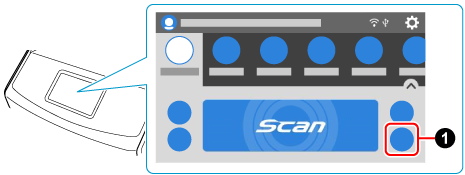
Select [QuickBooks] from the profile list on the touch panel. Select [quickbooks] from the profile list on the touch panel.

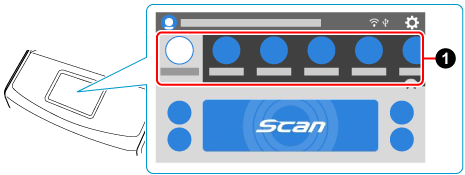
If [QuickBooks] is not displayed in the profile list, create a profile in ScanSnap Home. When you create a new profile, select [QuickBooks] as a template profile.
If [quickbooks] is not displayed in the profile list, create a profile in ScanSnap Home. When you create a new profile, select [quickbooks] as a template profile.
- Load the documents in the ScanSnap.
For details about documents that can be loaded with the Receipt Guide
, refer to Attaching/Removing the Receipt Guide.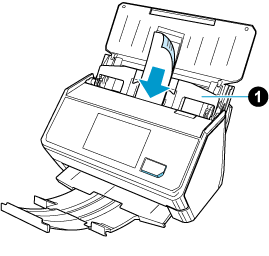
-
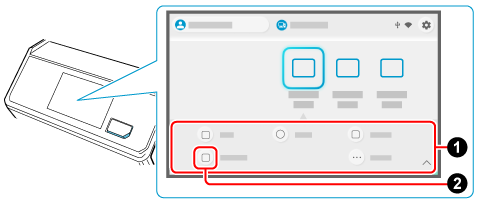
Specify the feeding method on the touch panel. Press the feed mode settings icon on the touch panel and specify the feeding method.
Press the arrow at the bottom of the touch panel to display the scan settings. In [Feed] that appears when you press the feed icon, modify the settings.
For details about feed setting items, refer to Displayed Screens on the Touch Panel.
For details about feed mode setting items, refer to Displayed Screens on the Touch Panel.
-
Press the [Scan] button to scan the documents. Press the [Scan] button on the touch panel to scan the documents. Press the [Scan/Stop] button to scan the document. Press the [Scan] button to scan the documents.
To scan documents which are longer than 360 mm (14.17 in.), hold down the [Scan] button for 3 seconds or longer.
To scan documents which are longer than 360 mm (14.17 in.), hold down the [Scan] button for 3 seconds or longer.


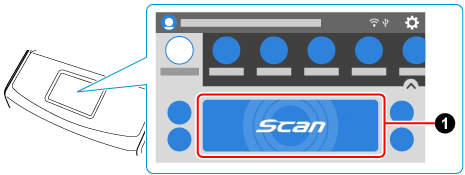


If the [Scan] button is still flashing in blue when the scanning of documents is complete, press the [Scan] button again to finish the scan.
If the [Scan] button is still flashing in blue when the scanning of documents is complete, press the [Scan] button again to finish the scan.
If the [Scan/Stop] button is still flashing in blue when the scanning of documents is complete, press the [Scan/Stop] button again to finish the scan.
If the power LED is still flashing in blue when the scanning of documents is complete, press the [Stop] button to finish the scan.
The content information created from the scanned receipts/invoices will be transferred to QuickBooks Online or QuickBooks Desktop.
macOS
You can transfer content information created from receipts/invoices scanned with the ScanSnap to QuickBooks Online.
You can also edit the images and content information in the [Scan to QuickBooks Online] window before transferring them to QuickBooks Online.
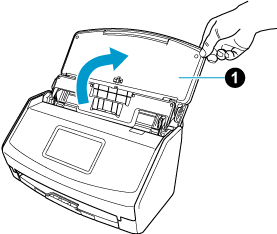
- Open the ADF paper chute (cover) of the ScanSnap.
When the ADF paper chute (cover) is opened, the power is turned on.
-
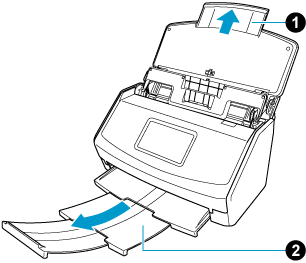
Extend the stacker on the ScanSnap. Pull out the extension and the stacker .
-
Select [QuickBooks Online] from the profile list on the touch panel. Select [quickbooks online] from the profile list on the touch panel.
If [QuickBooks Online] is not displayed in the profile list, create a new profile in ScanSnap Home. When you create a new profile, select [QuickBooks Online] as a template profile.
If [quickbooks online] is not displayed in the profile list, create a new profile in ScanSnap Home. When you create a new profile, select [quickbooks online] as a template profile.
- Load the documents in the ScanSnap.
For details about documents that can be loaded with the Receipt Guide
, refer to Attaching/Removing the Receipt Guide. -
Specify the feeding method on the touch panel. Press the feed mode settings icon on the touch panel and specify the feeding method.
Press the arrow at the bottom of the touch panel to display the scan settings. In [Feed] that appears when you press the feed icon, modify the settings.
For details about feed setting items, refer to Displayed Screens on the Touch Panel.
For details about feed mode setting items, refer to Displayed Screens on the Touch Panel.
-
Press the [Scan] button to scan the documents. Press the [Scan] button on the touch panel to scan the documents. Press the [Scan/Stop] button to scan the document. Press the [Scan] button to scan the documents.
To scan documents which are longer than 360 mm (14.17 in.), hold down the [Scan] button for 3 seconds or longer.
To scan documents which are longer than 360 mm (14.17 in.), hold down the [Scan] button for 3 seconds or longer.
If the [Scan] button is still flashing in blue when the scanning of documents is complete, press the [Scan] button again to finish the scan.
If the [Scan] button is still flashing in blue when the scanning of documents is complete, press the [Scan] button again to finish the scan.
If the [Scan/Stop] button is still flashing in blue when the scanning of documents is complete, press the [Scan/Stop] button again to finish the scan.
If the power LED is still flashing in blue when the scanning of documents is complete, press the [Stop] button to finish the scan.
The content information created from the scanned receipts/invoices will be transferred to QuickBooks Online.