This website is designed to be used with ScanSnap Home 2.xx.
If you are using ScanSnap Home 3.0 or later, refer to here.
Scanning Double-Sided Business Cards
Scan the front side and then the back side of a double-sided business card with the ScanSnap to import a single content data record for the business card.
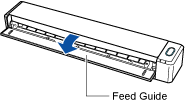
- Open the feed guide of the ScanSnap to turn the power on.
- Click the [Scan] button at the top of the Main Window of ScanSnap Home to display the Scan Window.
If the main window is not already displayed, refer to To Display the Main Window.
If the main window is not already displayed, click the [ScanSnap Home] icon
 in the application list that appears when you click Launchpad in the Dock.
 -
Select a scanning side for a document.
When the scanning side setting icon displayed on the right side of the [Scan] button in the scan window is
 , select [Duplex] in the [Side setting] window that is displayed when you clicked the icon.
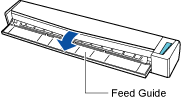
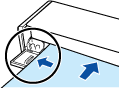
 - Insert the document straight into the feeding section of the ScanSnap, with the front side of the document facing up.
ATTENTION
-
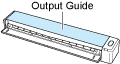
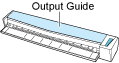
If you scan a business card with the output guide open, a paper jam may occur and damage the business card. Scan a business card with the output guide closed.
Insert one document at a time. When you perform a dual scan (Two documents are inserted and scanned at the same time or one document is inserted while another document is being scanned in the ScanSnap) on a double-sided business card, the scanned images of the double-sided business card that you scanned cannot be made into a single content data record.
TIP-
When [Business card (90 x 55 mm, 55 x 90 mm)] is specified for the document size in the profile, be sure to insert the document as you place it against the left side of the feeding section.

-
The image created from the front side and back side of the document that you scanned is saved as a single content data record in the folder which is specified for [Save to] in the profile.
When scanning double-sided business cards, if you want to scan a single-sided business card, click the [Skip the back side] button in the window, where "Turn over the document and insert it." is displayed.
-
You can receive a notification on your computer about the document type for the content data records and the save destination for the scanned images after the scanning of documents is complete.
For details, refer to Specifying Actions of ScanSnap Home.
When you establish a link with a cloud service with ScanSnap Cloud, refer to Specifying Actions When Using ScanSnap Cloud.
For details, refer to Specifying Actions of ScanSnap Home.