This website is designed to be used with ScanSnap Home 2.xx.
If you are using ScanSnap Home 3.0 or later, refer to here.
Quick Menu for Selecting an Application to Perform a Particular Action
The Quick Menu is a function that allows you to select an application to perform a particular action every time you scan a document.
You can perform a particular action on the scanned image by selecting an application in the Quick Menu which is displayed after scanning a document.
In order to use the Quick Menu, the image created from a document that you scanned is saved in the folder which is specified for [Save to] in the profile, and the scanned image is not managed in ScanSnap Home.
However, if you select one of the following applications in the Quick Menu, the image created from a document that you scanned is saved in the [ScanSnap Home] folder, and the scanned image is managed in ScanSnap Home as a content data record.
ScanSnap Home
Save Documents
Save Business Cards
Save Receipts
Save Photos
When you use the Quick Menu, you cannot assign a password to an image in a PDF format to open it.
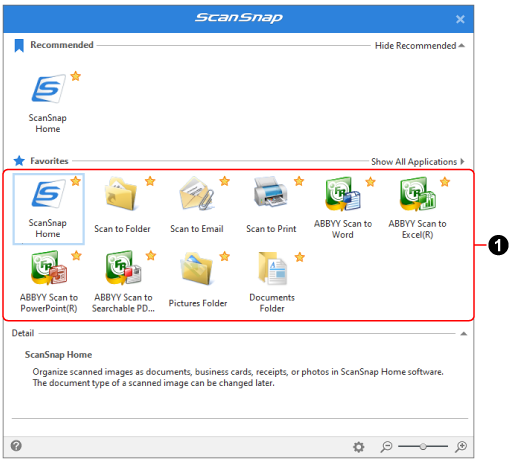
Quick Menu Window
The Quick Menu consists of the following:
-
Shows [ScanSnap Home] as a recommended application.
Click
 /
/  to switch between [Show Recommended] and [Hide Recommended].
 - Favorites/All Applications
-
Two display modes are available in the Quick Menu.
Click
 /
/  to switch the display mode.
[Favorites] mode
Shows only the applications that are specified as favorites in the [Applications to Show/Hide] window.
When you specify applications that are often used as favorites and display them in the [Favorites] mode, you can quickly find a desired application.
For details about how to set applications so that they are displayed in the [Favorites] mode, refer to To change the display of the Quick Menu.
[All Applications] mode
Shows all applications available in the Quick Menu.
 is displayed on the icons for the applications that are specified as favorites in the [Applications to Show/Hide] window.
- Application list (
 )
) -
A list of available applications in order to perform a particular action is displayed.
The applications that you chose to add are also displayed in the Application list.
For details, refer to Adding an Application That You Want to Run.
When the document type for the scanned document is detected incorrectly, the application for the type may not appear in the Application list.
If the application for the type does not appear, select [ScanSnap Home] in the Quick Menu and change the document type after importing the content data record to ScanSnap Home.
To change the document type for a content data record, refer to Changing the Document Type for a Content Data Record.
Images and content information created from the documents that you scanned are managed in ScanSnap Home as content data records. The content data records can be checked in the content data record list view on the main window.
Displayed when the document type of an image is detected as [Documents].
Images and content information created from the documents that you scanned are managed in ScanSnap Home as content data records with [Documents] as the document type. The content data records can be checked in the content data record list view on the main window.
For details about how to display applications in the [Favorites] mode in the Quick Menu, refer to To change the display of the Quick Menu.
Displayed when the document type of an image is detected as [Business Cards].
Images and content information created from the documents that you scanned are managed in ScanSnap Home as content data records with [Business Cards] as the document type. The content data records can be checked in the content data record list view on the main window.
For details about how to display applications in the [Favorites] mode in the Quick Menu, refer to To change the display of the Quick Menu.
Displayed when the document type of an image is detected as [Receipts].
Images and content information created from the documents that you scanned are managed in ScanSnap Home as content data records with [Receipts] as the document type. The content data records can be checked in the content data record list view on the main window.
For details about how to display applications in the [Favorites] mode in the Quick Menu, refer to To change the display of the Quick Menu.
Displayed when the document type of an image is detected as [Photos].
Images and content information created from the documents that you scanned are managed in ScanSnap Home as content data records with [Photos] as the document type. The content data records can be checked in the content data record list view on the main window.
For details about how to display applications in the [Favorites] mode in the Quick Menu, refer to To change the display of the Quick Menu.
- Scan to Folder
In the [Scan to Folder] Window, specify an image created from the document that you scanned, a title, and a folder for the save destination, and then click the [Save] button to save the scanned image as a file.
In the [Scan to Folder] window, you can use Preview to check the image in order to change the orientation of pages, remove unnecessary pages, or display the viewer window to edit the image before saving it.
- Scan to Email
In the [Scan to Email] Window, check images created from the documents that you scanned and check the file names for the images, and click the [Attach] button to attach the image files in a new e-mail window from an e-mail program.
In the [Scan to Email] window, you can use Preview to check the image in order to change the orientation of pages, remove unnecessary pages, or display the viewer window to edit the image before attaching it to an e-mail.
- Scan to Print
In the [Scan to Print] window, check images created from the documents that you scanned, modify the setting if necessary, and click the [Print] button to print the images with a printer.
In the [Scan to Print] window, you can use Preview to check the image in order to change the orientation of pages, remove unnecessary pages, or display the viewer window to edit the image before printing it.
Displayed when Dropbox desktop application 77.4.131 or later is installed and you are logged in to Dropbox.
The images created from the document that you scanned are uploaded to Dropbox by specifying a sync folder in advance.
Refer to here for the Dropbox desktop application download page.
- Evernote
Displayed when Evernote for Windows 6.20.2 or later is installed.
Logging in to Evernote in advance uploads the images created from the document that you scanned to Evernote.
Refer to here for Evernote for Windows download page.
- Google Drive
Displayed when Google Drive for desktop 50.0.11.0 or later is installed and you are logged in to Google Drive.
Specifying a sync folder in advance uploads the images created from the document that you scanned to Google Drive.
Refer to here for the Google Drive for desktop download page.
Displayed when OneDrive sync client 19.103.0527 or later is installed and you are logged in to OneDrive.
Specifying a sync folder in advance uploads the images created from the document that you scanned to Google Drive.
Refer to here for the OneDrive sync client download page.
This is displayed when ABBYY FineReader for ScanSnap is installed.
The images created from the document that you scanned are converted into a Word, Excel, or PowerPoint file.
If you take the contents in an image created from the document that you scanned into consideration when selecting a format for the file to which the image is converted, reproducibility of the image after it is converted becomes higher. For details, refer to OCR Function of ABBYY FineReader for ScanSnap.
TIPRegardless of the settings configured in the application settings window, Word, Excel, or PowerPoint files are saved in the save destination folder together with PDF files with the same names.
This is displayed when ABBYY FineReader for ScanSnap is installed.
The image created from the document that you scanned is converted into a searchable PDF.
Specifying a language of text to be recognized in the setting window for an application improves the text recognition rate.
To display the setting window for the application, click
 which appears when you put the cursor over the icon of the application.
For details about the setting window for the application, refer to the ABBYY FineReader for ScanSnap User's Guide.
TIPRegardless of the settings configured on the setting window for the application, two PDF files will be saved in the destination folder.
A PDF file with "_OCR" at the end of its name is a searchable PDF file.
- Pictures Folder
The images created from the document that you scanned are saved in the Picture folder.
- Documents Folder
The images created from the document that you scanned are saved in the Documents folder.
- Scan to Rack2-Filer Smart
This application is displayed when Rack2-Filer Smart trial version or Rack2-Filer Smart is installed.
The images created from the document that you scanned are saved in Rack2-Filer Smart trial version or Rack2-Filer Smart.
This is available when the file format of the scanned images is PDF.
Displayed when you put the cursor over the icon of an application that the settings can be modified for, and when you click on the icon, the settings window for the application is displayed.
- Detail
Shows the descriptions for the application that you select.
Click
/ to switch the Show/Hide descriptions for the application.
When you click this, the [Applications to Show/Hide] window (where you can select applications to appear in the [Favorites] mode or where you can change the order of applications in the Quick Menu) is displayed.

Changes the icon size of the applications displayed in the Quick Menu in three levels.
Moving the slider to the right enlarges the icon size while moving the slider to the left reduces the icon size.
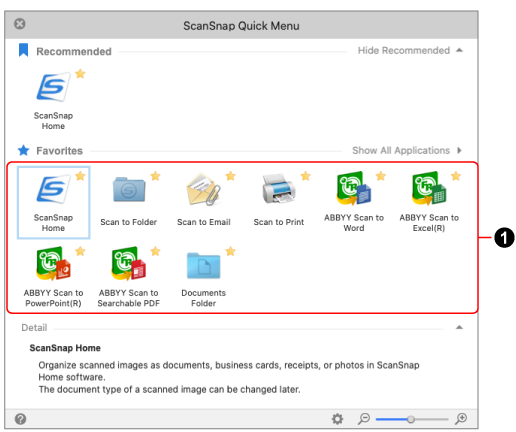
- Recommended
-
Shows [ScanSnap Home] as a recommended application.
Click
/ to switch between [Show Recommended] and [Hide Recommended]. - Favorites/All Applications
-
Two display modes are available in the Quick Menu.
Click
/ to switch the display mode.[Favorites] mode
Shows only the applications that are specified as favorites in the [Applications to Show/Hide] window.
When you specify applications that are often used as favorites and display them in the [Favorites] mode, you can quickly find a desired application.
For details about how to set applications so that they are displayed in the [Favorites] mode, refer to To change the display of the Quick Menu.
[All Applications] mode
Shows all applications available in the Quick Menu.
is displayed on the icons for the applications that are specified as favorites in the [Applications to Show/Hide] window.- Application list ()
-
A list of available applications in order to perform a particular action is displayed.
TIPThe applications that you chose to add are also displayed in the Application list.
For details, refer to Adding an Application That You Want to Run.
When the document type for the scanned document is detected incorrectly, the application for the type may not appear in the Application list.
If the application for the type does not appear, select [ScanSnap Home] in the Quick Menu and change the document type after importing the content data record to ScanSnap Home.
To change the document type for a content data record, refer to Changing the Document Type for a Content Data Record.
- ScanSnap Home
Images and content information created from the documents that you scanned are managed in ScanSnap Home as content data records. The content data records can be checked in the content data record list view on the main window.
- Save Documents
Displayed when the document type of an image is detected as [Documents].
Images and content information created from the documents that you scanned are managed in ScanSnap Home as content data records with [Documents] as the document type. The content data records can be checked in the content data record list view on the main window.
For details about how to display applications in the [Favorites] mode in the Quick Menu, refer to To change the display of the Quick Menu.
- Save Business Cards
Displayed when the document type of an image is detected as [Business Cards].
Images and content information created from the documents that you scanned are managed in ScanSnap Home as content data records with [Business Cards] as the document type. The content data records can be checked in the content data record list view on the main window.
For details about how to display applications in the [Favorites] mode in the Quick Menu, refer to To change the display of the Quick Menu.
- Save Receipts
Displayed when the document type of an image is detected as [Receipts].
Images and content information created from the documents that you scanned are managed in ScanSnap Home as content data records with [Receipts] as the document type. The content data records can be checked in the content data record list view on the main window.
For details about how to display applications in the [Favorites] mode in the Quick Menu, refer to To change the display of the Quick Menu.
- Save Photos
Displayed when the document type of an image is detected as [Photos].
Images and content information created from the documents that you scanned are managed in ScanSnap Home as content data records with [Photos] as the document type. The content data records can be checked in the content data record list view on the main window.
For details about how to display applications in the [Favorites] mode in the Quick Menu, refer to To change the display of the Quick Menu.
- Scan to Folder
In the [Scan to Folder] Window, specify an image created from the document that you scanned, a title, and a folder for the save destination, and then click the [Save] button to save the scanned image as a file.
In the [Scan to Folder] window, you can use Preview to check the image in order to change the orientation of pages or remove unnecessary pages before saving the image.
- Scan to Email
In the [Scan to Email] Window, check images created from the documents that you scanned and check the file names for the images, and click the [Attach] button to attach the image files in a new e-mail window from an e-mail program.
In the [Scan to Email] window, you can use Preview to check the image in order to change the orientation of pages or remove unnecessary pages before attaching it to an e-mail.
- Scan to Print
In the [Print] window, check images created from the documents that you scanned, modify the setting if necessary, and click the [Print] button to print the images with a printer.
- Dropbox
Displayed when Dropbox desktop application 77.4.131 or later is installed and you are logged in to Dropbox.
The images created from the document that you scanned are uploaded to Dropbox by specifying a sync folder in advance.
Refer to here for the Dropbox desktop application download page.
- Evernote
Displayed when Evernote for Mac 7.1.1 or later is installed.
Logging in to Evernote in advance uploads the images created from the document that you scanned to Evernote.
Refer to here for the Evernote for Mac download page.
- Google Drive
Displayed when Google Drive for desktop 50.0.11.0 or later is installed and you are logged in to Google Drive.
Specifying a sync folder in advance uploads the images created from the document that you scanned to Google Drive.
Refer to here for the Google Drive for desktop download page.
- OneDrive
Displayed when OneDrive sync client 19.103.0527 or later is installed and you are logged in to OneDrive.
Specifying a sync folder in advance uploads the images created from the document that you scanned to Google Drive.
Refer to here for the OneDrive sync client download page.
- [ABBYY Scan to Word]/[ABBYY Scan to Excel(R)]/[ABBYY Scan to PowerPoint(R)]
This is displayed when ABBYY FineReader for ScanSnap is installed.
The images created from the document that you scanned are converted into a Word, Excel, or PowerPoint file.
If you take the contents in an image created from the document that you scanned into consideration when selecting a format for the file to which the image is converted, reproducibility of the image after it is converted becomes higher. For details, refer to OCR Function of ABBYY FineReader for ScanSnap.
TIPRegardless of the settings configured in the application settings window, Word, Excel, or PowerPoint files are saved in the save destination folder together with PDF files with the same names.
- ABBYY Scan to Searchable PDF
This is displayed when ABBYY FineReader for ScanSnap is installed.
The image created from the document that you scanned is converted into a searchable PDF.
Specifying a language of text to be recognized in the setting window for an application improves the text recognition rate.
To display the setting window for the application, click
which appears when you put the cursor over the icon of the application.For details about the setting window for the application, refer to the ABBYY FineReader for ScanSnap User's Guide.
TIPRegardless of the settings configured on the setting window for the application, two PDF files will be saved in the destination folder.
A PDF file with "_OCR" at the end of its name is a searchable PDF file.
- Documents Folder
The images created from the document that you scanned are saved in the Documents folder.
Displayed when you put the cursor over the icon of an application that the settings can be modified for, and when you click on the icon, the settings window for the application is displayed.
- Detail
Shows the descriptions for the application that you select.
Click
/ to switch the Show/Hide descriptions for the application.When you click this, the [Applications to Show/Hide] window (where you can select applications to appear in the [Favorites] mode or where you can change the order of applications in the Quick Menu) is displayed.

Changes the icon size of the applications displayed in the Quick Menu in three levels.
Moving the slider to the right enlarges the icon size while moving the slider to the left reduces the icon size.
To change the display of the Quick Menu
In the [Applications to Show/Hide] window, you can select applications to display in the [Favorites] mode or you can change the order of applications in the Quick Menu.
The [Applications to Show/Hide] window appears when you click ![]() in the Quick Menu.
in the Quick Menu.
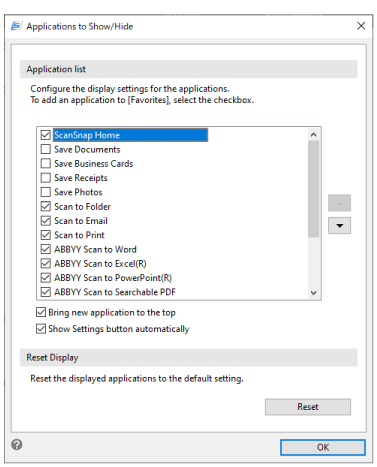
- Application list
Displays all applications that appear in the Quick Menu.
When you select the checkboxes for applications, the selected applications will appear in the [Favorites] mode in the Quick Menu.
![[Up] Button](../common/../images/QM_button_up.png) /
/ ![[Down] Button](../common/../images/QM_button_down.png)
You can change the order of applications that appear in the Quick Menu.
While you select an application in the application list and move the application up or down with this button, the order of applications that appear in the Quick Menu will change.
If an application that you selected cannot move up or down anymore, the button is disabled.
If you select this checkbox, when you add a new application to the Quick Menu, the new application is added to the top of the application list in the Quick Menu. If you clear the checkbox, the new application is added to the bottom of the application list in the Quick Menu.
If you select this checkbox,
is displayed when you put the cursor over an icon for an application that the settings can be modified for.
-
- [Reset] button
When you click this button, the order of applications in the Quick Menu and the show/hide settings in the [Favorites] mode in the Quick Menu return back to the default.
Note that the application that you added is not removed.
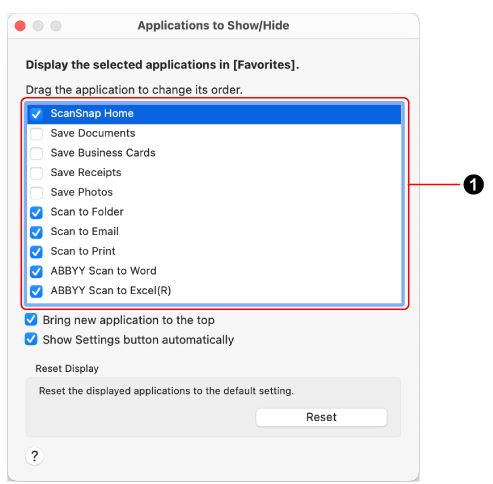
- Application list ()
Displays all applications that appear in the Quick Menu.
When you select the checkboxes for applications, the selected applications will appear in the [Favorites] mode in the Quick Menu.
You can change the order in which they are displayed by drag and drop.
- [Bring new application to the top] checkbox
If you select this checkbox, when you add a new application to the Quick Menu, the new application is added to the top of the application list in the Quick Menu. If you clear the checkbox, the new application is added to the bottom of the application list in the Quick Menu.
- [Show Settings button automatically] checkbox
If you select this checkbox,
is displayed when you put the cursor over an icon for an application that the settings can be modified for.
- Reset Display
-
- [Reset] button
When you click this button, the order of applications in the Quick Menu and the show/hide settings in the [Favorites] mode in the Quick Menu return back to the default.
Note that the application that you added is not removed.