This website is designed to be used with ScanSnap Home 2.xx.
If you are using ScanSnap Home 3.0 or later, refer to here.
Scanning Documents by Inserting Two Documents at a Time or by Inserting the Next Document While the Current Document Is Being Scanned
When scanning small size documents such as business cards, receipts, or postcards with the ScanSnap, you can insert two documents at a time or you can insert the next document while the current document is being scanned. These scanning methods are referred to as dual scans.
Documents can be inserted in the following two methods:
-
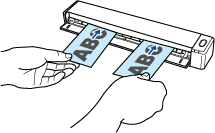
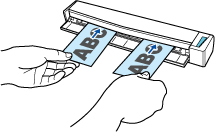
Inserting two documents at a time in the ScanSnap
-
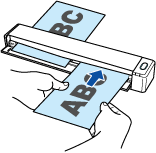
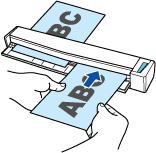
Inserting the next document while the current document is being scanned
When you select an option other than [Automatic detection] for the paper size in the scan settings, the dual scan function is disabled.
-
Use a dual scan to scan a document within the following ranges. If one of the following ranges is exceeded, a length error occurs and part of the document may not appear in the scanned image.
-
Length of a document that can be scanned
863 mm (34 in.) (355.6 mm (14 in.) when [Excellent] is specified for the image quality in the scan settings)
-
Number of documents that can be scanned
20 sheets
-
When you continue scanning by inserting the next document while the current document is being scanned, the [Scan/Stop] button flashes more quickly if the scanning length exceeds 650 mm (26 in.). If this occurs, wait until scanning is complete without continuing to insert more documents. After scanning is complete, insert the next document. The next scan is started automatically.
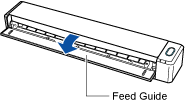
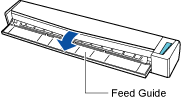
- Open the feed guide of the ScanSnap to turn the power on.
- Click the [Scan] button at the top of the Main Window of ScanSnap Home to display the Scan Window.
If the main window is not already displayed, refer to To Display the Main Window.
If the main window is not already displayed, click the [ScanSnap Home] icon
 in the application list that appears when you click Launchpad in the Dock.
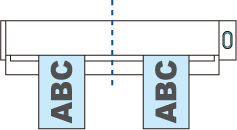
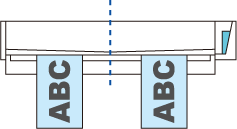
 - Insert documents straight into the feeding section of the ScanSnap, with the scanning side facing up.
Insert each document in the center of the left half and in the center of the right half of the feeding section at least 10 mm (0.39 in.) apart from each other. Make sure that the documents are fed into the ScanSnap and are held firmly.
 ATTENTION
-
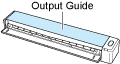
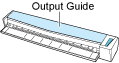
If you scan the following documents with the output guide open, a paper jam may occur and damage the documents. Scan the following documents with the output guide closed.
Thick paper (80 g/m2 [20 lb] or heavier)
Postcards
Business cards
-
The image created from the document that you scanned is saved in the folder which is specified for [Save to] in the profile.
-
You can receive a notification on your computer about the document type for the content data records and the save destination for the scanned images after the scanning of documents is complete.
For details, refer to Specifying Actions of ScanSnap Home.
When you establish a link with a cloud service with ScanSnap Cloud, refer to Specifying Actions When Using ScanSnap Cloud.
For details, refer to Specifying Actions of ScanSnap Home.