This website is designed to be used with ScanSnap Home 2.xx.
If you are using ScanSnap Home 3.0 or later, refer to here.
Changing the Computer Which the ScanSnap is Used with
Set up the ScanSnap to use with ScanSnap Home in the new computer system environment after you replaced the computer that you had been using with a new one or you performed a clean installation on a computer that you are using.
The procedure to set up the ScanSnap is as follows:
 Preparations Before Setting Up the ScanSnap
-
To change the computer or the computer's system environment which the ScanSnap is used with, you need to make preparations on the computer that you are using.
Export profiles that were created on the computer or in the computer system environment that you are using.
For details, refer to Importing or Exporting a Profile.
Save the exported profiles to a folder located in the new computer or new computer system environment.
Export content data records that are managed in ScanSnap Home.
For details, refer to Exporting Content Data Records.
Save the exported content data records to a folder located in the new computer or new computer system environment.
Uninstall ScanSnap Home.
For details, refer to How to Uninstall the Software.
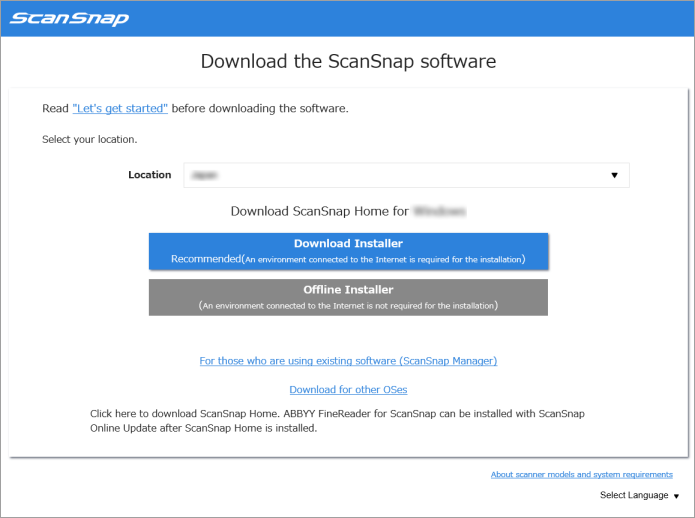
 Downloading the Software
-
On your computer, download the software from here.
When your computer is connected to the Internet
Click [Download Installer] to download the software.
When your computer is not connected to the Internet
On another computer that is connected to the Internet, click [Offline Installer] to download the software in advance.
Copy the downloaded software to your computer.
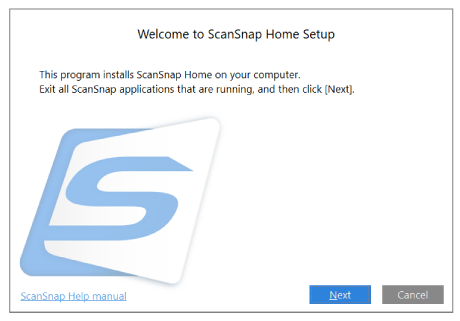
 Installing the Software/Connecting the ScanSnap
-
Run the installer that you saved on your computer.
When the [ScanSnap Home Setup] window (Welcome to ScanSnap Home Setup) appears, click the [Next] button to start installing the software.
Follow the instructions to install the software.
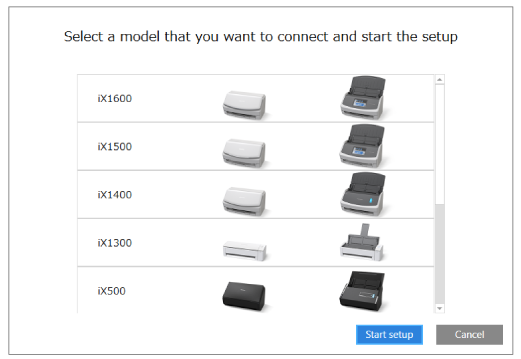
The window for selecting a model to be connected appears after the installation is complete, select a ScanSnap model that you want to connect and then click the [Start setup] button.
-
When the [ScanSnap Home - Connecting ScanSnap] window (Connect the ScanSnap to your computer) is displayed, follow the instructions on the window to connect the ScanSnap to a computer via a USB cable and click the [Next] button.
Do not use a cable other than the supplied one to connect to the ScanSnap. Using other cables may cause a scanner failure.
TIPIf you cannot connect a USB cable to a computer, click [Setup without the USB cable] displayed in the lower left of the [ScanSnap Home - Connecting ScanSnap] window (Connect the ScanSnap to your computer), and follow the instructions on the window to connect the ScanSnap to the computer via Wi-Fi.
The default scanner name of the ScanSnap is "ModelName-<Serial No.>".
To connect the ScanSnap and a computer via Wi-Fi, you need to connect the computer and the ScanSnap to the same wireless access point.
TIPIf you cannot connect a USB cable to a computer, click [Setup without the USB cable] displayed in the lower left of the [ScanSnap Home - Connecting ScanSnap] window (Connect the ScanSnap to your computer), and follow the instructions on the window to connect the ScanSnap to the computer via Wi-Fi.
When the [ScanSnap Home - Connecting ScanSnap] window (How to connect ScanSnap) is displayed, follow the instructions on the window to connect the ScanSnap to a computer via a USB cable and click the [Next] button.
Do not use a cable other than the supplied one to connect to the ScanSnap. Using other cables may cause a scanner failure.
-
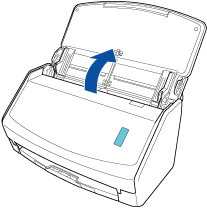
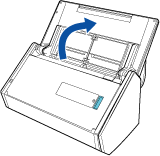
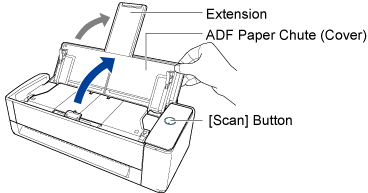
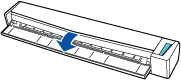
Follow the instructions on the window and open the ADF paper chute (cover) of the ScanSnap to turn the power on, then click the [Next] button.
-
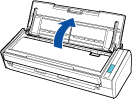
Follow the instructions on the window and hold the right side of the ADF paper chute (cover) of the ScanSnap, and open it to turn the power on, then click the [Next] button.
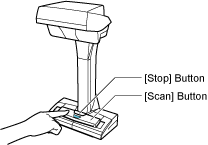
Open the ADF paper chute (cover) fully so that the [Scan] button lights up in blue.
When the ADF paper chute (cover) is opened, the extension will rise automatically.
-
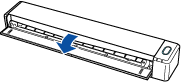
Follow the instructions on the window and open the feed guide of the ScanSnap to turn the power on, then click the [Next] button.
-
Follow the instructions on the window and press the [Scan] button or [Stop] button on the ScanSnap to turn the power on, and then click the [Next] button.
When the [ScanSnap Home - Connecting ScanSnap] window (Select a startup mode.) appears, select a startup mode and click the [Next] button.
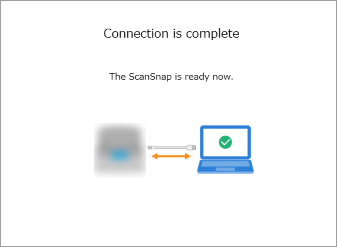
When the "Connection is complete" window appears, click the [Next] button.
When the "ScanSnap has been connected successfully." window appears, click the [Finish] button.

The window for checking whether to configure the Wi-Fi settings for the ScanSnap is displayed.
- Wi-Fi connection
-
ATTENTION
-
To connect the ScanSnap and a computer via Wi-Fi, the computer must be already connected to the wireless access point that you want to connect the ScanSnap to.
Click the [Yes] button.
When the wireless network setup wizard appears, follow the instructions on the window to connect the ScanSnap to a wireless access point.
-
- USB cable connection
Click the [No] button.
The Wi-Fi settings for the ScanSnap can be configured later.
For details, refer to Connecting the ScanSnap and the Computer Via a Specified Wireless Access Point.
For details, refer to Configuring the Wi-Fi Settings.
When the [ScanSnap wireless network setup] window appears, select whether to configure the Wi-Fi settings for the ScanSnap.
- Wi-Fi connection
-
ATTENTION
-
To connect the ScanSnap and a computer via Wi-Fi, the computer must be already connected to the wireless access point that you want to connect the ScanSnap to.
Click the [Setup now] button.
When the wireless network setup wizard appears, follow the instructions on the window to connect the ScanSnap to a wireless access point.
-
- USB cable connection
Click the [Later] button.
The Wi-Fi settings for the ScanSnap can be configured later.
For details, refer to Configuring the Wi-Fi Settings.
When the ScanSnap is connected correctly, the scanner name of the connected ScanSnap is displayed in [Select a scanner] in the Scan Window.
 Operations After Setting Up the ScanSnap
-
Import the profiles and content data records that you saved before setting up the ScanSnap, to ScanSnap Home on your new computer or in the new computer system environment.
Import the profiles.
For details, refer to Importing or Exporting a Profile.
Import the content data records.
For details, refer to Importing Content Data Records.
The imported profiles will be displayed in the scan window of ScanSnap Home, and the imported content data records are displayed in the Content Data Record List View of the Main Window.