This website is designed to be used with ScanSnap Home 2.xx.
If you are using ScanSnap Home 3.0 or later, refer to here.
Setting Up the ScanSnap That You Purchased as a Replacement or as an Additional Scanner
Set up the ScanSnap that you purchased as a replacement or as an additional scanner so that it is ready to scan with ScanSnap Home.
The following preparations are required before you set up the ScanSnap.
-
Check that all items are included in the package
For details, refer to Package List.
For details, refer to "Package List" in Getting Started that is supplied with the scanner.
TIPWhen Getting Started is included in the package, refer to "Package List" in Getting Started.
-
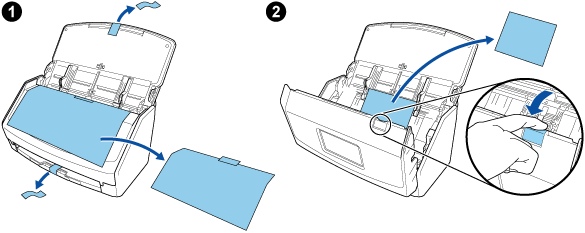
Remove the protective inner cover and tape (
 ) and the cardboard sheet (
 ) from the ScanSnap
For ScanSnap iX1600
For ScanSnap iX1600 Receipt Edition
-
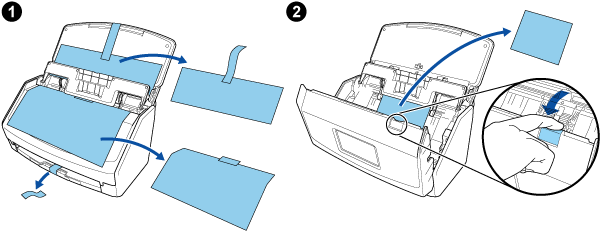
Remove the protective inner cover and tape (
) and the cardboard sheet () from the ScanSnap
-
Remove the protective inner cover and tape (
) and the cardboard sheet () from the ScanSnap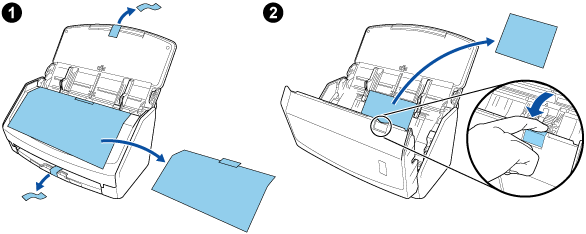
-
Remove the materials used for protection from the ScanSnap
For details, refer to Getting Started that is supplied with the scanner.
-
Remove the protective inner cover and tape (
) and the cardboard sheet () from the ScanSnap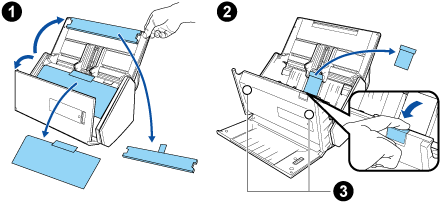
The data on the card may be lost if the black magnetic part of a magnetic card or IC card is in contact with the magnetic part (
 ).
).
-
Remove the tape seal (
) and tape () from the ScanSnap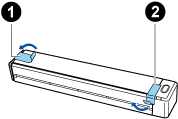
-
Remove the tape (
) and tape seal () from the ScanSnap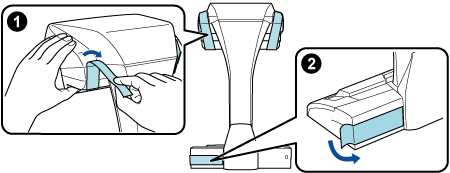
-
Remove the tape seal (
) from the ScanSnap
-
Remove the tape seal (
) and tape () from the ScanSnap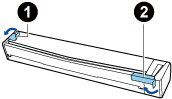
-
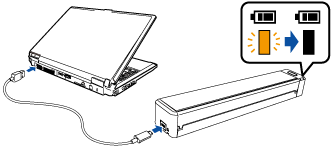
Connect the ScanSnap and the computer with a USB cable, and charge the battery until the battery indicator light turns off
 ATTENTION
Do not open the feed guide until the instructions are displayed on the window for installing software.
It is recommended to use the supplied USB cable, but you can also charge the ScanSnap using your own USB power adapter.
-
Attach the extenders to the ScanSnap
ATTENTION-
The following preparations are required before you attach the extenders.
Wipe off dust and dirt such as oily dirt on the place where the extenders will be attached
Peel the protective tape off the bottom of the extenders
Leaving about 3 to 5 mm of space between the extenders and the back and side of the ScanSnap, push the extenders down until they lock in place. If the extenders are placed against the side of the ScanSnap base or the protrusion of the extenders are placed on the ScanSnap base, the bottom of the extenders may not stay in place firmly.

-
The procedure to set up the ScanSnap is as follows:
-
If ScanSnap Manager is installed on a computer, refer to Migrating ScanSnap Manager to ScanSnap Home to set up the ScanSnap.
Click the [Scan] button at the top of the Main Window of ScanSnap Home to display the Scan Window.
If the main window is not already displayed, refer to To Display the Main Window.
If the main window is not already displayed, click
![[ScanSnap Home] Icon](../common/../images/SSHome_icon.png) in the application list that appears when you click Launchpad in the Dock.
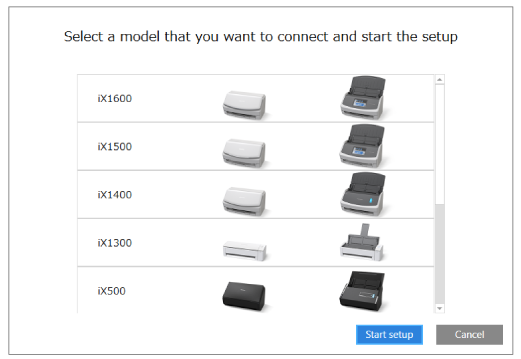
in the application list that appears when you click Launchpad in the Dock.Select [Add a ScanSnap] from the [Select a scanner] list.
The window for selecting a model to be connected appears, select a ScanSnap model that you want to connect and then click the [Start setup] button.
-
When the [ScanSnap Home - Connecting ScanSnap] window (Connect the ScanSnap to your computer) is displayed, follow the instructions on the window to connect the ScanSnap to a computer via a USB cable and click the [Next] button.
Do not use a cable other than the supplied one to connect to the ScanSnap. Using other cables may cause a scanner failure.
TIPIf you cannot connect a USB cable to a computer, click [Setup without the USB cable] displayed in the lower left of the [ScanSnap Home - Connecting ScanSnap] window (Connect the ScanSnap to your computer), and follow the instructions on the window to connect the ScanSnap to the computer via Wi-Fi.
The default scanner name of the ScanSnap is "ModelName-<Serial No.>".
To connect the ScanSnap and a computer via Wi-Fi, you need to connect the computer and the ScanSnap to the same wireless access point.
TIPIf you cannot connect a USB cable to a computer, click [Setup without the USB cable] displayed in the lower left of the [ScanSnap Home - Connecting ScanSnap] window (Connect the ScanSnap to your computer), and follow the instructions on the window to connect the ScanSnap to the computer via Wi-Fi.
When the [ScanSnap Home - Connecting ScanSnap] window (How to connect ScanSnap) is displayed, follow the instructions on the window to connect the ScanSnap to a computer via a USB cable and click the [Next] button.
Do not use a cable other than the supplied one to connect to the ScanSnap. Using other cables may cause a scanner failure.
-
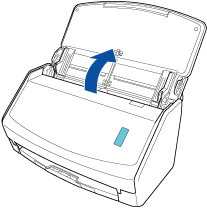
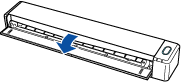
Follow the instructions on the window and open the ADF paper chute (cover) of the ScanSnap to turn the power on, then click the [Next] button.
-
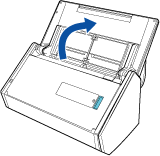
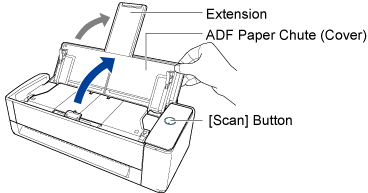
Follow the instructions on the window and hold the right side of the ADF paper chute (cover) of the ScanSnap, and open it to turn the power on, then click the [Next] button.
Open the ADF paper chute (cover) fully so that the [Scan] button lights up in blue.
When the ADF paper chute (cover) is opened, the extension will rise automatically.
-
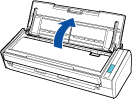
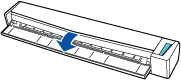
Follow the instructions on the window and open the feed guide of the ScanSnap to turn the power on, then click the [Next] button.
-
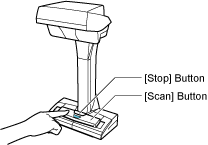
Follow the instructions on the window and press the [Scan] button or [Stop] button on the ScanSnap to turn the power on, and then click the [Next] button.
When the [ScanSnap Home - Connecting ScanSnap] window (Select a startup mode.) appears, select a startup mode and click the [Next] button.
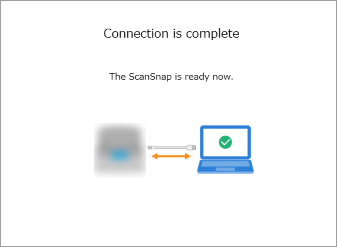
When the "Connection is complete" window appears, click the [Next] button.
When the "ScanSnap has been connected successfully." window appears, click the [Finish] button.

The window for checking whether to configure the Wi-Fi settings for the ScanSnap is displayed.
- Wi-Fi connection
-
ATTENTION
-
To connect the ScanSnap and a computer via Wi-Fi, the computer must be already connected to the wireless access point that you want to connect the ScanSnap to.
Click the [Yes] button.
When the wireless network setup wizard appears, follow the instructions on the window to connect the ScanSnap to a wireless access point.
-
- USB cable connection
Click the [No] button.
The Wi-Fi settings for the ScanSnap can be configured later.
For details, refer to Connecting the ScanSnap and the Computer Via a Specified Wireless Access Point.
For details, refer to Configuring the Wi-Fi Settings.
When the [ScanSnap wireless network setup] window appears, select whether to configure the Wi-Fi settings for the ScanSnap.
- Wi-Fi connection
-
ATTENTION
-
To connect the ScanSnap and a computer via Wi-Fi, the computer must be already connected to the wireless access point that you want to connect the ScanSnap to.
Click the [Setup now] button.
When the wireless network setup wizard appears, follow the instructions on the window to connect the ScanSnap to a wireless access point.
-
- USB cable connection
Click the [Later] button.
The Wi-Fi settings for the ScanSnap can be configured later.
For details, refer to Configuring the Wi-Fi Settings.
When the [ScanSnap Home - Connecting ScanSnap] window (Let's use it!) appears, check the contents and click the [Close] button.
The ScanSnap is registered with ScanSnap Home and you can perform a scan.