This website is designed to be used with ScanSnap Home 2.xx.
If you are using ScanSnap Home 3.0 or later, refer to here.
Scanning a Book Using Page Turning Detection
Scan a book using the page turning detection, which automatically starts a scan when a page in a book is turned.
This scanning method is very useful when you scan multiple pages in a book continuously.
-
When the installation environment of the ScanSnap or the specification of the book encounters any of the following, use timed mode to scan a book.
For details, refer to Scanning Documents Using Timed Mode.
Installation environment of the ScanSnap
The ScanSnap is installed under direct sunlight
The ScanSnap is installed under lighting that emits a lot of infrared rays such as incandescent lamps
The ScanSnap is under uneven lighting caused by some environmental factors such as the use of a spotlight
An object other than the book to be scanned is placed on the Background Pad
A device that emits infrared light such as a heater is placed near the ScanSnap
Movement of shadow such as a person appears on the Background Pad
Book specifications
Books such as comics and paperback books, which are smaller than A4 (210 × 297 mm)/Letter (8.5 × 11 in. (216 × 279.4 mm)) when opened in a double-page spread
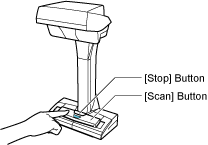
When scanning a book, you can also enable page turning detection by holding down the [Scan] button on the ScanSnap for 2 seconds or longer. When this is the case, after you finish scanning the documents, page turning detection becomes disabled again.
-
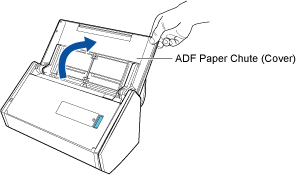
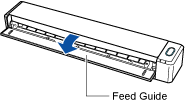
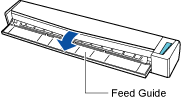
Open the ADF paper chute (cover) of the ScanSnap to turn the power on. Hold the right side of the ADF paper chute (cover) of the ScanSnap then open it or press the [Scan] button to turn it on. Open the feed guide of the ScanSnap to turn the power on. Press the [Scan] button or [Stop] button on the ScanSnap to turn the power on.
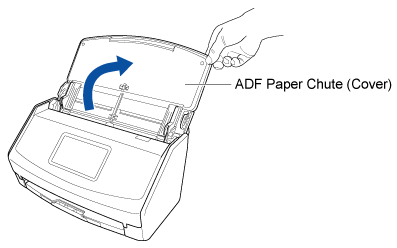
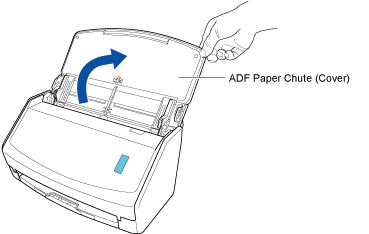
Open the ADF paper chute (cover) fully so that the [Scan] button lights up in blue.
When the ADF paper chute (cover) is opened, the extension will rise automatically.


-
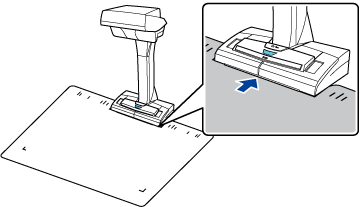
Place the Background Pad on the front side of the ScanSnap.
Place the Background Pad so that it is in contact with the ScanSnap.
- Configure the settings for a profile.
- Click the [Scan] button at the top of the Main Window of ScanSnap Home to display the Scan Window.
If the main window is not already displayed, refer to To Display the Main Window.
If the main window is not already displayed, click the [ScanSnap Home] icon
 in the application list that appears when you click Launchpad in the Dock.
 -
Click
 to display the [Edit profiles] Window.
TIP
to display the [Edit profiles] Window.
TIPWhen creating a new profile, click
 .
.From the template list in the [Add new profile] Window that appears when you click
, select a template profile and modify the settings.
- Click the [Scan] button at the top of the Main Window of ScanSnap Home to display the Scan Window.
- Place a book in the scan area of the ScanSnap.
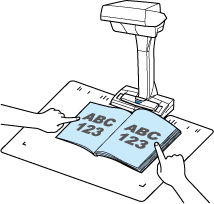
- Open the next page to be scanned.
Turn the pages at a constant speed. The recommended page turning speed is approximately 1 to 2 seconds per page.
To make page turning easy to detect, hold the bottom part of the page and keep the page straight when turning it.
To continue scanning pages in the book, turn to the next page after a scan is complete.
 ATTENTION
Do not cover the white sheets on the ScanSnap with your hands or with something else while scanning a book. The color reproducibility of the scanned image will be affected.
Do not shake the table or desk when the ScanSnap is being used or move the book while it is being scanned. Doing so may distort the scanned image or blur the color.
TIPWhen [Turn the page.] message appears on the [ScanSnap Home - Image scanning and file saving] window, if you hold or move your hand over the Background Pad, such motion may be incorrectly detected as page turning.
If continuous scanning does not start after a page is turned, click the [Continue Scanning] button in the [ScanSnap Home - Image scanning and file saving] window or press the [Scan] button on the ScanSnap.
The image created from the book that you scanned is saved in the folder which is specified for [Save to] in the profile.
-
You can receive a notification on your computer about the document type for the content data records and the save destination for the scanned images after the scanning of a book is complete.
For details, refer to Specifying Actions of ScanSnap Home.