This website is designed to be used with ScanSnap Home 2.xx.
If you are using ScanSnap Home 3.0 or later, refer to here.
The Image Is Skewed
When you perform a scan with the ScanSnap, if the scanned image is skewed, check the following:
Did the document skew during scanning?
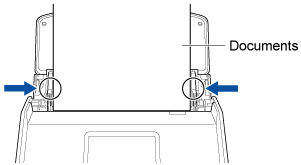
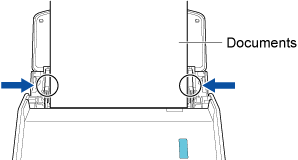
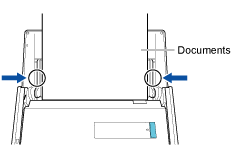
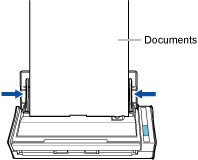
When you load the documents, adjust the side guides to the width of the documents.
When you load the documents in the ADF paper chute (cover), adjust the side guides to the width of the documents.
Hold each side guide in the middle to adjust them. Otherwise, the documents may be fed skewed.
Feeding documents becomes easier with the Receipt Guide.
For details about how to attach the Receipt Guide, refer to Attaching the Receipt Guide.
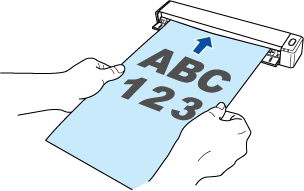
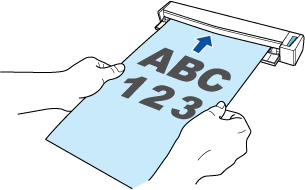
When you insert a document into the manual feeder, insert it straight.
Make sure that the document is fed into the ScanSnap and is held firmly.
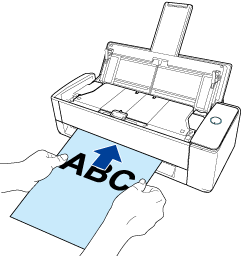
Did you insert the document at a skewed angle in the ScanSnap?
Insert the document straight into the feeding section of the ScanSnap.
Make sure that the document is fed into the ScanSnap and is held firmly.
Did you scan documents of different widths and lengths in the same batch?
Perform one of the following:
Align the top of the documents, and load them in the ADF paper chute (cover) as the leading edge. Make sure that all documents are set to the center of the pick roller's width.
Also, adjust the side guides to the widest document in the batch. Load the other documents so that they can be scanned straight.
For details, refer to Scanning Documents of Different Sizes in One Go.
Change the feed mode setting to [Continuous scan] in the procedure below. Then, divide the documents into batches with the same width to load them separately and then scan them.
On the touch panel of the ScanSnap, select the profile that you are using from the profile list in the home screen.
Press the feed mode setting icon and change the feed mode setting to [Continuous scan].
If you change the scan settings on the touch panel and scan a document, after it is scanned, the scan settings will return back to the settings before any changes are made. If you want to scan documents under the same settings all the time, the scan settings need to be saved as a profile.
Use the Receipt Guide to perform a scan.
For details about how to attach the Receipt Guide, refer to Attaching the Receipt Guide.
Perform one of the following:
Align the top of the documents, and load them in the ADF paper chute (cover) as the leading edge. Make sure that all documents are set to the center of the pick roller's width.
Align the top of the documents, and load them in the ADF paper chute (cover) as the leading edge. Make sure that all documents are set to the center of the pick roller's width.
Also, adjust the side guides to the widest document in the batch. Load the other documents so that they can be scanned straight.
For details, refer to Scanning Documents of Different Sizes in One Go.
Change the feed mode setting to [Continuous scan] in the procedure below. Then, divide the documents into batches with the same width to load them separately and then scan them.
-
Click the [Scan] button at the top of the main window of ScanSnap Home to display the scan window.
If the main window is not already displayed, refer to To Display the Main Window.
Select the profile that you are using from the profile list.
Click the feed mode setting icon and change the feed mode setting to [Continuous scan].
-
Click the [Scan] button at the top of the main window of ScanSnap Home to display the scan window.
If the main window is not already displayed, click the [ScanSnap Home] icon
 in the application list that appears when you click Launchpad in the Dock.
 Select the profile that you are using from the profile list.
Click the feed mode setting icon and change the feed mode setting to [Continuous scan].
If you change the scan settings in the scan window and scan a document, after it is scanned, the scan settings will return back to the settings before any changes are made. If you want to scan documents under the same settings all the time, the scan settings need to be saved as a profile.
-
Have you selected the [Deskew by document text] checkbox in the scan settings?
Depending on the contents of the document, the skewed image may not be corrected properly.
The image may be skewed when you scan the following types of documents:
Documents on which pitches between lines or characters are extremely narrow, or characters are overlapped
Documents with many outlined or decorated characters
Documents with many photographs or figures and few characters
Documents with characters on a patterned background
Documents with characters printed in various directions such as drawings
Documents with long diagonal lines
Documents with handwritten characters
Clear the [Deskew by document text] checkbox in the following procedure:
-
Click the [Scan] button at the top of the main window of ScanSnap Home to display the scan window.
If the main window is not already displayed, refer to To Display the Main Window.
Select the profile that you are using from the profile list.
Click
 to display the [Edit profiles] window.
Click the [Detailed settings] button in [Scan settings] to display the [Detailed settings] window.
Click the [Option] button in the [Scan] tab to display the [Scanning options] window.
Clear the [Deskew by document text] checkbox.
-
Click the [Scan] button at the top of the main window of ScanSnap Home to display the scan window.
If the main window is not already displayed, click the [ScanSnap Home] icon
in the application list that appears when you click Launchpad in the Dock. Select the profile that you are using from the profile list.
Click
to display the [Edit profiles] window.Click the [Detailed settings] button in [Scan settings] to display the [Detailed settings] window.
Click the [Option] button in the [Scan] tab to display the [Scanning options] window.
Clear the [Deskew by document text] checkbox.
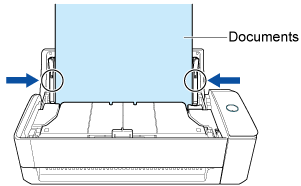
Did you adjust the side guides to the width of the document?
When you load the document, adjust the side guides to the width of the document.
Hold each side guide in the middle to adjust them. Otherwise, the document may be fed skewed.