This website is designed to be used with ScanSnap Home 2.xx.
If you are using ScanSnap Home 3.0 or later, refer to here.
Using Multiple ScanSnap Units with One Computer
Multiple ScanSnap units can be added to one computer. Switch to a ScanSnap unit to be connected which you selected from those added to the computer in ScanSnap Home. For example, you can connect a ScanSnap unit in your office and another one at home to a single computer, and easily switch between them.
When doing so, using ScanSnap Cloud allows you to use the profile with the same settings on either of the ScanSnap units.
For regions where ScanSnap Cloud can be used, refer to here.

It is assumed in the following explanation that ScanSnap Home is installed on a computer to be connected to the ScanSnap. If not, install ScanSnap Home from here.
Up to ten ScanSnap units per computer can be registered.
- Connect the ScanSnap to a wireless access point.
-
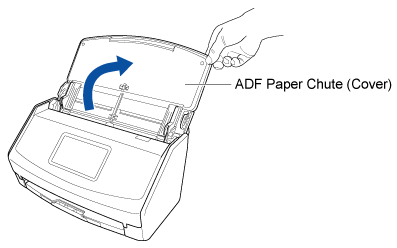
Open the ADF paper chute (cover) of the ScanSnap to turn the power on.
- Press
 in the home screen on the touch panel of the ScanSnap to display the [Settings] screen.
 - Press
 to display the [Wi-Fi settings] screen.
 - Press
 to return to the [Wi-Fi settings] screen.
 - Press to return to the [Wi-Fi settings] screen.
- Press
 to display the home screen.
-
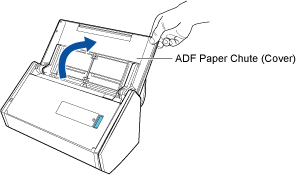
Open the ADF paper chute (cover) of the ScanSnap to turn the power on.
- Check the scanner name of the ScanSnap to be connected.
- Press in the home screen on the touch panel of the ScanSnap to display the [Settings] screen.
- Press
 to display the [Connecting Devices] screen.
 - Check the scanner name that is displayed in [Scanner name].
- Press
- Add the ScanSnap that you want to use to ScanSnap Home.
-
Click the [Scan] button at the top of the Main Window of ScanSnap Home to display the Scan Window.
If the main window is not already displayed, refer to To Display the Main Window.
If the main window is not already displayed, click the [ScanSnap Home] icon
 in the application list that appears when you click Launchpad in the Dock.
-
Click the [Scan] button at the top of the Main Window of ScanSnap Home to display the Scan Window.
-
Open the ADF paper chute (cover) of the ScanSnap to turn the power on.
-
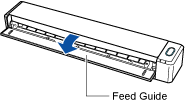
Open the feed guide of the ScanSnap to turn the power on.
-
Hold the right side of the ADF paper chute (cover) of the ScanSnap then open it or press the [Scan] button to turn it on.
Open the ADF paper chute (cover) fully so that the [Scan] button lights up in blue.
When the ADF paper chute (cover) is opened, the extension will rise automatically.

-
Click the [Scan] button at the top of the Main Window of ScanSnap Home to display the Scan Window.
If the main window is not already displayed, refer to To Display the Main Window.
If the main window is not already displayed, click the [ScanSnap Home] icon
in the application list that appears when you click Launchpad in the Dock.
Multiple ScanSnap units can be used with one computer by switching the connection. [Scan to Cloud] which is the default profile, and a profile that you added by selecting [Scan to Cloud] which is the template profile can be used with all the ScanSnap units that are added to ScanSnap Home.
-
You can also connect the ScanSnap by clicking the [Add] button under [Scanner information] in the [Scanner] tab of the preferences window. To remove the ScanSnap that you do not need, select the ScanSnap from the list of ScanSnap units and click the [Remove] button. It is also removed from the [Select a scanner] list in the scan window.
To display the preferences window, select [Settings] → [Preferences] from the menu.
-
You can also connect the ScanSnap by clicking the [Add] button under [Scanner information] in the [Scanner] tab of the preferences window. To delete the ScanSnap that you do not need, select the ScanSnap from the list of ScanSnap units and click the [Delete] button. It is also deleted from the [Select a scanner] list in the scan window.
To display the preferences window, select [ScanSnap Home] → [Preferences] in the menu bar.