• HOME
  • ScanSnap iX1600

  • ScanSnap Help
  • Scanning Documents
  • How to Scan Receipts/Invoices (ScanSnap iX1600 Receipt Edition)
  • Transferring Information on Scanned Receipts/Invoices to QuickBooks (ScanSnap iX1600 Receipt Edition)

Transferring Information on Scanned Receipts/Invoices to QuickBooks (ScanSnap iX1600 Receipt Edition)

You can transfer content information created from receipts/invoices scanned with the ScanSnap to QuickBooks Online or QuickBooks Desktop.

You can also edit the images and content information in the [Scan to QuickBooks] window before transferring them to QuickBooks.

To transfer information on scanned receipts/invoices to QuickBooks Desktop, download and install one of the following client applications from the download page.

  • QuickBooks Desktop Pro 2021 or later

  • QuickBooks Desktop Premier 2021 or later

  • QuickBooks Desktop Enterprise 2021 or later

Refer to here for the download page.

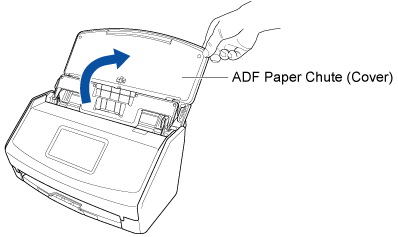
  1. Open the ADF paper chute (cover) of the ScanSnap to turn the power on.
    Opening the ADF Paper Chute (Cover)
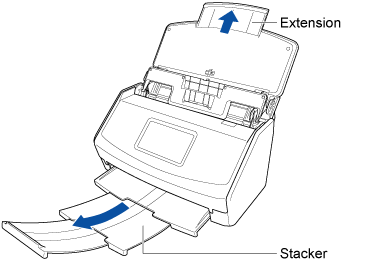
  2. Pull out the extension and the stacker on the ADF paper chute (cover).
    Pulling Out the Extension
  3. In the Home screen on the touch panel, select [quickbooks] from the profile list.
    HINT
    • When multiple users share one ScanSnap unit, make sure that a profile that was created with another computer is not selected.

      You can switch to the profile list which displays only profiles created with the computer that is using the ScanSnap.

      For details, refer to Changing Users in order to Display the User's Own Profiles.

    • If [quickbooks] is not displayed in the profile list, create a new profile in ScanSnap Home. When you create a new profile, select [quickbooks] as a template profile.

      For details, refer to Creating a New Profile.

  4. Specify the feeding method.

    When the feed mode setting icon displayed on the right side of the [Scan] button on the touch panel is Manual Scan, select [Normal scan] or [Continuous scan] in the [Feed mode setting] screen that is displayed when the icon is pressed.

  5. Load documents in the ADF paper chute (cover).

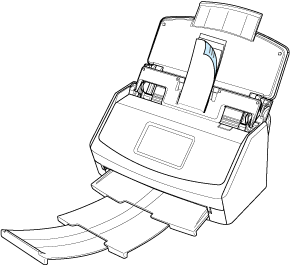
    Load documents in the guides on the Receipt Guide according to the width of each guide.

    Load the documents face-down and top-first with their back facing you.

    For details about documents that can be loaded with the Receipt Guide, refer to Attaching the Receipt Guide.

    Loading Documents
  6. Press the [Scan] button in the home screen on the touch panel to scan the documents.
  7. Establish a link with QuickBooks.
    • If you are establishing a link with QuickBooks for the first time

      Select the application that you want to establish a link with in the [Select Application] window.

      To establish a link with QuickBooks, operate in accordance with the instructions on the window that is displayed after the application is selected.

    • If you have already established a link with QuickBooks

      The [Scan to QuickBooks] window will be displayed. Confirm the application with which a link is established in [Export to] at the top of the window.

      To change the application, select another application from the [Export to] list.

  8. Check images and content information created from the documents that you scanned in the [Scan to QuickBooks] window.

    If necessary, edit the images and content information.

  9. Click the [Export] button.

The content information created from the scanned receipts/invoices will be transferred to QuickBooks Online or QuickBooks Desktop.

HINT
  • You can receive a notification on your computer about the document type for the content data records and the save destination for the scanned images after the scanning of documents is complete.

    For details, refer to Specifying Actions of ScanSnap Home.
You can transfer content information created from receipts/invoices scanned with the ScanSnap to QuickBooks Online.

You can also edit the images and content information in the [Scan to QuickBooks Online] window before transferring them to QuickBooks Online.

  1. Open the ADF paper chute (cover) of the ScanSnap to turn the power on.
    Opening the ADF Paper Chute (Cover)
  2. Pull out the extension and the stacker on the ADF paper chute (cover).
    Pulling Out the Extension
  3. In the Home screen on the touch panel, select [quickbooks online] from the profile list.
    HINT
    • When multiple users share one ScanSnap unit, make sure that a profile that was created with another computer is not selected.

      You can switch to the profile list which displays only profiles created with the computer that is using the ScanSnap.

      For details, refer to Changing Users in order to Display the User's Own Profiles.

    • If [quickbooks online] is not displayed in the profile list, create a new profile in ScanSnap Home. When you create a new profile, select [quickbooks online] as a template profile.

      For details, refer to Creating a New Profile.

  4. Specify the feeding method.

    When the feed mode setting icon displayed on the right side of the [Scan] button on the touch panel is Manual Scan, select [Normal scan] or [Continuous scan] in the [Feed mode setting] screen that is displayed when the icon is pressed.

  5. Load documents in the ADF paper chute (cover).

    Load documents in the guides on the Receipt Guide according to the width of each guide.

    Load the documents face-down and top-first with their back facing you.

    For details about documents that can be loaded with the Receipt Guide, refer to Attaching the Receipt Guide.

    Loading Documents
  6. Press the [Scan] button in the home screen on the touch panel to scan the documents.
  7. When the [Scan to QuickBooks Online] window of ScanSnap Home appears, click the [Connect] button on the top of the window to sign in to QuickBooks Online.

    Perform operations while following the instructions on the window.

    If you have already signed in to QuickBooks Online, proceed to the next step.

  8. Check images and content information created from the documents that you scanned.

    If necessary, edit the images and content information.

  9. Click the [Export] button.

The content information created from the scanned receipts/invoices will be transferred to QuickBooks Online.

HINT
  • You can receive a notification on your computer about the document type for the content data records and the save destination for the scanned images after the scanning of documents is complete.

    For details, refer to Specifying Actions of ScanSnap Home.
See also

  • Power for the ScanSnap
  • Documents That Can Be Scanned with the ScanSnap
  • Advanced Functions for the ScanSnap iX1600 Receipt Edition
  • Making Information on Scanned Receipts/Invoices Manageable with ScanSnap Home (ScanSnap iX1600 Receipt Edition)
  • Before Using This Site
  • How to Use This Site
  • Customer Support
  • Cookie Policy

© PFU Limited 2018-2024

  • TOP