• HOME
  • ScanSnap Help
  • Scanning Documents
  • Linking with a Cloud Service
  • Saving a Scanned Image in a Cloud Service by Using ScanSnap Cloud

Saving a Scanned Image in a Cloud Service by Using ScanSnap Cloud

Save an image created from the document that you scanned in a cloud service by using ScanSnap Cloud.

For regions where ScanSnap Cloud can be used, refer to here.

HINT
  • To save an image created from a document that you scanned with the ScanSnap to a cloud service, two methods are available.

    For details, refer to Differences in the Methods for Establishing a Link with a Cloud Service.

  • A profile which uses ScanSnap Cloud to save a scanned image in a cloud service may not be displayed in the profile list on the touch panel depending on the setting that has been selected for the method for displaying profiles.

    For details, refer to Changing Users in order to Display the User's Own Profiles.

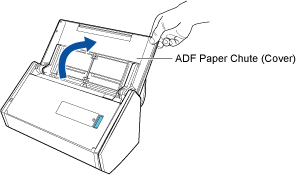
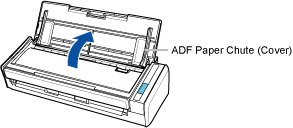
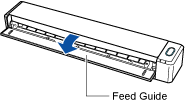
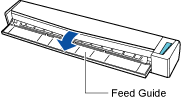
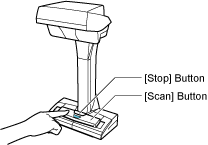
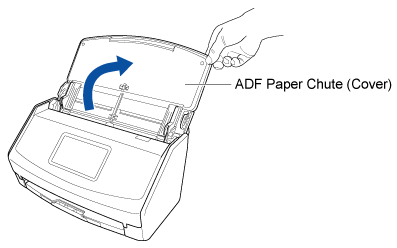
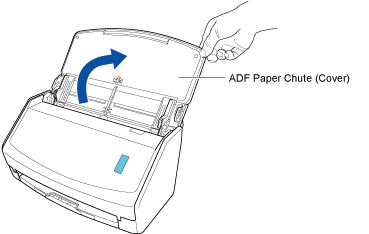
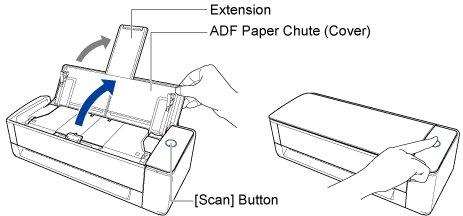
  1. Open the ADF paper chute (cover) of the ScanSnap to turn the power on. Hold the right side of the ADF paper chute (cover) of the ScanSnap then open it or press the [Scan] button to turn it on. Open the feed guide of the ScanSnap to turn the power on. Press the [Scan] button or [Stop] button on the ScanSnap to turn the power on.
    Opening the ADF Paper Chute (Cover)
    Opening the ADF Paper Chute (Cover)

    Open the ADF paper chute (cover) fully so that the [Scan] button lights up in blue.

    When the ADF paper chute (cover) is opened, the extension will rise automatically.

    Opening the ADF Paper Chute (Cover)
    Opening the ADF Paper Chute (Cover)
    Opening the ADF Paper Chute (Cover)
    Opening the Feed Guide
    Opening the Feed Guide
    Turning On
  2. Open the feed guide of the ScanSnap to turn the power on.
    Opening the Feed Guide
    HINT
    • If you want the document to be ejected from the front of the ScanSnap or when there is not enough space where the document exits the ScanSnap, open the output guide.

      Opening the Output Guide
    • How the document is ejected differs as below depending on whether the output guide is open or closed.

      • When the output guide is closed

        When the Output Guide Is Closed
      • When the output guide is open

        When the Output Guide Is Open
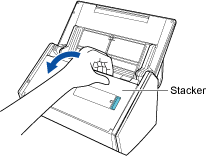
  3. Pull the stacker towards you.
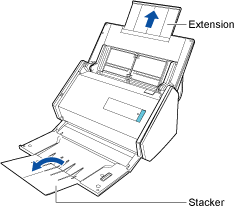
    Pulling the Stacker towards You
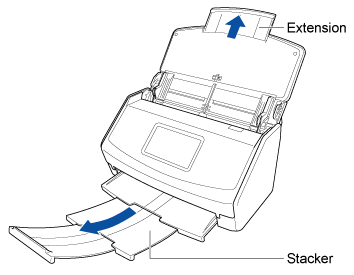
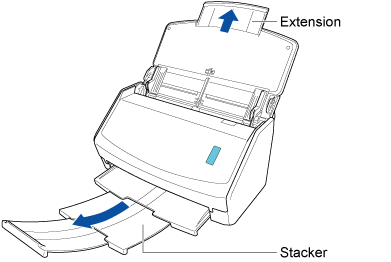
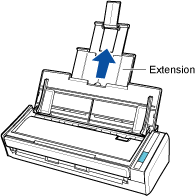
  4. Pull out the extension and the stacker on the ADF paper chute (cover). Pull out the extension on the ADF paper chute (cover) and open the stacker. Pull out the extension.
    Pulling Out the Extension
    Pulling Out the Extension
    Pulling Out the Extension and Opening the Stacker
    Pulling Out the Extension
  5. Connect the ScanSnap to a wireless access point.

    When the ScanSnap is connected to a wireless access point, proceed to the next step.

    1. On the touch panel of the ScanSnap, press Settings in the home screen.
    2. Press Wi-Fi Settings to display the [Wi-Fi settings] screen.
    3. Check that [Wi-Fi connect mode] is set to [Access point connection].
    4. Press [Access point connection].
    5. Press [Access point connect settings] and connect the ScanSnap to a wireless access point by following the instructions shown on the screen.
    6. After a connection to the wireless access point is established, press Home to display the home screen.
  6. Display the Main Window of ScanSnap Home.

    For details, refer to To Display the Main Window.

  7. Select [Settings] in the menu → [Preferences] to display the preferences window.
  8. Connect the ScanSnap to a wireless access point.

    When the ScanSnap is already connected to a wireless access point, proceed to the next step.

    1. Select the [Scanner] tab.
    2. Click the [Wireless setup] button in [Scanner information] to start ScanSnap Wireless Setup Tool.

      Refer to the ScanSnap Wireless Setup Tool Help and connect the ScanSnap to a wireless access point.

  9. Sign in to the ScanSnap Cloud service with a ScanSnap account.

    If you have already signed in to the ScanSnap Cloud service with a ScanSnap account, proceed to the next step.

    1. Select the [Account] tab.
    2. Sign in by entering a ScanSnap account e-mail address and password in the fields under [ScanSnap account].

      You can register a ScanSnap account in the ScanSnap account registration page that is displayed when you click [If an account is not registered, Click Here].

    3. In [ScanSnap Cloud], make sure that the [Use ScanSnap Cloud] checkbox is selected.
  10. Click the [OK] button to close the preferences window.
  11. Configure a profile that is to be linked with a cloud service.

    To scan documents with the ScanSnap, you need to save the settings (such as the document type setting, scan settings, and the settings for establishing a link with a cloud service after a scan) as a profile. By selecting a saved profile to scan documents, scanned images are output according to the settings in the profile.

    When you establish a link with a cloud service, the methods for creating a profile vary depending on your needs.

    • When you want to scan all documents in one go without thinking about which type of document to select every time

      Create a profile that is used to automatically detect a type of image ("Documents", "Business Cards", "Receipts" or "Photos") created from a document that you scan, and sort and save the scanned images to a cloud service that you specified for each document type.

      Modify the settings in the [Scan to Cloud] profile that is available as a default profile in order to create a profile. The scan settings can be specified for each document type.

      Only one profile per ScanSnap account can be created by using the [Scan to Cloud] profile.

      1. Click the [Scan] button at the top of the Main Window of ScanSnap Home to display the Scan Window.

      2. Click Edit Profiles to display the [Edit profiles] Window (When Using ScanSnap Cloud).

      3. Select [Scan to Cloud] from the profile list.

      4. Specify a cloud service in which a scanned image is to be saved.

        In the list that is displayed when you click the [Select] button for [Cloud Service] in [Scan settings], select a cloud service to specify it as a save destination.

        Note that if you specify a cloud service for [Cloud Service], a profile name is automatically generated.

      5. If necessary, change other settings.

      6. Click the [Save] button.

    • When you want to use a created profile depending on the type of a document

      Create a profile that is used to save an image (created from a document that you scanned) to a cloud service that has been set for one of the four document types ("Documents", "Business Cards", "Receipts", or "Photos").

      Use a template profile to create a new profile.

      1. Click the [Scan] button at the top of the Main Window of ScanSnap Home to display the Scan Window.

      2. Click Add Profiles to display the [Add new profile] Window (When Using ScanSnap Cloud).

      3. Select a template profile other than [Scan to Cloud] from [Cloud services (via ScanSnap Cloud server)] located in the template list.

      4. Select a document type in [Document type detection].

      5. Specify a cloud service in which a scanned image is to be saved.

        In the list that is displayed when you click the [Select] button for [Cloud Service] in [Managing options], select a cloud service to specify it as a save destination.

        Note that if you specify a document type for [Document type detection] and a cloud service for [Cloud Service], a profile name is automatically generated.

      6. If necessary, change other settings.

      7. Click the [Add] button.

  12. Configure a profile that is to be linked with a cloud service.

    To scan documents with the ScanSnap, you need to save the settings (such as the document type setting, scan settings, and the settings for establishing a link with a cloud service after a scan) as a profile. By selecting a saved profile to scan documents, scanned images are output according to the settings in the profile.

    To establish a link with a cloud server via ScanSnap Cloud, modify the settings in the [Scan to Cloud] profile that is available as a default profile in order to create a profile. You can configure the scan settings for each document type in order to detect a document type automatically.

    Only one profile per ScanSnap account can be created by using the [Scan to Cloud] profile.

    1. Click the [Scan] button at the top of the Main Window of ScanSnap Home to display the Scan Window.
    2. Click Edit Profiles to display the [Edit profiles] Window (When Using ScanSnap Cloud).
    3. Select [Scan to Cloud] from the profile list.
    4. Specify a cloud service in which a scanned image is to be saved.

      In the list that is displayed when you click the [Select] button for [Cloud Service] in [Scan settings], select a cloud service to specify it as a save destination.

      Note that if you specify a cloud service for [Cloud Service], a profile name is automatically generated.

    5. If necessary, change other settings.
    6. Click the [Save] button.
  13. Scan a document.
    1. In the home screen on the touch panel, select the profile that you have configured from the profile list. Click Cloud in the scan window and check that the [Scan] button on the ScanSnap lights up in purple. Click Cloud in the scan window and check that the [Scan] button on the ScanSnap lights up in purple. Click Cloud in the scan window and check that the [Scan/Stop] button on the ScanSnap lights up in purple.
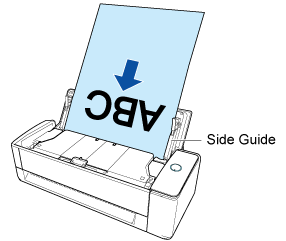
    2. Load the document in the ADF paper chute (cover) of the ScanSnap. Load the documents in the ADF paper chute (cover) or insert the document into the manual feeder. Insert the document straight into the feeding section of the ScanSnap, with the scanning side facing up.

      Load the document face-down and head-first with the back facing you (when loading multiple documents, the last page is on the top). Adjust the number of documents so that they do not go beyond Mark That Indicates the Maximum Number of Documents to Be Loaded within the side guides when they are loaded.

      Loading a Document
      Loading a Document

      Make sure that the document is fed into the ScanSnap and is held firmly.

      Inserting a Document
      HINT
      • The ScanSnap can scan documents in various sizes.

        For details about loading documents, refer to How to Scan Documents.

        For details about loading documents, refer to How to Scan Documents.

        For details about loading documents, refer to How to Scan Documents.

        For details about inserting a document refer to How to Scan Documents.

      • When scanning documents all at once (U-turn Scan)

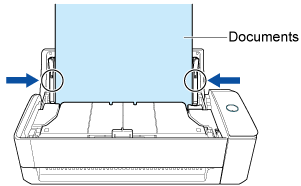
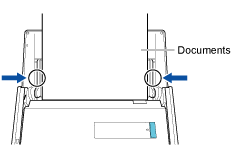
        Load the documents in the ADF paper chute (cover), and align the side guides with both ends of the documents.

        Load the document face-up and head-first with the front facing you (when loading multiple documents, the first page is on the top).

        Loading the Documents

        Hold each side guide in the middle to adjust them. Otherwise, the document may be fed skewed.

        Adjusting the Side Guides
        ATTENTION
        • Make sure that the document support tab is open.

          Otherwise, a paper jam may occur.

          If the document support tab is closed, pull it up with your fingers.

          Pulling up the Document Support Tab
        • If the document support tab comes off, contact the distributor/dealer where you purchased this product.

      • When scanning documents one by one (Return Scan)

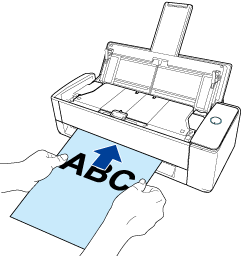
        Insert a document into the manual feeder.

        Face the front side of a document upwards and insert the top end of the document straight into the middle of the manual feeder.

        Make sure that the document is fed into the ScanSnap and is held firmly.

        Inserting a Document
        ATTENTION
        • The document comes out from the back of the ScanSnap during the scan.

          Leave space (about the length of the document) at the back of the ScanSnap.

        HINT
        • You can scan a document with the ADF paper chute (cover) closed.

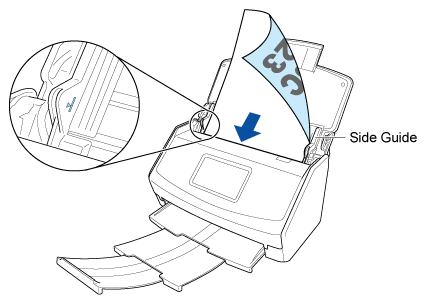
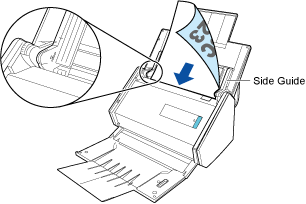
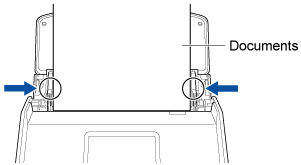
    3. Align the side guides with both ends of the document.

      Hold each side guide in the middle to adjust them. Otherwise, the document may be fed skewed.

      Adjusting the Side Guides
      Adjusting the Side Guides
    4. Press the [Scan] button in the home screen on the touch panel to scan the document. Press the [Scan] button to scan the document. Press the [Scan] button to scan the document. Press the [Scan/Stop] button to start scanning the document.

      To continue scanning with Return Scan, insert the next document to be scanned into the manual feeder. When the document is inserted, scanning starts automatically.

      To continue scanning, insert the next document to be scanned. When the document is inserted, scanning starts automatically.

    5. If you started a scan with Return Scan, press the [Scan] button to finish scanning documents.
    6. Press the [Scan/Stop] button to finish scanning documents.

An image of the document that you scanned is saved in a cloud service via the ScanSnap Cloud server.

You can check the image that is saved on the ScanSnap Cloud server by clicking Cloud on the toolbar in the main window of ScanSnap Home. The image that is saved on the ScanSnap Cloud server is kept for two weeks.

If the settings in a profile have already been configured, you can save an image of a document that you scanned in a cloud service by selecting the profile on the touch panel without having to start up a computer.

If the settings in a profile have already been configured, you can save an image of a document that you scanned in a cloud service by pressing the [Scan] button on the ScanSnap without having to start up a computer.

If the settings in a profile have already been configured, you can save an image of a document that you scanned in a cloud service by pressing the [Scan] button on the ScanSnap without having to start up a computer.

If the settings in a profile have already been configured, you can save an image of a document that you scanned in a cloud service by pressing the [Scan/Stop] button on the ScanSnap without having to start a computer.

In addition, in the menu that is displayed when you click ScanSnap Home Icon in the notification area of the taskbar, you can change the destination to which the ScanSnap is connected from the ScanSnap Cloud server to a computer.

For details, refer to Icon (Indicator for ScanSnap Connection Status) and Menus.

HINT
  • You can receive a notification on your computer about the transfer status or errors for the scanned images after the scanning of documents is complete.

    For details, refer to Specifying Actions When Using ScanSnap Cloud.

  1. Open the ADF paper chute (cover) of the ScanSnap to turn the power on. Hold the right side of the ADF paper chute (cover) of the ScanSnap then open it or press the [Scan] button to turn it on. Open the feed guide of the ScanSnap to turn the power on. Press the [Scan] button or [Stop] button on the ScanSnap to turn the power on.
    Opening the ADF Paper Chute (Cover)
    Opening the ADF Paper Chute (Cover)

    Open the ADF paper chute (cover) fully so that the [Scan] button lights up in blue.

    When the ADF paper chute (cover) is opened, the extension will rise automatically.

    Opening the ADF Paper Chute (Cover)
    Opening the ADF Paper Chute (Cover)
    Opening the ADF Paper Chute (Cover)
    Opening the Feed Guide
    Opening the Feed Guide
    Turning On
  2. Open the feed guide of the ScanSnap to turn the power on.
    Opening the Feed Guide
    HINT
    • If you want the document to be ejected from the front of the ScanSnap or when there is not enough space where the document exits the ScanSnap, open the output guide.

      Opening the Output Guide
    • How the document is ejected differs as below depending on whether the output guide is open or closed.

      • When the output guide is closed

        When the Output Guide Is Closed
      • When the output guide is open

        When the Output Guide Is Open
  3. Pull the stacker towards you.
    Pulling the Stacker towards You
  4. Pull out the extension and the stacker on the ADF paper chute (cover). Pull out the extension on the ADF paper chute (cover) and open the stacker. Pull out the extension.
    Pulling Out the Extension
    Pulling Out the Extension
    Pulling Out the Extension and Opening the Stacker
    Pulling Out the Extension
  5. Connect the ScanSnap to a wireless access point.

    When the ScanSnap is connected to a wireless access point, proceed to the next step.

    1. On the touch panel of the ScanSnap, press Settings in the home screen.
    2. Press Wi-Fi Settings to display the [Wi-Fi settings] screen.
    3. Check that [Wi-Fi connect mode] is set to [Access point connection].
    4. Press [Access point connection].
    5. Press [Access point connect settings] and connect the ScanSnap to a wireless access point by following the instructions shown on the screen.
    6. After a connection to the wireless access point is established, press Home to display the home screen.
  6. Display the Main Window of ScanSnap Home.

    Click the [ScanSnap Home] icon ScanSnap Home Icon in the application list that appears when you click Launchpad in the Dock.

  7. Select [ScanSnap Home] on the menu bar → [Preferences] to display the preferences window.
  8. Connect the ScanSnap to a wireless access point.

    When the ScanSnap is already connected to a wireless access point, proceed to the next step.

    1. Select the [Scanner] tab.
    2. Click the [Wireless setup] button in [Scanner information] to start ScanSnap Wireless Setup Tool.

      Refer to the ScanSnap Wireless Setup Tool Help and connect the ScanSnap to a wireless access point.

  9. Sign in to the ScanSnap Cloud service with a ScanSnap account.

    If you have already signed in to the ScanSnap Cloud service with a ScanSnap account, proceed to the next step.

    1. Select the [Account] tab.
    2. Sign in by entering a ScanSnap account e-mail address and password in the fields under [ScanSnap account].

      You can register a ScanSnap account in the ScanSnap account registration page that is displayed when you click [If an account is not registered, Click Here].

    3. In [ScanSnap Cloud], make sure that the [Use ScanSnap Cloud] checkbox is selected.
  10. Click the [OK] button to close the preferences window.
  11. Configure a profile that is to be linked with a cloud service.

    To scan documents with the ScanSnap, you need to save the settings (such as the document type setting, scan settings, and the settings for establishing a link with a cloud service after a scan) as a profile. By selecting a saved profile to scan documents, scanned images are output according to the settings in the profile.

    When you establish a link with a cloud service, the methods for creating a profile vary depending on your needs.

    • When you want to scan all documents in one go without thinking about which type of document to select every time

      Create a profile that is used to automatically detect a type of image ("Documents", "Business Cards", "Receipts" or "Photos") created from a document that you scan, and sort and save the scanned images to a cloud service that you specified for each document type.

      Modify the settings in the [Scan to Cloud] profile that is available as a default profile in order to create a profile. The scan settings can be specified for each document type.

      Only one profile per ScanSnap account can be created by using the [Scan to Cloud] profile.

      1. Click the [Scan] button at the top of the Main Window of ScanSnap Home to display the Scan Window.

      2. Click Edit Profiles to display the [Edit profiles] Window (When Using ScanSnap Cloud).

      3. Select [Scan to Cloud] from the profile list.

      4. Specify a cloud service in which a scanned image is to be saved.

        In the list that is displayed when you click the [Select] button for [Cloud Service] in [Scan settings], select a cloud service to specify it as a save destination.

        Note that if you specify a cloud service for [Cloud Service], a profile name is automatically generated.

      5. If necessary, change other settings.

      6. Click the [Save] button.

    • When you want to use a created profile depending on the type of a document

      Create a profile that is used to save an image (created from a document that you scanned) to a cloud service that has been set for one of the four document types ("Documents", "Business Cards", "Receipts", or "Photos").

      Use a template profile to create a new profile.

      1. Click the [Scan] button at the top of the Main Window of ScanSnap Home to display the Scan Window.

      2. Click Add Profiles to display the [Add new profile] Window (When Using ScanSnap Cloud).

      3. Select a template profile other than [Scan to Cloud] from [Cloud services (via ScanSnap Cloud server)] located in the template list.

      4. Select a document type in [Document type detection].

      5. Specify a cloud service in which a scanned image is to be saved.

        In the list that is displayed when you click the [Select] button for [Cloud Service] in [Managing options], select a cloud service to specify it as a save destination.

        Note that if you specify a document type for [Document type detection] and a cloud service for [Cloud Service], a profile name is automatically generated.

      6. If necessary, change other settings.

      7. Click the [Add] button.

  12. Configure a profile that is to be linked with a cloud service.

    To scan documents with the ScanSnap, you need to save the settings (such as the document type setting, scan settings, and the settings for establishing a link with a cloud service after a scan) as a profile. By selecting a saved profile to scan documents, scanned images are output according to the settings in the profile.

    To establish a link with a cloud server via ScanSnap Cloud, modify the settings in the [Scan to Cloud] profile that is available as a default profile in order to create a profile. You can configure the scan settings for each document type in order to detect a document type automatically.

    Only one profile per ScanSnap account can be created by using the [Scan to Cloud] profile.

    1. Click the [Scan] button at the top of the Main Window of ScanSnap Home to display the Scan Window.
    2. Click Edit Profiles to display the [Edit profiles] Window (When Using ScanSnap Cloud).
    3. Select [Scan to Cloud] from the profile list.
    4. Specify a cloud service in which a scanned image is to be saved.

      In the list that is displayed when you click the [Select] button for [Cloud Service] in [Scan settings], select a cloud service to specify it as a save destination.

      Note that if you specify a cloud service for [Cloud Service], a profile name is automatically generated.

    5. If necessary, change other settings.
    6. Click the [Save] button.
  13. Scan a document.
    1. In the home screen on the touch panel, select the profile that you have configured from the profile list. Click Cloud in the scan window and check that the [Scan] button on the ScanSnap lights up in purple. Click Cloud in the scan window and check that the [Scan] button on the ScanSnap lights up in purple. Click Cloud in the scan window and check that the [Scan/Stop] button on the ScanSnap lights up in purple.
    2. Load the document in the ADF paper chute (cover) of the ScanSnap. Load the documents in the ADF paper chute (cover) or insert the document into the manual feeder. Insert the document straight into the feeding section of the ScanSnap, with the scanning side facing up.

      Load the document face-down and head-first with the back facing you (when loading multiple documents, the last page is on the top). Adjust the number of documents so that they do not go beyond Mark That Indicates the Maximum Number of Documents to Be Loaded within the side guides when they are loaded.

      Loading a Document
      Loading a Document

      Make sure that the document is fed into the ScanSnap and is held firmly.

      Inserting a Document
      HINT
      • The ScanSnap can scan documents in various sizes.

        For details about loading documents, refer to How to Scan Documents.

        For details about loading documents, refer to How to Scan Documents.

        For details about loading documents, refer to How to Scan Documents.

        For details about inserting a document refer to How to Scan Documents.

      • When scanning documents all at once (U-turn Scan)

        Load the documents in the ADF paper chute (cover), and align the side guides with both ends of the documents.

        Load the document face-up and head-first with the front facing you (when loading multiple documents, the first page is on the top).

        Loading the Documents

        Hold each side guide in the middle to adjust them. Otherwise, the document may be fed skewed.

        Adjusting the Side Guides
        ATTENTION
        • Make sure that the document support tab is open.

          Otherwise, a paper jam may occur.

          If the document support tab is closed, pull it up with your fingers.

          Pulling up the Document Support Tab
        • If the document support tab comes off, contact the distributor/dealer where you purchased this product.

      • When scanning documents one by one (Return Scan)

        Insert a document into the manual feeder.

        Face the front side of a document upwards and insert the top end of the document straight into the middle of the manual feeder.

        Make sure that the document is fed into the ScanSnap and is held firmly.

        Inserting a Document
        ATTENTION
        • The document comes out from the back of the ScanSnap during the scan.

          Leave space (about the length of the document) at the back of the ScanSnap.

        HINT
        • You can scan a document with the ADF paper chute (cover) closed.

    3. Align the side guides with both ends of the document.

      Hold each side guide in the middle to adjust them. Otherwise, the document may be fed skewed.

      Adjusting the Side Guides
      Adjusting the Side Guides
    4. Press the [Scan] button in the home screen on the touch panel to scan the document. Press the [Scan] button to scan the document. Press the [Scan] button to scan the document. Press the [Scan/Stop] button to start scanning the document.

      To continue scanning with Return Scan, insert the next document to be scanned into the manual feeder. When the document is inserted, scanning starts automatically.

      To continue scanning, insert the next document to be scanned. When the document is inserted, scanning starts automatically.

    5. If you started a scan with Return Scan, press the [Scan] button to finish scanning documents.
    6. Press the [Scan/Stop] button to finish scanning documents.

An image of the document that you scanned is saved in a cloud service via the ScanSnap Cloud server.

You can check the image that is saved on the ScanSnap Cloud server by clicking Cloud on the toolbar in the main window of ScanSnap Home. The image that is saved on the ScanSnap Cloud server is kept for two weeks.

If the settings in a profile have already been configured, you can save an image of a document that you scanned in a cloud service by selecting the profile on the touch panel without having to start up a computer.

If the settings in a profile have already been configured, you can save an image of a document that you scanned in a cloud service by pressing the [Scan] button on the ScanSnap without having to start up a computer.

If the settings in a profile have already been configured, you can save an image of a document that you scanned in a cloud service by pressing the [Scan] button on the ScanSnap without having to start up a computer.

If the settings in a profile have already been configured, you can save an image of a document that you scanned in a cloud service by pressing the [Scan/Stop] button on the ScanSnap without having to start a computer.

In addition, in the menu that is displayed when you click ScanSnap Home Icon shown in the menu bar, you can change the destination to which the ScanSnap is connected from the ScanSnap Cloud server to a computer.
For details, refer to Icon (Indicator for ScanSnap Connection Status) and Menus.

HINT
  • You can receive a notification on your computer about the transfer status or errors for the scanned images after the scanning of documents is complete.

    For details, refer to Specifying Actions When Using ScanSnap Cloud.

See also

  • Power for the ScanSnap
  • Signing in to the ScanSnap Cloud service with a ScanSnap account
  • Documents That Can Be Scanned with the ScanSnap
  • The Status of the ScanSnap When Using ScanSnap Cloud
  • Modifying the Settings for a Profile (When Using ScanSnap Cloud)
  • Deleting a Profile
  • The ScanSnap Is Not Connected to the Network (When Using ScanSnap Cloud)
  • Before Using This Site
  • How to Use This Site
  • Customer Support
  • Cookie Policy

© PFU Limited 2018-2024

  • TOP